Xactly Incent Report Widgets
You can use Xactly Incent Report Widgets to integrate Xactly Incent report components
within dashboards or other pages in Oracle CRM On Demand or Salesforce
CRM. These widgets enable sales representatives using single sign-on to quickly view
incentive information in combination with other CRM data.
note: Report Widgets do not support Report Year Visibility, Report Publishing, Report
Customization, or Users associated with multiple people.
Screen
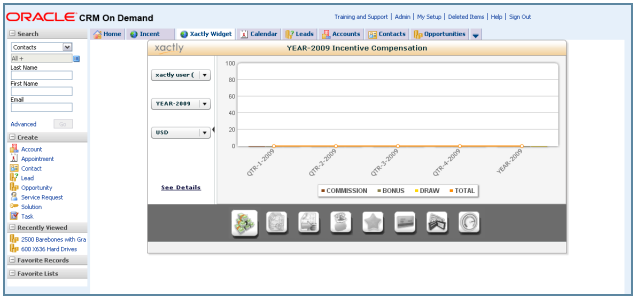
Oracle CRM On Demand with Xactly Incent Report Widget
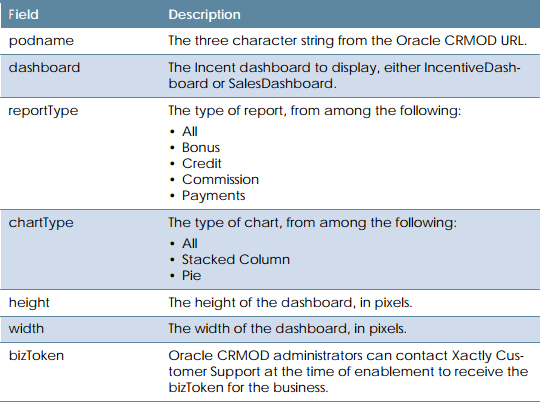
Required Fields
The following table describes the required information you need to specify when configuring
the Xactly Incent Report Widgets
How to…
This section describes how to configure Xactly Incent Report Widgets within Oracle
CRM On Demand and Salesforce CRM.
Configure Xactly Incent Report Widget within Oracle CRM
You need to complete the following tasks to configure the Xactly Incent Report Widget
within Oracle CRM On Demand:
• Create a new custom Web tab
• Configure the personal layout
Create a New Custom Web Tab
1. Log in to Oracle CRM On Demand as an administrator. The Oracle CRM On
Demand home page appears.
Oracle CRM On Demand Home
2. Click the Admin link.
3. Click the Application Customization link.
4. Click the Global Web Applets link in the Application Setup section. The Applet
List screen appears.
5. Click the New button. The new Custom Web Applet screen appears.

Custom Web Applet
6. Type the name of the tab in the Name field (for example, Xactly Incent).
7. Choose Homepage from the Location drop-down list.
8. Choose Double from the Columns drop-down list.
9. Choose URL from the Type drop-down list.
10. Type (or paste) the following in the URL field.
https://www.xactlycorp.com/icm/jsp/widget/widgetContainer.jsp?
partner=Oracle&sbSSOToken=%%%SSOToken%%%&sbEmail=
%%%User email%%%&sbUserId=%%%User id%%%&sbEndpoint= &xactlyURL=https://www.xactlycorp.com/icm/&dashboard=
&reportType=&chartType=&height=
&width=&homeTab=https:// OnDemand/user/CustomTab?Tab.Name=%5BIncentives%5D
&bizToken=
Refer to the table in this section for a description of each parameter.
For example:
https://www.xactlycorp.com/icm/jsp/widget/widgetContainer.jsp?
partner=Oracle&sbSSOToken=%%%SSO Token%%%&sbEmail=
%%%User email%%%&sbUserId=%%%User id%%%&sbEndpoint=dsa
&xactlyURL=https://www.xactlycorp.com/icm/&dashboard=
IncentiveDashboard&reportType=SalesDashboardl&chartType=
Creditsl&height=400&width=800&homeTab=
https://secure-ausomxdsa.crmondemand.com/OnDemand/user/
CustomTab?Tab.Name=%5BIncentives%5D&bizToken=<>
11. (Optional) Type a description in the Description field.
12. Type 425 in the Frame Height field.
13. Click the Save button.
Configure the My Homepage Layout
1. Click the Admin link.
2. Click the Application Customization link.
3. Click the My Homepage Layout link.
4. Click the New Layout button.
5. Type the Layout Name (for example, Home with Incent).
6. (Optional) Type a description in the Description field.
7. Click Step 2, Homepage Layout.
8. Move the Xactly Web applet (for example Xactly Incent, defined in the previous
procedure) from Available Sections to the left side of the Homepage layout.
9. Click the Finish button.
Configure the Personal Layout
1. Click the Admin link.
2. Click the User Management & Access Controls link.
3. Click the Role Management link.
4. Click the Edit button corresponding to the roles for which you want to modify
the home page.
5. Click Step8, Homepage Layout Assignment, and select the new layout for the
My Homepage record type.
6. Click the Finish button.
Configure Xactly Incent Report Widget within Salesforce CRM
You need to complete the following tasks to configure the Xactly Incent Report Widget
within Salesforce CRM:
• Create a new custom S-Control
• Create a new tab for the S-Control
Create a New Custom S-Control
1. Log in to Salesforce.
2. Click the Setup link.
3. Click App Setup > Develop > S-Controls.
4. Click the New Custom S-Control button. The Custom S-Control Edit screen
appears.

Custom S-Control Edit Screen
5. Type the label of the S-Control in the Label field.
6. Type the name of the S-Control in the S-Control Name field.
7. (Optional) Type a description in the Description field.
8. Select the URL radio button in the Type field.
9. Type (or paste) the following in the URL field.
https://www.xactlycorp.com/icm/jsp/widget/widgetContainer.jsp?
partner=Salesforce&sfUserName={!$User.Email}
&sfSessionId={!API.Session_ID}&sfPartnerServerUrl={!API.Partner_Server_URL_90}
&xactlyURL=https://www.xactlycorp.com/icm/
&dashboard=&reportType=
&chartType=&height=&width=
Refer to the table in this section for a description of each parameter.
For example:
https://www.xactlycorp.com/icm/jsp/widget/widgetContainer.jsp
?partner=Salesforce&sfUserName={!$User.Email}&sfSessionId={!API.Session_ID}
&sfPartnerServerUrl={!API.Partner_Server_URL_90}&xactlyURL=https://
www.xactlycorp.com/icm/&dashboard=SalesDashboard&reportType=All
&chartType=All&height=400&width=785
10. Click the Save button.
Create a New Tab for the S-Control
Next, you can create a new tab for the S-Control.
1. Click the Setup link.
2. Click App Setup > Create > Tabs. The Custom Tabs screen appears.

Custom Tabs Screen
3. Click the New button in the Web Tabs section. The New Web Tab wizard
launches and displays the Choose Tab Layout screen.
Select the page layout for the new Web tab, either full page width or two columns
with Salesforce sidebar. Click Next.
4. In Step 2 of 5, define the content and display properties.
Do the following:
a. Choose Custom S-Control from the Tab Type drop-down list.
b. Type a label in the Tab Label field.
c. Type a name in the Tab Name field.
d. Choose a style using the Tab Style pop-up.
e. Click Next.
5. In Step 3 of 5, choose the control using the Custom S-Control drop-down list,
and click Next.
6. In Step 4 of 5, choose the user profiles for which the new custom tab will be
available, and click Next.
7. In Step 5 of 5, choose the custom applications for which the new custom tab
will be available, and click Save.
8. Click the Save button.