Setup > Preferences
You can use the Preferences area to set system parameters that affect specific displays and operations in Incent, and to define the business currency, date format, and number format within the application.
You set most of these preferences only once during initial setup and configuration of Xactly Incent. You can enable or modify other preferences over time to meet the needs of your growing and changing business. The preferences you set here can help improve the Incent experience for both administrators and end users.
Screen
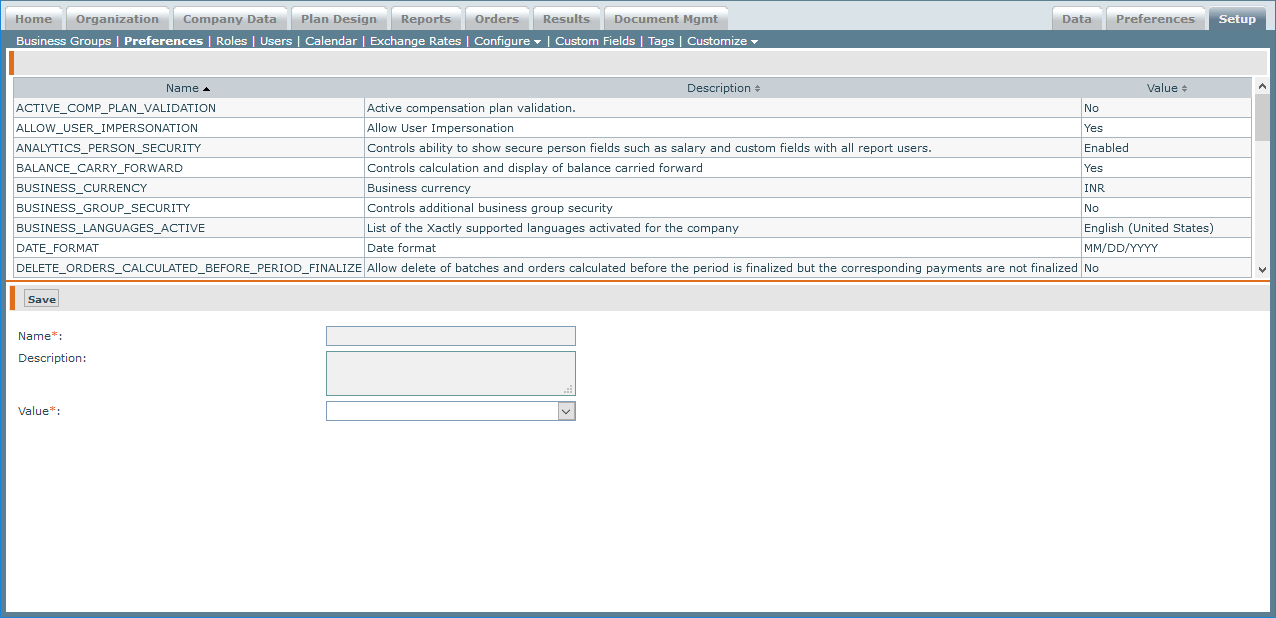 Preferences Screen
How to…
This section describes the details of each preference, and how to set the system parameters.
Enable the ACTIVE_COMP_PLAN_VALIDATION Preference
When you enable the Active Compensation Plan Validation preference, the application checks (during validation processing) whether the people listed on a staging order item are on an active compensation plan.
To be on an active plan:
- A person must be assigned to a position
- The position (defined by position name or title) needs to be assigned to a plan
- The incentive date on the stage order item must fall within the active year of the plan assigned
By default, the ACTIVE_COMP_PLAN_VALIDATION preference is set to NO.
To enable the preference:
- Click the Setup tab, then click Preferences in the secondary menu. The Preferences screen appears.
- Click ACTIVE_COMP_PLAN_VALIDATION. The ACTIVE_COMP_PLAN_VALIDATION name appears in the Name* field. (This field cannot be edited.)
- In the Value* field, choose Yes using the drop-down list to enable Active Compensation Plan Validation.
- Click the Save button. The ACTIVE_COMP_PLAN_VALIDATION preference is saved.
Enable the ALLOW_USER_IMPERSONATION Preference
The Allow User Impersonation preference allows administrators and business group administrators to impersonate Incent users. This is a useful tool for viewing Incent from the perspective of a payee or manager, troubleshooting inquiries from end users, and configuring dashboards on behalf of a payee.
note: A user needs to have an associated person record to enable impersonation.
Administrators can impersonate users with the following roles:
- Executive
- Business Group Executive
- Manager
- Individual Payee.
To enable the preference:
- Click the Setup tab, then click Preferences in the secondary menu. The Preferences screen appears.
- Click ALLOW_USER_IMPERSONATION. The Name* field is automatically populated. (This field cannot be edited.)
- In the Value* field, choose Yes using the drop-down list.
- Click the Save button. The ALLOW_USER_IMPERSONATION preference is saved.
Configure the ANALYTICS_PERSON_SECURITY Preference
The Analytics Person Security preference specifies whether to show secure person fields, such as salary and custom fields, to all report users.
To configure the preference:
- Click the Setup tab, then click Preferences in the secondary menu. The Preferences screen appears.
- Click ANALYTICS_PERSON_SECURITY . The Name* field is automatically populated. (This field cannot be edited.)
- In the Value* field, choose either Enabled or Disabled using the drop-down list.
- Click the Save button. The ANALYTICS_PERSON_SECURITY preference is saved.
Enable the BALANCE_CARRY_FORWARD Preference
When you enable the Balance Carry Forward (BCF) preference, Incent carries negative balances forward into the next period (even into the following year). In addition, two extra rows (Balance Recovered and Total Balance) become available in the Reports > Customize > Payment area.
When you select the rows, amounts for Balance Recovered and Total Balance appear along with Total Pending and Total Released in the Incentive Details and Incentive Statement reports.
Effect on Payment Downloads
When BCF is enabled, payment downloads contain a column (Negative Payment Amount) representing the payment amount to be moved to the Payment Balances table and recovered from future earnings. This column is populated when the period has been previewed or finalized.
The following table describes how downloads work based on the BCF setting (after the period has been previewed or finalized):
| BCF | Download | Description |
|---|---|---|
| On | User interface: Non-aggregated | If the sum of all commissions/bonuses earned is positive, the Negative Payment Amount column is 0 for all records. If the sum of all commissions/bonuses earned is negative:
|
| User interface: Aggregated | If the sum of all commissions/bonuses earned is positive, the Negative Payment Amount column is 0 for aggregated records. If the sum of all commissions/bonuses earned is negative:
|
|
| On | Template Download: Non-aggregated | You need to modify existing templates to include the new Negative Payment Amount column. If the template contains the field, then:
|
| Template Download: Aggregated | You need to modify existing templates to include the new Negative Payment Amount column. If the template contains the field, then:
If the person is eligible for a draw, there will be two records for each position: one for the draw amount and other for the non-draw amount. |
|
| Off | The Negative Payment Amount column for downloads and templates is always zero. |
note: Periods that have not been previewed or finalized show no value in the Negative Payment Amount column.
Manually Zeroing Negative Payments When BCF is Off
When BCF is enabled and a sales representative has a total negative commission amount (and is eligible for a draw), Xactly Incent totals the draw amount and the commission amount on aggregated downloads and standard reports.
In this case, to reflect actual draw amounts, you have the following options:
- Download an aggregated template without negatives for use with payroll. The download will reflect the accurate payment amount (draw amount) but will not be synchronized with reports which total the draw amount and negative commission/bonus amounts.
- To synchronize reports with draw payments, in preview and prior to finalization, download aggregated templates with and without negatives. After downloading, manually identify the differences and input an adjustment equal to the differences between the two template downloads to reverse the negative commission amount. The payroll file and reports will be synchronized showing only the draw amount to be paid.
Enable the Preference
- Click the Setup tab, then click Preferences in the secondary menu. The Preferences screen appears.
- Click BALANCE_CARRY_FORWARD. The Name* field is automatically populated. (This field cannot be edited.)
- In the Value* field, choose Yes using the drop-down list.
- In the Payment Balance Start Period* field, choose the period using the dropdown list.
- In the Payment Balance Recovery field, choose either Immediate or No Draw using the drop-down list. The default value is No Draw. The No Draw option starts carrying the balances forward after the individual is no longer on a draw. In other words, any balance generated during the draw period is automatically forgiven. The Immediate option starts carrying balances forward right away, but will not recover against a draw payment.
- Click the Save button. The BALANCE_CARRY_FORWARD preference is saved.
After enabling the BALANCE_CARRY_FORWARD preference, do the following:
- Click the Results tab, then click Templates > Payments in the secondary menu. The Templates screen appears.
- When creating a payroll template, in Step 4: Select Aggregation, choose Yes in both the Aggregation and Include Negative Payments fields.
important: After the BALANCE_CARRY_FORWARD preference is enabled, it cannot be disabled. Similarly, the Payment Balance Start Period and Payment Balance Recovery fields cannot be modified after enabling and saving the preference.
Configure the BUSINESS_CURRENCY Preference
The Business Currency preference specifies the business currency used by your organization. This preference sets the default for areas of Incent that require a currency, but can be overridden by more specific currency assignments (order currency, person default currency, and so on).
The list of available currencies for the preference are defined in the Setup > Configure > Unit Type area (specifically, unit types that specify “Currency” as the unit type group).
To configure the preference:
- Click the Setup tab, then click Preferences in the secondary menu. The Preferences screen appears.
- Click BUSINESS_CURRENCY. The Name* field is automatically populated. (This field cannot be edited.)
- In the Value* field, choose a currency using the drop-down list.
- Click the Save button. The BUSINESS_CURRENCY preference is saved.
Enable the BUSINESS_GROUP_SECURITY Preference
The Business Group Security preference specifies whether business group security is enabled for your organization. Business group security enables you to control the access that administrators and executives have to data within Incent.
To enable the preference:
- Click the Setup tab, then click Preferences in the secondary menu. The Preferences screen appears.
- Click BUSINESS_GROUP_SECURITY. The Name* field is automatically populated. (This field cannot be edited.)
- In the Value* field, choose Yes using the drop-down list. After enabling business group security, two new roles become available in the Setup > Roles area: Business Group Administrator and Business Group Executive. Also, the Business Group field becomes a required field in the Organization > People area.
- Click the Save button. The BUSINESS_GROUP_SECURITY preference is saved.
important: After enabling business group security in the Setup > Preferences area, it is not possible to disable business group security for your organization.
For more information on the value and use cases for business group security, refer to the Incent Concepts Guide on the Admin Help page.
Configure the BUSINESS_LANGUAGES_ACTIVE Preference
The Business Languages Active preference enables you to activate a set of languages for your organization. You can choose from the list of Xactly-supported languages, offering more granular control over the languages that are enabled.
note: This preference impacts the list of languages that appear in the Translation Workbench, as well as the personal language preferences for end users.
To configure the preference:
- Click the Setup tab, then click Preferences in the secondary menu. The Preferences screen appears.
- Click BUSINESS_LANGUAGES_ACTIVE. The Name* field is automatically populated. (This field cannot be edited.)
- In the Value* field, specify the activated languages using the list of available languages. Use the following buttons to specify the languages
 You can select from among the following languages:
• English (United States)
• French (France)
• German (Germany)
• Spanish (Spain)
• Spanish (Mexico)
• Swedish (Sweden)
• Dutch (Netherlands)
• Norwegian Bokmal (Norway)
• Chinese (China)
• Portuguese (Brazil)
• Italian (Italy)
• Japanese (Japan)
• Russian (Russia)
• Korean (South Korea)
• Traditional Chinese (Taiwan)
• French (Canada) - (Optional) In the End User Access field, select the check box to make the list of activated languages accessible to users (allowing them to select the language of their choice).
When disabled, end users cannot change the language set by the administrator. When enabled, end users can select their own preference. - Click the Save button. The BUSINESS_LANGUAGES_ACTIVE preference is saved.
note: This setting only affects an end user’s personal view of the Xactly Incent user interface. The administrator language selection is used when routing plan documents, ensuring administrator control over the routing process.
Configure the DATE_FORMAT Preference
The Date Format preference enables administrators to specify the date format for all date fields, including custom fields, in Xactly Incent.
Note that while this preference sets the default date format for administrators and end users, users can specify their own date format preference for their personal view of Xactly Incent (using the “Change Preferences” menu option).
To configure the preference:
- Click the Setup tab, then click Preferences in the secondary menu. The Preferences screen appears.
- Click DATE_FORMAT. The Name* field is automatically populated. (This field cannot be edited.)
- In the Value* field, choose a date format using the drop-down list.
- Click the Save button. The DATE_FORMAT preference is saved.
Configure the DELETE_ORDERS_CALCULATED_BEFORE_
PERIOD_FINALIZED Preference
The Delete Orders Calculated Before Period Finalized preference allows deletion of batches and orders that have been calculated before the period is finalized, but for which the corresponding payments are not finalized.
To configure the preference:
- Click the Setup tab, then click Preferences in the secondary menu. The Preferences screen appears.
- Click DELETE_ORDERS_CALCULATED_BEFORE_PERIOD_FINALIZED. The Name* field is automatically populated. (This field cannot be edited.)
- In the Value* field, choose either Yes or No using the drop-down list.
- Click the Save button. The DELETE_ORDERS_CALCULATED_BEFORE_PERIOD_FINALIZED preference is saved.
Configure the EDOCS_PASTDUE_NOTICES Preference
The eDocs Past Due Notices preference enables administrators to set the number of days (past a due date) that daily past due notices are to be sent to users with an outstanding item.
To set the preference:
- Click the Setup tab, then click Preferences in the secondary menu. The Preferences screen appears.
- Click EDOCS_PASTDUE_NOTICES. The name field is automatically populated. (This field cannot be edited.)
- In the Value* field, choose either ONCE or 30 DAYS using the drop-down list.
- Click the Save button. The EDOCS_PASTDUE_NOTICES preference is saved.
Configure the ENABLE_ROUTE_PLANDOC_BY_PERSON Preference
important: This preference has been deprecated. All administrators with the Docs > Manage Documents role privilege have access to Docs > Route > Plan Documents by Person area of Xactly Incent. The preference is set to be removed in a future release.
The route plan documents by person preference enables administrators to send plan documents to a group of people based on customizable criteria using Xactly eDocs & Approvals.
To set the preference:
- Click the Setup tab, then click Preferences in the secondary menu. The Preferences screen appears.
- Click ENABLE_ROUTE_PLANDOC_BY_PERSON. The name field is automatically populated. (This field cannot be edited.)
- In the Value* field, choose either Yes or No using the drop-down list.
- Click the Save button. The ENABLE_ROUTE_PLANDOC_BY_PERSON preference is saved.
Configure the HIDE_TEMPLATE_INFO_PLAN_DOCUMENT Preference
The hide template info plan document preference enables administrators to hide template information on plan documents.
To set the preference:
- Click the Setup tab, then click Preferences in the secondary menu. The Preferences screen appears.
- Click HIDE_TEMPLATE_INFO_PLAN_DOCUMENT. The name field is automatically populated. (This field cannot be edited.)
- In the Value* field, choose either Yes or No using the drop-down list.
- Click the Save button. The HIDE_TEMPLATE_INFO_PLAN_DOCUMENT preference is saved.
Enable the MOBILE Preference
The MOBILE preference enables access to Incent data using the Xactly Incent for iOS and Android applications. These mobile applications can be downloaded for free from the Apple App Store and Google Play Store respectively. After downloading, end users or administrators can log in using their standard Xactly login or SSO credentials (if this preference is disabled, the login is not allowed).
To enable the preference:
- Click the Setup tab, then click Preferences in the secondary menu. The Preferences screen appears.
- Click IOS. The Name* field is automatically populated. (This field cannot be edited.)
- In the Value* field, choose Yes using the drop-down list.
- Click the Save button. The MOBILE preference is saved.
Configure the MAXIMUM_VALUE_TRUNCATION Preference
The Maximum Value Truncation preference enables administrators to specify the decimal truncation of the Maximum function for commission and credit rules.
To set the preference:
- Click the Setup tab, then click Preferences in the secondary menu. The Preferences screen appears.
- Click MAXIMUM_VALUE_TRUNCATION. The name field is automatically populated. (This field cannot be edited.)
- In the Value* field, choose either 5 or 2 (representing decimal places) using the drop-down list.
- Click the Save button. The MAXIMUM_VALUE_TRUNCATION preference is saved.
Configure the NUMBER_FORMAT Preference
The Number Format preference enables administrators to specify the number format to be used in Xactly Incent.
Note that while this preference sets the default number format for administrators and end users, users can specify their own number format preference for their personal view of Xactly Incent (using the “Change Preferences” menu option).
To configure the preference:
- Click the Setup tab, then click Preferences in the secondary menu. The Preferences screen appears.
- Click NUMBER_FORMAT. The name field is automatically populated. (This field cannot be edited.)
- In the Value* field, choose a number format using the drop-down list.
- Click the Save button. The NUMBER_FORMAT preference is saved.
Configure the ORDERS_PERIOD_COUNTS Preference
The Orders Period Counts preference enables administrators to display the number of orders for a period before initiating a search. This is useful for determining the total number of orders in a given period before searching to retrieve a subset of the results.
To configure the preference:
- Click the Setup tab, then click Preferences in the secondary menu. The Preferences screen appears.
- Click ORDERS_PERIOD_COUNTS. The name field is automatically populated. (This field cannot be edited.)
- In the Value* field, choose either Yes or No using the drop-down list.
- Click the Save button. The ORDERS_PERIOD_COUNTS preference is saved.
Configure the PARTIAL_COMMISSION_RELEASES Preference
The Partial Commission Releases preference specifies the behavior of Incent after a held commission is released. Administrators can choose from among the following options:
- Hold Zero Commission—After all of a held commission is released, a commission record showing $0 remains in the Results > Holds > Commissions area
- Release Zero Commission—After all of a held commission is released, the record is removed from the Results > Holds > Commissions area and a payment record showing $0 is created
Administrators can use this preference to control the type of audit record created as part of the commission release process.
To configure the preference:
- Click the Setup tab, then click Preferences in the secondary menu. The Preferences screen appears.
- Click PARTIAL_COMMISSION_RELEASES. The Name* field is automatically populated. (This field cannot be edited.)
- In the Value* field, choose a zero commission setting (either Hold Zero Commission or Release Zero Commission) using the drop-down list.
- Click the Save button. The PARTIAL_COMMISSION_RELEASES preference is saved.
Configure the PAYCURVE_RELEASE_SCOPE_TO_ATTAINMENT Preference
The Pay Curve Release Scope to Attainment preference enables administrators to configure the pay curve commission release process to be consistent with the threshold period defined in the attainment measure of the percent to goal rule.
To configure the preference:
- Click the Setup tab, then click Preferences in the secondary menu. The Preferences screen appears.
- Click PAYCURVE_RELEASE_SCOPE_TO_ATTAINMENT. The name field is automatically populated. (This field cannot be edited.)
- In the Value* field, choose either Yes or No using the drop-down list.
- Click the Save button. The preference is saved.
For more information, see Understanding the Pay Curve Release Scope to Attainment Business Preference.
Configure the PERSON_POSITION_REPORTING_OPTION Preference
The Person Position Reporting preference enables administrators to choose between person or position-based reports in individual and team incentive statements and plan summary reports.
Enabling this preference causes a period drop-down list to appear on reports (such as Incentive Statement) allowing users to choose the period (end date) for which to display report information. The period end date filters by the active position for that day as well as by all effective dated information.
For the incentive statement, the position based reporting provides additional filters to the person fields and quota section only. For the plan summary, position based reporting provides additional filters to the person fields, quota, and rate tables. For the incentive details, position based reporting provides additional filters to the person fields only. We will update the documentation for the preference to provide more detail.To configure the preference:
- Click the Setup tab, then click Preferences in the secondary menu. The Preferences screen appears.
- Click PERSON_POSITION_REPORTING_OPTION. The name field is automatically populated. (This field cannot be edited.)
- In the Value* field, choose a reporting option using the drop-down list.
- Click the Save button. The PERSON_POSITION_REPORTING_OPTION preference is saved.
Configure the PREVIEW_ENABLED Preference
The Preview Enabled preference enables draws and balance carry forward balances to be previewed in Xactly Analytics.
To configure the preference:
- Click the Setup tab, then click Preferences in the secondary menu. The Preferences screen appears.
- Click PREVIEW_ENABLED. The name field is automatically populated. (This field cannot be edited.)
- In the Value* field, choose an option from the drop down.
- Click the Save button. The PREVIEW_ENABLED preference is saved.
Configure the REPORT_DECIMAL_DISPLAY_CURRENCY Preference
The Report Decimal Display Currency preference controls the number of digits displayed after the decimal for currencies.
To configure the preference:
- Click the Setup tab, then click Preferences in the secondary menu. The Preferences screen appears.
- Click REPORT_DECIMAL_DISPLAY_CURRENCY. The Name* field is automatically populated. (This field cannot be edited.)
- In the Value* field, choose a number using the drop-down list. The default value is 2.
- Click the Save button. The REPORT_DECIMAL_DISPLAY_CURRENCY preference is saved.
Configure the REPORT_DECIMAL_DISPLAY_RATES Preference
The Report Decimal Display Rates preference controls the number of digits displayed after the decimal for percentages and rates.
To configure the preference:
- Click the Setup tab, then click Preferences in the secondary menu. The Preferences screen appears.
- Click REPORT_DECIMAL_DISPLAY_RATES. The Name* field is automatically populated. (This field cannot be edited.)
- In the Value* field, choose a number using the drop-down list. The default value is 8.
- Click the Save button. The REPORT_DECIMAL_DISPLAY_RATES preference is saved.
Configure the REPORT_DEFAULT_PERIOD Preference
The Report Default Period preference controls the default period displayed in reports.
To configure the preference:
- Click the Setup tab, then click Preferences in the secondary menu. The Preferences screen appears.
- Click REPORT_DEFAULT_PERIOD. The Name* field is automatically populated. (This field cannot be edited.)
- In the Value* field, choose the default period using the drop-down list.You can choose from among the following values:
• First Open Period
• Last Closed Period (default)
• Period Prior to Current Date (for example, if today’s date is Feb 15, 2017 and, assuming the default calendar, the period would default to Jan-2017)
• Current Calendar Period (for example, if today’s date is Feb 15, 2017 and, assuming the default calendar, the period would default to Feb-2017) - Click the Save button. The REPORT_DEFAULT_PERIOD preference is saved.
note: If the last closed period is not visible, Incent uses the latest closed period (in reports) that is visible in the calendar.
Configure the REPORT_PUBLISHING Preference
The Report Publishing preference controls the visibility of incentive data within reports. Administrators need to configure this preference to ensure the proper filtering of report data.
note: When a business is set up, this preference is disabled by default. This allows all users to see all report data for all periods.
To configure the preference:
- Click the Setup tab, then click Preferences in the secondary menu. The Preferences screen appears, showing the default preference at the top and a form at the bottom.
- Click REPORT_PUBLISHING. The Name* field is automatically populated. (This field cannot be edited.)
- In the Value* field, choose Manual by Period using the drop-down list to enable the Report Publishing feature.
When Manual by Period is set, only the leaf periods specified by the administrator are viewable for reporting before and up to a specific calendar leaf period. When Automatic is set, all calendar leaf periods are viewable for reporting. - Click the Save button. The REPORT_PUBLISHING preference is saved.
note: After the REPORT_PUBLISHING preference is enabled, administrators need to configure the Incent calendar to a specific leaf period up to which users are allowed to see report data.
If the REPORT_PUBLISHING preference is enabled but none of the monthly periods are made publishable, all calculated results are visible in reports.
Configure the REPORT_SUMMARY_DISPLAY Preference
The Report Summary Display preference controls the visibility of percentage unit types in quarterly and yearly columns on the Incentive Statement.
To configure the preference:
- Click the Setup tab, then click Preferences in the secondary menu. The Preferences screen appears, showing the default preference at the top and a form at the bottom.
- Click REPORT_SUMMARY_DISPLAY. The Name* field is automatically populated. (This field cannot be edited.)
- In the Percentage Value* field, choose LATEST PERIOD using the drop-down list to display the latest monthly value for quarterly and yearly fields on the Incentive Statement.
For example, if January, February, and March appear as part of the first quarter of the year, the value for March displays in the quarterly column on the statement, and the latest non-zero value for the year (in this case March) appears in the yearly column. Note that NOT VISIBLE is the default setting for this preference. This means that when percentage unit types are in use, their values do not appear in quarterly and monthly fields on the statement. - In the Quantity Value* field, choose whether to display the sum or the latest monthly values for quarterly and yearly fields on the Incent incentive statement.
- Click the Save button. The REPORT_SUMMARY_DISPLAY preference is saved.
Configure the SESSION_TIMEOUT Preference
The Session Timeout preference controls the amount of time that is allowed to pass before a user’s session times out due to inactivity. Note that Incent resets the session timer only after a call to the Xactly Server. The session timer does not reset in cases when user interaction does not result in a call to the Xactly Server.
To configure the preference:
- Click the Setup tab, then click Preferences in the secondary menu. The Preferences screen appears.
- Click SESSION_TIMEOUT. The Name* and Description fields are automatically populated. (These fields cannot be edited.)
- In the Value* field, choose the session timeout using the drop-down list, either 30 minutes or 1 hour.
- Click the Save button. The SESSION_TIMEOUT preference is saved.
note: This setting also affects users of the Xactly Incent for iOS and Android mobile apps.
Configure the SESSION_TIMEOUT_WARNING Preference
The Session Timeout Warning preference controls whether users are given a warning, in the form of a pop-up window, when their session is about to expire due to inactivity.
To configure the preference:
- Click the Setup tab, then click Preferences in the secondary menu. The Preferences screen appears.
- Click SESSION_TIMEOUT_WARNING. The Name* and Description fields are automatically populated. (These fields cannot be edited.)
- In the Value* field, choose the session timeout warning using the drop-down list. You can choose either no warning, or a 10 minute warning.
- Click the Save button. The SESSION_TIMEOUT_WARNING preference is saved.
note: This setting only applies to Xactly Incent. This setting does not affect other products such as Xactly Objectives, Xactly Quota, Xactly Credit Assignment, and Xactly Analytics.
Enable the SUBMIT_INQUIRY Preference
Administrators can use the Submit Inquiry preference to disable the Submit Inquiry function on all screens that currently display the action. Specifically, setting the SUBMIT_INQUIRY preference to No hides the button on the following screens for all users:
- myIncentives > Incentive Statement
- myIncentives > Incentive Statement >Detailed Drill Down
- myHome > Detailed Drill Down
- myIncentives > Incentive Details
- myIncentives > Plan Summary
Similarly, the New and Reply buttons are not displayed in the Home > Messages > myMessages area when the SUBMIT_INQUIRY preference is set to No.
Setting the SUBMIT_INQUIRY preference to Yes displays the Submit Inquiry button and the New and Reply buttons on the respective screens.
To configure the preference:
- Click the Setup tab, then click Preferences in the secondary menu. The Preferences screen appears.
- Click SUBMIT_INQUIRY. The Name* field is automatically populated. (This field cannot be edited.)
- In the Value* field, choose either Yes or No using the drop-down list.
- Click the Save button. The SUBMIT_INQUIRY preference is saved.
Configure the SUPPORT_EMAIL Preference
The Support Email preference specifies the email address to which support inquiries are sent for Executive, Business Group Executive, Manager, and Individual Payee users.
To configure the preference:
- Click the Setup tab, then click Preferences in the secondary menu. The Preferences screen appears.
- Click SUPPORT_EMAIL. The Name* field is automatically populated. (This field cannot be edited.)
- In the Value* field, type the support email address. By default, this is set to the email address of the first administrator created for the business.
- Click the Save button. The SUPPORT_EMAIL preference is saved.
Configure the TIME_ZONE Preference
The Time Zone preference specifies the time zone for everyone in your organization.
Note that while this preference sets the default time zone for administrators and end users, users can specify their own time zone preference for their personal view of Xactly Incent (using the “Change Preferences” menu option).
To configure the preference:
- Click the Setup tab, then click Preferences in the secondary menu. The Preferences screen appears.
- Click TIME_ZONE. The Name* field is automatically populated. (This field cannot be edited.)
- In the Value* field, choose a time zone using the drop-down list.
- Click the Save button. The TIME_ZONE preference is saved.
Configure the TRANSLATION_WORKBENCH Preference
The Translation Workbench preference controls the administrator’s ability to upload custom and translated labels.
The Translation Workbench allows administrators to support a global sales team with additional languages, for instance, or to more easily manage custom labels in English. If you have already customized end user facing labels of reports and sales pods, they can be modified using the Translation Workbench under the “English” language translations.
In addition to controlling the workbench, this preference enables the ability to create plan document template versions by language. Plan documents by language allow customized and translated labels for each supported language, for all plan document templates.
Note that the Translation Workbench area in Incent can be used by administrators before enabling this preference. Doing so allows all translations and customizations to be completed before rolling out to the business. In addition, the preference can be disabled and enabled at any time.
See Translation Workbench. for more information.
To configure the preference:
- Click the Setup tab, then click Preferences in the secondary menu. The Preferences screen appears.
- Click TRANSLATION_WORKBENCH. The Name* field is automatically populated. (This field cannot be edited.)
- In the Value* field, choose either Yes or No using the drop-down list.
- Click the Save button. The TRANSLATION_WORKBENCH preference is saved.
note: By enabling the Translation Workbench, all standard and custom field labels can only have one set of translations per language. If you have customized a label to have multiple variations across the Incentive Statement templates, only one custom label can be used in the Translation Workbench. In addition, Translation Workbench exports reflect any custom labels added in the Incent user interface; similarly, the Incent UI reflects any imports through the Translation Workbench.
Configure the RATE_TABLE_VALUES Preference
The Rate Table Values preference determines whether a formula name, expression, or value appears in rate tables, and controls the visibility of these rate tables for all reports in a business.
To configure the preference:
- Click the Setup tab, then click Preferences in the secondary menu. The Preferences screen appears.
- Click RATE_TABLE_VALUES. The Name* field is automatically populated. (This field cannot be edited.)
- In the Value* field, choose an option using the drop-down list. You can choose from among the following options:
• View Formula Name—The formula name appears in rate tables in Plan Summary and Team Plan Summary reports.
• View Formula Expression—The formula expression appears in rate tables in the Plan Summary and Team Plan Summary reports.
• Derive Formula Rate Values—The derived value appears in rate tables in the Plan Summary and Team Plan Summary reports.
- Click the Save button. The RATE_TABLE_VALUES preference is saved.
note: Derive Formula Rate Values are visible in Plan Summary and Team Plan Summary reports as long as the rate tables are set to be visible when these reports are configured. (Rate table visibility is configured in the Product Commission Rates section of the Reports > Customize > Plan Summary area.)
Rate values can only be derived when the information in the formula is directly available to Incent. For example, data related to Person, Position, and Quota items are directly available to Incent, while data related to Order, Credit, and Commission items (for instance) are only available to Incent during the calculation process. Therefore, you should not use formulas that include information that is not directly available to Incent to derive rate values for reports.
Configure the VIEW_FUTURE_REPORT_DATA Preference
The View Future Report Data preference allows the masking of personal data to prevent managers from seeing future data in cases when an employee changes jobs and no longer reports to them. This preference is set to Yes by default, which allows all data to be viewed. To mask personal data, administrators need to set this preference to No.
To configure the preference:
- Click the Setup tab, then click Preferences in the secondary menu. The Preferences screen appears.
- Click VIEW_FUTURE_REPORT_DATA. The field name is automatically populated.
- In the Value* field, choose either Yes or No using the drop-down list.
- Click the Save button. The VIEW_FUTURE_REPORT_DATA preference is saved.