Setup > Calendar
You can use the Calendar area to set up a company’s incentive calendar for compensation payments. The calendar contains the year in which the business was created in Xactly Incent (or Modeling) and two successive business years.
For example, if the business was created in 2015, the following years are displayed:
• YEAR-2015
• YEAR-2016
• YEAR-2017
These years can be deleted or modified.
important: Xactly Incent (and Modeling) requires monthly periods in the calendar. All calendar periods defined are available for all users to view in reports.
Screen
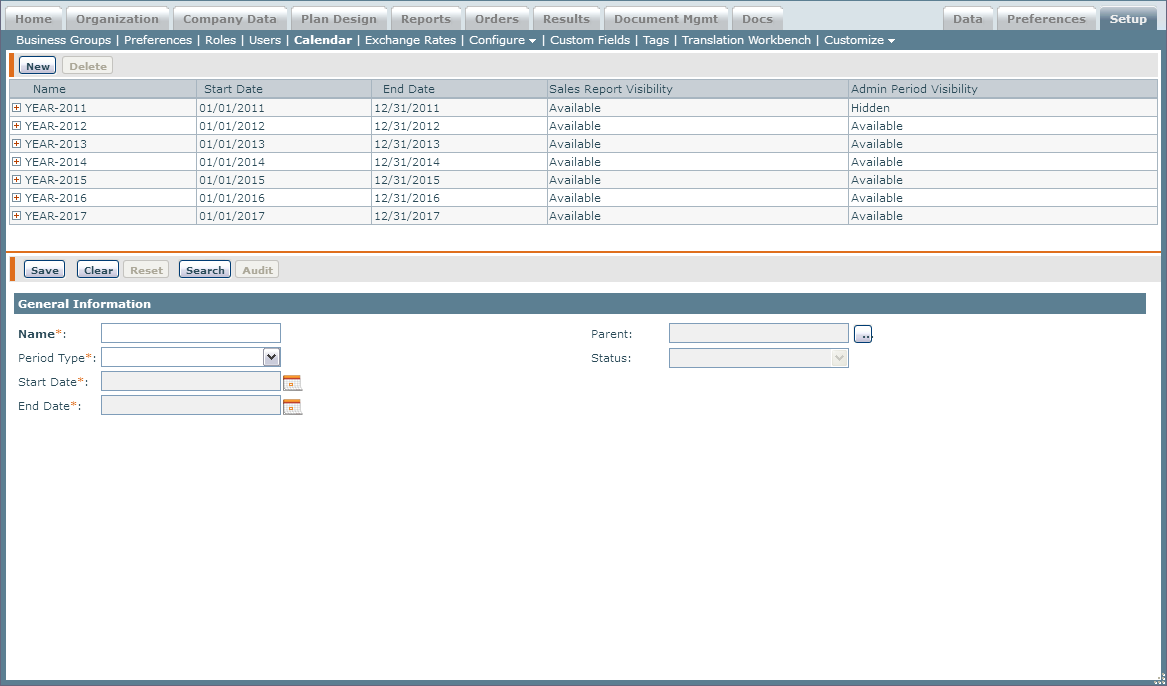 Calendar Screen
All Fields
The following table describes the information you can specify when managing calendars:
| Field | Description |
|---|---|
| Name | The calendar period name, for example, YEAR-2012 or JAN-2012. The maximum length is 32 characters. |
| PeriodType | The calendar period, from among the following: • YEARLY • QUARTERLY • MONTHLY |
| Start Date | The start date for the specified period. |
| End Date | The end date for the specified period. |
| Parent | The parent period. |
| Status | The status of the calendar. |
| Is Published | Specifies whether a user other than an administrator can view reports. |
| Sales Report Visibility | Specifies whether the yearly period is visible in sales reports. |
| Admin Period Visibility | Specifies whether the yearly period, and all its sub-periods, are visible in admin-visible period drop-down menus within Incent. |
How to…
This section describes the tasks you can perform when managing calendars.
Create a New Calendar Period
1. Click the Setup tab, then click Calendar in the secondary menu. The Calendar screen appears.
2. Click the New button.
3. In the Name* field, type a name for the calendar period (for example, YEAR-2017 or JAN-2017).
note: You cannot create a new calendar period using a period name that is already in use. For example, if you have a Year-2017 tree with period names March, April, and May. you cannot use the same period names in the Year-2018 tree. As a best practice, include the year in the period names for monthly and quarterly periods, for example, Jan-2017.
4. In the Period Type* field, choose a value using the drop-down list.
The options are:
• YEARLY
• QUARTERLY
• MONTHLY
If you choose YEARLY, the Visibility Options section appears.
5. In the Start Date* field, type or select a date for the period type.
note: The calendar that appears defaults to today’s date.
6. In the End Date* field, type or select a date for the period type.
note: A calendar can start and end on any date to match different fiscal calendars.
There is no validation of overlapping periods. Please make sure that the period start and end dates are correct.
7. (Optional) In the Parent field, click the ![]() button, select a period in the dialog that appears, and click the OK button.
button, select a period in the dialog that appears, and click the OK button.
This defines part of the calendar hierarchy (that you can subsequently expand by clicking the plus symbol that appears in front of periods in the results pane).
note: When creating a calendar year, the period start and end dates need to align with the parent start and end dates. For example if YEAR-2017 ends on 12/31/2017, Q4-2017 and DEC-2017 both also need to end on 12/31/2017. If the periods do not align, quotas and draws may not appear on reports (such as the Incentive Statement).
8. (Optional) If you chose MONTHLY as the period type, choose Yes or No from the Is Published drop-down list.
Choosing Yes allows users other than administrators to view reports.
9. If you chose YEARLY as the period type, do the following:
a. In the Sales Report Visibility* field, choose Available or Hidden using the drop-down list. This specifies whether the yearly period is visible in standard reports.
b. In the Admin Report Visibility* field, choose Available or Hidden using the drop-down list. This specifies whether the yearly period, and all its sub-periods, are visible in admin-visible period drop-down menus within Incent.
10. Click the Save button. The newly-created calendar period appears in the results pane.
Add a Calendar Period to a Parent Period
A calendar is a tree structure that requires a YEARLY period type as the root node. You can use the Parent field to attach calendar periods and define the complete tree structure.
important: It is advisable to add months and quarters to a newly-created year, since Xactly Incent and Modeling uses the month as the leaf period in most Plan Design objects, such as quotas and formulas.
1. Click the New button.
2. In the Name* field, type a name for the calendar.
3. In the PeriodType* field, choose QUARTERLY or MONTHLY using the drop-down list.
4. In the Start Date* field, type or select a date for the period type.
5. In the End Date* field, type or select a date for the period type.
6. In the Parent field, click the ![]() button, select a yearly period in the dialog that appears, and click the OK button.
button, select a yearly period in the dialog that appears, and click the OK button.
7. Click the Save button. The newly-created calendar period appears under the parent in the results pane.
Edit a Calendar
note: If you update a calendar after you have created associated objects, such as quotas, plans, orders, and so on, be sure to test how the changes impact your data in either Xactly Modeling or Xactly Sandbox.
1. Select a calendar from the list in the results pane.
2. Modify the fields that require changes.
3. Click the Save button.
Toggle Whether a Calendar Period is Published
You can toggle whether a calendar period is published or not, allowing you to control whether the period is visible to Incent end users.
note: The ability to toggle whether a period is published is controlled by the REPORT_PUBLISHING business preference (in the Setup > Preferences area). You need to set this preference to “Manual by Period” for the Is Published toggle to apply.
1. Expand a calendar year to select a period from the list.
2. In the Is Published field, choose Yes or No using the drop-down list.
Choosing Yes makes this period visible to end users; choosing No hides this period from end users.
note: You need to publish and unpublish periods in order. For example, if you have three unpublished periods, JAN-2017, FEB-2017, and MAR-2017, you need to publish JAN-2017 before you can publish FEB-2017. Similarly, if you have the same three periods published, you need to unpublish MAR-2017 before you can unpublish FEB-2017.
3. Click the Save button.
Delete a Calendar
note: You cannot delete a calendar used in the Plan Design area until all references are removed.
1. Select a calendar from the list in the results pane.
2. Click the Delete button. A message appears asking “Do you really want to delete the selected item?”.
3. Click the OK button, to confirm the deletion, or click the Cancel button to cancel the action.