Customize > Custom Applications
Xactly Incent enables administrators to define external, custom applications that users
can then access directly through single sign-on using the Incent application menu (in
the top right of the screen).
You can use the Custom Applications area to define and manage these custom
applications, specifying the application name, menu label, access roles, URL, and single
sign-on details, among other information.
Screen
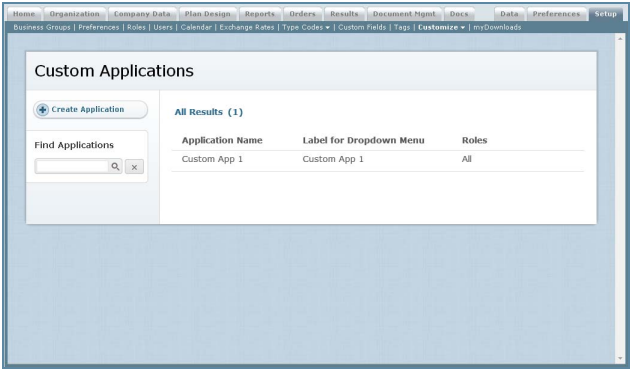
Custom Applications Screen
Required Fields
The following table describes the required information you need to specify when managing
custom applications:

Optional Fields
The following table describes the optional information you can specify when managing
custom applications:

All Fields
The following table describes the information you can specify when managing custom
applications:
How to…
This section describes the tasks you can perform when managing custom applications.
Display All Custom Applications
Click the Setup tab, then click Customize > Custom Applications in the secondary
menu. The Custom Applications screen appears.
• To find specific applications, type part of the name in the Find Applications text
box, and click the ![]() button. The search results appear.
button. The search results appear.
Click the ![]() button to clear the Find Applications text box and reset the search
button to clear the Find Applications text box and reset the search
results.
• To display a summary of the application, click the corresponding application in
the list. A panel appears showing the application details.
• Use the page navigation buttons to navigate between pages of custom applications.
Create a Custom Application
1. Click the Setup tab, then click Customize > Custom Applications in the secondary
menu. The Custom Applications screen appears.
2. Click the ![]() button. The Create Custom Application
button. The Create Custom Application
dialog appears.
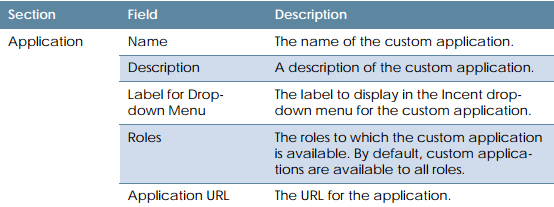
3. In the Name field, type the name of the custom application.
4. (Optional) In the Description field, type a description of the custom application.
5. In the Label for Dropdown Menu field, type the label that should be displayed in
the Incent drop-down menu for the custom application.
6. In the Roles field, select whether the custom application should be available to all
roles.
If you select No, click the See All Roles link to display all available roles. The Select
Roles dialog appears. Select the appropriate roles, and click the ![]()
button.
You can remove assigned roles by clicking the button next to a role.
7. In the Application URL field, type the URL for the custom application.
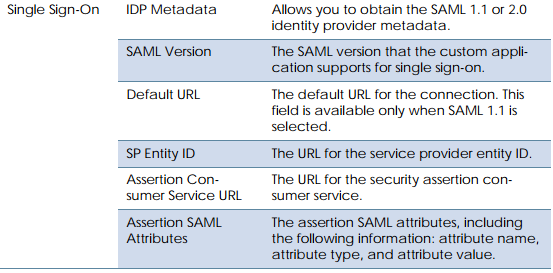
8. In the Single Sign-On field, select whether the custom application provides single
sign-on with Incent.
If you select Yes, specify the single sign-on configuration for the custom application
by doing the following:
a. In the IDP Metadata field, click either the SAML 1.1 Metadata or SAML 2.0
Metadata link to display the SAML 1.1 or 2.0 identity provider metadata
respectively.
b. In the SAML Version field, select the version of SAML (either SAML 1.1 or SAML
2.0) that the custom application supports for single sign-on.
c. If you selected SAML 1.1, in the Default URL field, type the default URL for the
connection.
d. In the SP Entity ID field, type the URL for the service provider entity ID.
e. In the Assertion Consumer Service URL field, type the URL for the security assertion
consumer service.
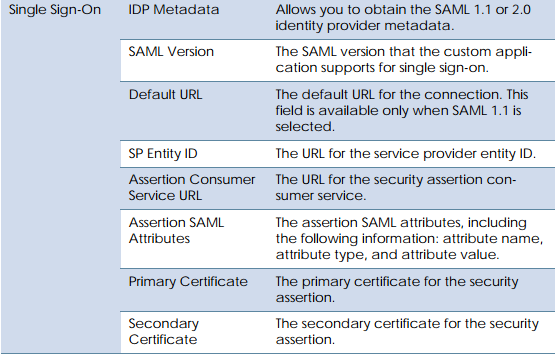
f. In the Assertion SAML Attributes field, specify the assertion SAML attributes,
including the attribute name, attribute type, and attribute value.
You can specify as many attributes as required.
g. (Optional) In the Primary Certificate field, select the primary certificate for the
security assertion using the drop-down list.
h. (Optional) In the Secondary Certificate field, select the secondary certificate
for the security assertion using the drop-down list.
9. Click the ![]() button.
button.
Alternatively, click the button to dismiss the dialog without saving the
custom application. Confirm that you want to cancel the operation without saving.
Edit a Custom Application
1. Click the Setup tab, then click Customize > Custom Applications in the secondary
menu. The Custom Applications screen appears.
2. Hover over the custom application, and click the Edit button that appears. The
Edit Custom Application screen appears.
3. Modify the fields, as required.
4. Click the ![]() button.
button.
Alternatively, click the![]() button to dismiss the dialog without saving the
button to dismiss the dialog without saving the
custom application. Confirm that you want to cancel the operation without saving.
Copy a Custom Application
1. Click the Setup tab, then click Customize > Custom Applications in the secondary
menu. The Custom Applications screen appears.
2. Hover over the custom application, and click the Copy button that appears. The
Copy Custom Application screen appears.
3. In the Name field, type a new name for the custom application.
4. Modify any other fields, as required.
5. Click the![]() button.
button.
Alternatively, click the![]() button to dismiss the dialog without saving the
button to dismiss the dialog without saving the
custom application. Confirm that you want to cancel the operation without saving.
Delete a Custom Application
1. Click the Setup tab, then click Customize > Custom Applications in the secondary
menu. The Custom Applications screen appears.
2. Hover over the custom application, and click the Delete button that appears. A
confirmation dialog appears.
3. Click the ![]() button to delete the custom application.
button to delete the custom application.
Alternatively, click the![]() button to dismiss the dialog without deleting the
button to dismiss the dialog without deleting the
custom application.