Route Plan Documents by Person
You can use the Route by Person area to send plan documents to a group of people based on customizable criteria. This complements other Xactly eDocs & Approvals capabilities that allows you to route documents based on titles or positions.
After defining one or more routing lists, eDocs & Approvals saves the lists, allowing you to route to the same group of people multiple times.
note: To access this feature, users need to have the Docs > Workflow Definitions privilege enabled for their corresponding role (configured in the Setup > Roles area of Incent).
Screen
 Route by Person Screen
All Fields
The following table describes the information displayed when managing routing lists:
| Field | Description |
|---|---|
| Routing List | The name of the routing list. |
| Description | A description of the routing list. |
| People in List | The number of people in the routing list. |
How to…
This section describes how to manage routing lists.
Display Routing Lists
Click the Docs tab, then click Route > Plan Documents By Person in the secondary menu. The Route by Person screen appears.
- To find specific routing lists, type part of the name in the Search text box, and click the
 button. The search results appear.
Click the button to clear the Search text box and reset the search results.
 - To filter routing lists by tags, select the appropriate tags in the Filters field.
- Click the column headers to toggle between sorting the fields in ascending and descending order.
- Use the page navigation buttons to navigate between the pages of routing list results.
Route to a List
1. Click the Docs tab, then click Route > Plan Documents By Person in the secondary menu. The Route by Person screen appears.
2. Hover over a routing list, and click the Route to List button that appears. The Route Plan Documents dialog appears.
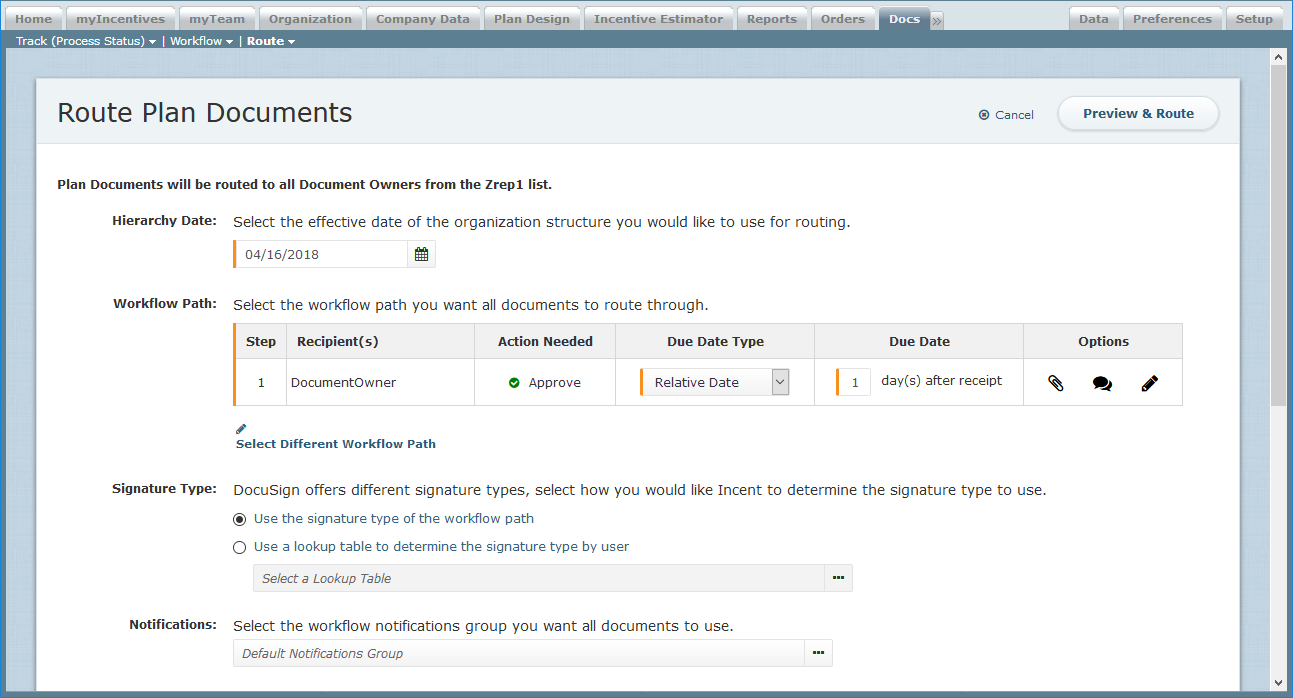
 Route Plan Documents Screen
3. In the Hierarchy Date field, select the effective date of the organization structure to use for routing.
4. In the Workflow Path field, select the workflow path through which to route the documents.
Click the Add Workflow Path button to add a workflow path. After selecting a workflow in the dialog that appears, the corresponding workflow path is displayed.
For each step, choose the Due Date Type using the drop-down list. If you choose Specific Date, select the due date for the step. If you choose Relative Date, type the number of days (1 to 30) after receipt to serve as the due date.
You can also replace the current workflow path by clicking the Select Different Workflow Path button.
5. In the Signature Type field, select how Incent should determine the signature type to use.
DocuSign offers multiple signature types. Select whether to use the signature type of the workflow path, or to use a lookup table to determine the signature type by user.
note: The Signature Type field only appears if your business has enabled DocuSign eSignatures (in the Setup > Customize > DocuSign Integration area), and you’ve selected a workflow that uses a DocuSign signature type.
If you choose to use a lookup table, select the corresponding table using the Select a Lookup Table field. This enables you to leverage a lookup table to dynamically assign specific signature types to plan documents routed to a routing group. Doing so provides greater flexibility when routing large groups of payees with different signing requirements.
6. In the Notifications field, select the workflow notifications group to use with all documents.
These are the notification groups defined n the Docs > Workflow > Notifications area of the applications.
7. In the Decline & Recall field, specify whether users need to select a reason code when declining or recalling a plan document.
8. In the Workflow Owner field, select the administrator that will own the group of documents being routed.
The workflow owner performs all administrative actions on documents in the routing group, including commenting, recalling, and so on. In addition, all emails sent to the initiator are directed to the workflow owner.
9. In the Reason Code field, select the reason code that describes why you are routing the plan document.
10. In the CC Manager field, select whether to have managers of all payees receive an email at the beginning and end of the workflow.
Note: The CC Manager field only appears if you’ve selected a workflow that uses a DocuSign signature type.
11. Click the ![]() button. The Preview Plan Documents for Routing dialog appears showing the person, position, title, and business group to which the documents will be routed.
button. The Preview Plan Documents for Routing dialog appears showing the person, position, title, and business group to which the documents will be routed.
To skip routing to specific individuals in the workflow without actually removing them from the routing group, select the Skip? check box for the corresponding person.
12. To preview a plan document for a person, hover over a person in the list and click the Preview button that appears. The plan document appears on a new web browser tab.
13. Click the ![]() button. An alert appears indicating that routing has started and showing the number of document owners to which the document is being routed.
button. An alert appears indicating that routing has started and showing the number of document owners to which the document is being routed.
Alternatively, click with Back to Criteria button to modify the routing details. Click the Cancel button to dismiss the dialog without routing the document.
Create a Routing List
1. Click the Docs tab, then click Route > Plan Documents By Person in the secondary menu. The Route by Person screen appears.
2. Click the ![]() button. The Creating Routing List: Criteria screen appears.
button. The Creating Routing List: Criteria screen appears.
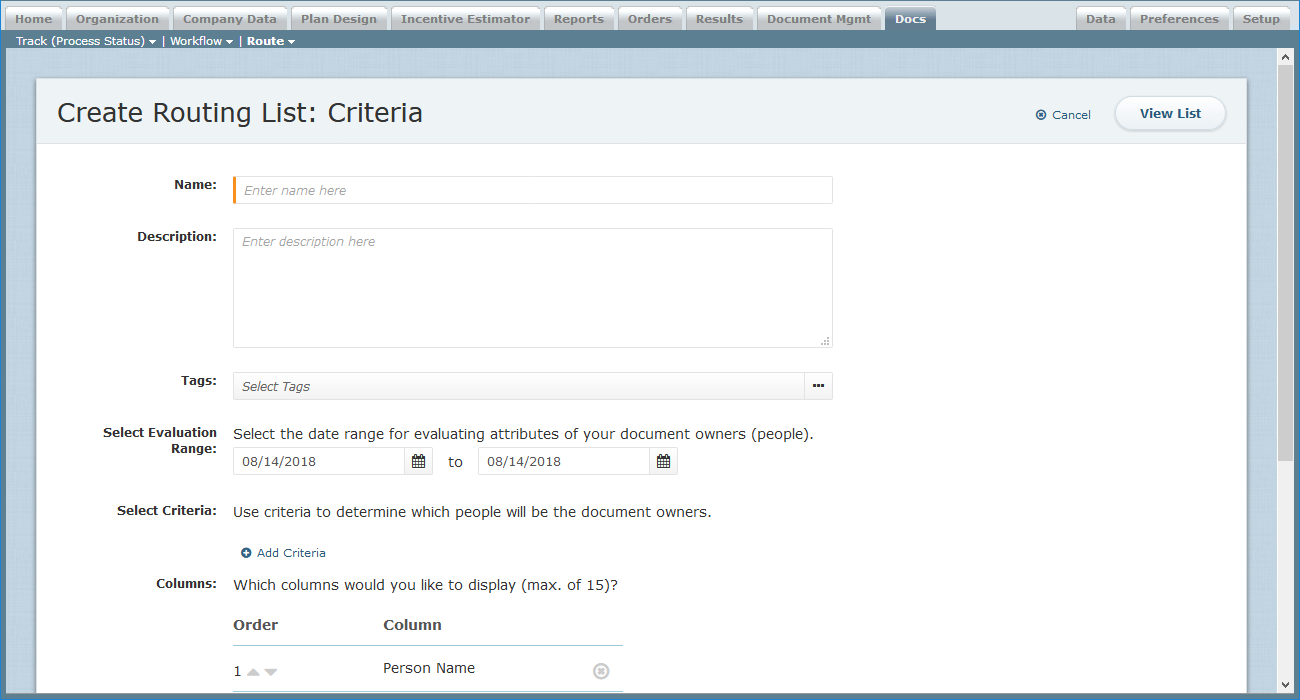
 Create Routing List Screen
3. In the Name field, type the name of the routing list.
4. (Optional) In the Description field, type a description of the routing list.
5. In the Tags field, select the tags to associate with the routing list.
6. In the Select Evaluation Range field, select the date range for evaluating attributes of the document owners (people).
This is the date range against which all criteria (specified below) are evaluated. For conditions based on versioned objects, such as Position and Person, the person is added to the list if the object has at least one version matching the condition.
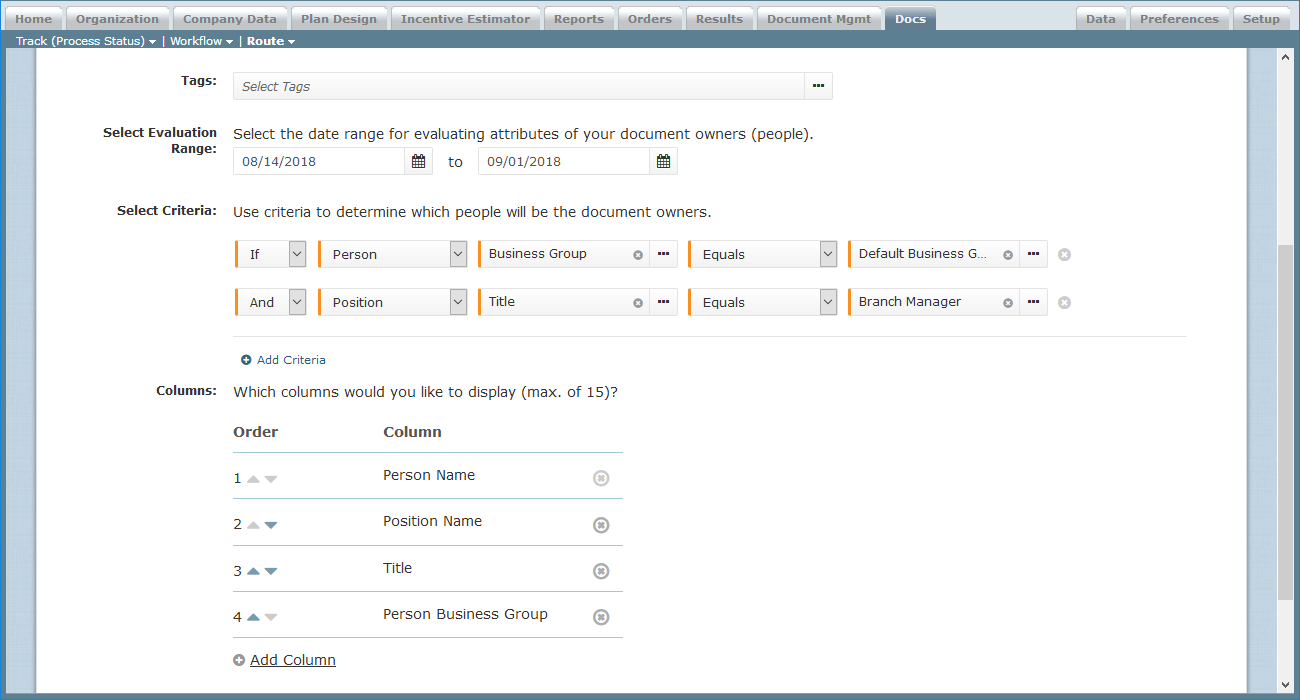
7. In the Select Criteria field, specify the criteria to determine the people that will be the document owners.
Click the ![]() button. A set of fields appear that allows you to base the criteria on a person or position, and then specify a logical condition (such as whether the person or position equals a particular value, for instance).
button. A set of fields appear that allows you to base the criteria on a person or position, and then specify a logical condition (such as whether the person or position equals a particular value, for instance).
 Routing List Criteria
Click the ![]() button to remove the corresponding criteria.
button to remove the corresponding criteria.
8. In the Columns field, specify the columns to display in the routing and people list views, up to a maximum of 15 columns.
Click the ![]() button. The Select Columns dialog appears. Select the columns to display, and click the
button. The Select Columns dialog appears. Select the columns to display, and click the ![]() button.
button.
Use the up and down arrows to reorder the columns. Click the ![]() button to remove the corresponding column.
button to remove the corresponding column.
9. Click the ![]() button to display the routing list based on the specified criteria.
button to display the routing list based on the specified criteria.
10. Click the ![]() button to save the routing list. Click the Cancel button to dismiss the screen without creating the routing list.
button to save the routing list. Click the Cancel button to dismiss the screen without creating the routing list.
Alternatively, click the ![]() button to save the routing list and route the document to the people on the list. The Route Plan Documents dialog appears.
button to save the routing list and route the document to the people on the list. The Route Plan Documents dialog appears.
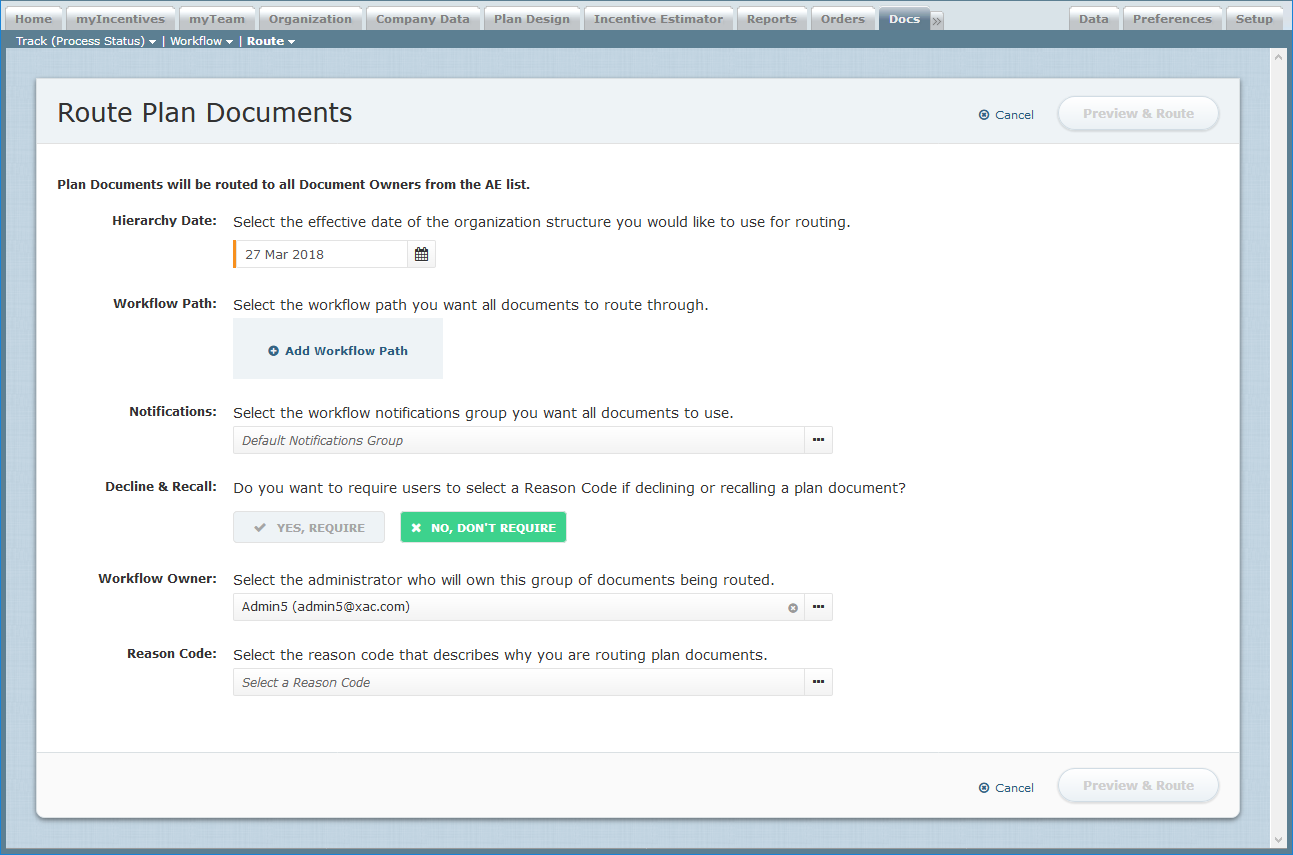
 Route Plan Documents Screen
a. In the Hierarchy Date field, select the effective date of the organization structure to use for routing.
b. In the Workflow Path field, select the workflow path through which to route the documents.
Click the Add Workflow Path button to add a workflow path. After selecting a workflow in the dialog that appears, the corresponding workflow path is displayed.
 Workflow Path
For each step, choose the Due Date Type using the drop-down list. If you choose Specific Date, select the due date for the step. If you choose Relative Date, type the number of days (1 to 30) after receipt to serve as the due date.
You can also replace the current workflow path by clicking the Select Different Workflow Path button.
c. In the Signature Type field, select how Incent should determine the signature type to use.
DocuSign offers multiple signature types. Select whether to use the signature type of the workflow path, or to use a lookup table to determine the signature type by user.
note: The Signature Type field only appears if your business has enabled DocuSign eSignatures (in the Setup > Customize > DocuSign Integration area).
If you choose to use a lookup table, select the corresponding table using the Select a Lookup Table field. This enables you to leverage a lookup table to dynamically assign specific signature types to plan documents routed to a routing group. Doing so provides greater flexibility when routing large groups of payees with different signing requirements.
d. In the Notifications field, select the workflow notifications group to use with all documents.
These are the notification groups defined n the Docs > Workflow > Notifications area of the applications.
e. In the Decline & Recall field, specify whether users need to select a reason code when declining or recalling a plan document.
f. In the Workflow Owner field, select the administrator that will own the group of documents being routed.
The workflow owner performs all administrative actions on documents in the routing group, including commenting, recalling, and so on. In addition, all emails sent to the initiator are directed to the workflow owner.
g. In the Reason Code field, select the reason code that describes why you are routing the plan document.
h. In the CC Manager field, select whether to have managers of all payees receive an email at the beginning and end of the workflow.
i. Click the ![]() button. The Preview Plan Documents for Routing dialog appears showing the person, position, title, and business group to which the documents will be routed.
button. The Preview Plan Documents for Routing dialog appears showing the person, position, title, and business group to which the documents will be routed.
To skip routing to specific individuals in the workflow without actually removing them from the routing group, select the Skip? check box for the corresponding person.
j. To preview a plan document for a person, hover over a person in the list and click the Preview button that appears. The plan document appears on a new web browser tab.
k. Click the ![]() button. An alert appears indicating that routing has started and showing the number of document owners to which the document is being routed.
button. An alert appears indicating that routing has started and showing the number of document owners to which the document is being routed.
Alternatively, click with Back to Criteria button to modify the routing details. Click the Cancel button to dismiss the dialog without routing the document.
Edit a Routing List
1. Click the Docs tab, then click Route > Plan Documents By Person in the secondary menu. The Route by Person screen appears.
2. Hover over a routing list, and click the Edit button that appears. The Edit Routing List: Criteria dialog appears.
3. Modify the fields and criteria, as needed.
4. Click the ![]() button to display the current routing list, based on the criteria specified.
button to display the current routing list, based on the criteria specified.
Click the Download People on List button to download the routing list to a comma-separated value (CSV) file.
Click the Back to Criteria button to return to editing the routing list criteria.
5. Click the ![]() button to save the routing list. Click the Cancel button to dismiss the screen without creating the routing list.
button to save the routing list. Click the Cancel button to dismiss the screen without creating the routing list.
Alternatively, click the ![]() button to save the routing list and route the document to the people on the list. The Route Plan Documents dialog appears.
button to save the routing list and route the document to the people on the list. The Route Plan Documents dialog appears.
a. In the Hierarchy Date field, select the effective date of the organization structure to use for routing.
b. In the Workflow Path field, select the workflow path through which to route the documents.
Click the Add Workflow Path button to add a workflow path. After selecting a workflow in the dialog that appears, the corresponding workflow path is displayed.
You can select a due date for each step of the workflow, as needed. You can also replace the current workflow path by clicking the Select Different Workflow Path button.
c. In the Signature Type field, select how Incent should determine the signature type to use.
DocuSign offers multiple signature types. Select whether to use the signature type of the workflow path, or to use a lookup table to determine the signature type by user.
note: The Signature Type field only appears if your business has enabled DocuSign eSignatures (in the Setup > Customize > DocuSign Integration area).
If you choose to use a lookup table, select the corresponding table using the Select a Lookup Table field. This enables you to leverage a lookup table to dynamically assign specific signature types to plan documents routed to a routing group. Doing so provides greater flexibility when routing large groups of payees with different signing requirements.
d. In the Notifications field, select the workflow notifications group to use with all documents.
These are the notification groups defined n the Docs > Workflow > Notifications area of the applications.
e. In the Decline & Recall field, specify whether users need to select a reason code when declining or recalling a plan document.
f. In the Workflow Owner field, select the administrator that will own the group of documents being routed.
The workflow owner performs all administrative actions on documents in the routing group, including commenting, recalling, and so on. In addition, all emails sent to the initiator are directed to the workflow owner.
g. In the Reason Code field, select the reason code that describes why you are routing the plan document.
h. In the CC Manager field, select whether to have managers of all payees receive an email at the beginning and end of the workflow.
i. Click the ![]() button. The Preview Plan Documents for Routing dialog appears showing the person, position, title, and business group to which the documents will be routed.
button. The Preview Plan Documents for Routing dialog appears showing the person, position, title, and business group to which the documents will be routed.
To skip routing to specific individuals in the workflow without actually removing them from the routing group, select the Skip? check box for the corresponding person.
j. To preview a plan document for a person, hover over a person in the list and click the Preview button that appears. The plan document appears on a new web browser tab.
k. Click the ![]() button. An alert appears indicating that routing has started and showing the number of document owners to which the document is being routed.
button. An alert appears indicating that routing has started and showing the number of document owners to which the document is being routed.
Alternatively, click with Back to Criteria button to modify the routing details. Click the Cancel button to dismiss the dialog without routing the document.
Delete a Routing List
1. Click the Docs tab, then click Route > Plan Documents By Person in the secondary menu. The Route by Person screen appears.
2. Hover over a routing list, and click the Delete button that appears. A confirmation dialog appears.
3. Click the ![]() button to delete the routing list. Alternatively, click the Cancel button to dismiss the dialog without deleting the routing list.
button to delete the routing list. Alternatively, click the Cancel button to dismiss the dialog without deleting the routing list.
