Notifications
You can use the Notifications area to define and manage navigation groups, which allows you to customize and schedule email notifications that are sent during the plan document life cycle.
note: To access this feature, users need to have the Docs > Workflow Definitions privilege enabled for their corresponding role (configured in the Setup > Roles area of Incent).
Screen
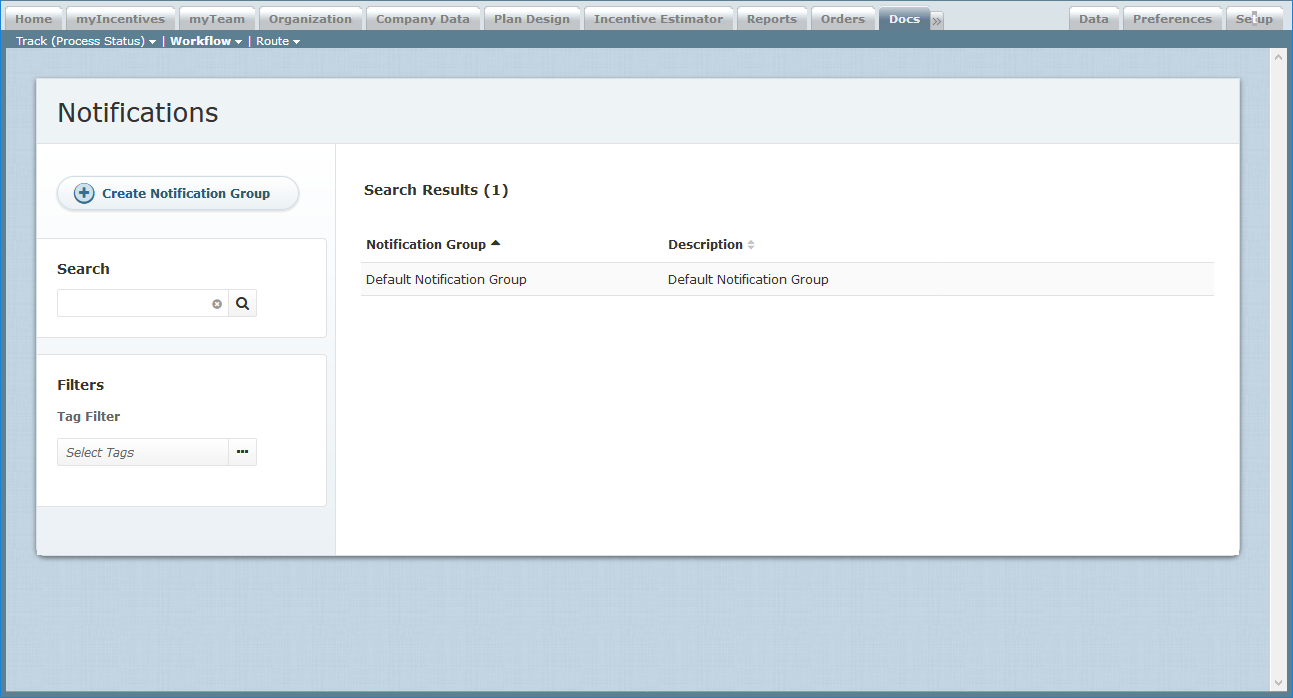
 Notifications Screen
All Fields
The following table describes the information displayed when managing notifications:
| Column | Description |
|---|---|
| Notification Group | The name of the notification group. |
| Description | A description of the notification group. |
How to…
This section describes how to manage notifications.
Display Notifications
Click the Docs tab, then click Workflow > Notifications in the secondary menu. The Notifications screen appears.
- To find specific notification groups, type part of the name in the Search text box, and click the
 button. The search results appear.
Click the button to clear the Search text box and reset the search results.
 - To display a summary of a particular notification group, click the name of the group. The entry expands to display summary information. Click the group name again to collapse the summary.
- To filter notification groups by tags, select the appropriate tags in the Tags field.
- Click the column headers to toggle between sorting in ascending and descending order.
- Use the page navigation buttons to navigate between the pages of results.
Create a Notification Group
1. Click the Docs tab, then click Workflow > Notifications in the secondary menu. The Create Notification Group screen appears.
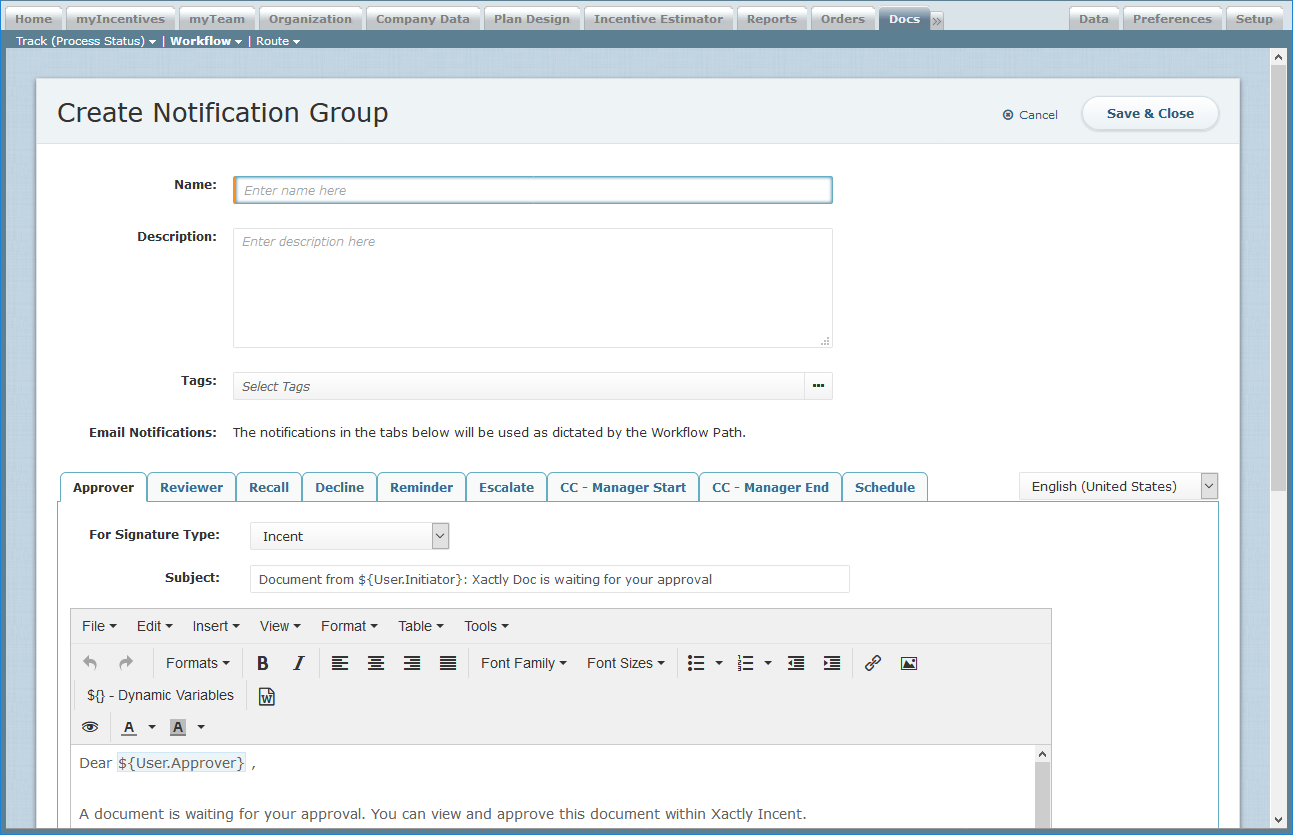
 Create Notification Group Screen
2. Click the ![]() button. The Create Notification Group screen appears.
button. The Create Notification Group screen appears.
3. In the Name field, type the name of the notification group.
4. (Optional) In the Description field, type a description of the notification group.
5. (Optional) In the Tags field, specify the tags to associate with the notification group.
This allows you to add one or more tags to help identify notification groups when searching. You can also use tags to hide notification groups that are no longer being used.
6. In the Email Notifications field, edit the email notification templates.
Do the following:
a. Choose the language for the email notifications using the drop-down list on the right.
The language drop-down list only appears if your organization has the Translation Workbench enabled. If enabled, the list of available languages correspond to the languages that are active for your organization. Default content is then provided for each language.
b. Click the tab corresponding to the email notification that you want to review and potentially modify. The email notification template appears in the editor.
You can specify email notifications for the following purposes:
• Approver — Sent to document approvers
• Reviewer — Sent to document reviewers
• Recall — Sent when a document has been recalled
• Decline — Sent when a person has declined a document
• Reminder — Sent as a reminder that a document is awaiting approval
• Escalate — Sent to sales leaders when a document is behind schedule
• CC – Manager Start — Sent to a manager at the start of the workflow
• CC – Manager End — Sent to a manager at the end of the workflow
c. In the For Signature Type field, choose the signature type for the email notification.
You can choose from among the following options:
• Incent
• DocuSign E-Signature
• DocuSign E-Signature Access Code
• DocuSign WET Signature
• DocuSign WET Signature Access Code
Note that this field only appears for the Approver, CC – Manager Start, and CC – Manager End notification templates.
d. In the Subject field, review and modify the email subject as appropriate.
e. Review the existing template, and make changes as appropriate.
Use the following dynamic variables to help customize and personalize the email notifications:
• ${Document.DueDate} — The document due date.
• ${Document.Link} — A link to the document.
• ${Document.Name} — The name of the document.
• ${User.Approver} — The user name of the person that is the document approver.
• ${User.Initiator} — The user name of the person that is the document initiator.
• ${User.Owner} — The user name of the person that is the document owner.
• ${User.Reviewer} — The user name of the person that is the document reviewer.
• ${User.WorkflowStep} — The user name of the person that owns the current step of the workflow.
• ${User.ManagerName} — The user name of the manager that the notification is about. For example, consider the case in which Joe reports to Sam and the workflow notifications are sent regarding Sam’s step of the workflow. In this case, the MangerName would be Joe.
• ${User.DeclineReason} — The reason code that the user chooses when declining the document.
7. (Optional) Schedule reminder notifications to send to users (using Xactly messages and email) when documents are waiting for approval.
 Schedule Notifications
Do the following:
a. In the Email Notifications field, click the Schedule tab.
b. In the Reminders field, specify the number of days at which to send a notification either before the due date or after the document was received.
Click the ![]() button to add a new notification reminder. You can schedule up to ten reminders.
button to add a new notification reminder. You can schedule up to ten reminders.
c. In the Escalations field, specify when an escalation notification should be sent to an approver’s manager.
Click the ![]() button. Use the appropriate fields to specify when the escalation notification should be sent. You can schedule up to five escalations.
button. Use the appropriate fields to specify when the escalation notification should be sent. You can schedule up to five escalations.
8. Click the ![]() button to save the notification group. Alternatively, click the Cancel button to dismiss the screen without creating the notification group.
button to save the notification group. Alternatively, click the Cancel button to dismiss the screen without creating the notification group.
Edit a Notification Group
1. Click the Docs tab, then click Workflow > Notifications in the secondary menu. The Notifications screen appears.
2. Hover over a notification group in the list, and click the Edit button that appears. The Edit Notification Group dialog appears.
3. Modify the fields, as required.
4. Click the ![]() button to save the notification group. Alternatively, click the Cancel button to dismiss the screen without saving your changes.
button to save the notification group. Alternatively, click the Cancel button to dismiss the screen without saving your changes.
Copy a Notification Group
1. Click the Docs tab, then click Workflow > Notifications in the secondary menu. The Notifications screen appears.
2. Hover over a notification group in the list, and click the Copy button that appears. The Edit Notification Group dialog appears.
3. In the Name field, modify the name of the copied notification group.
4. Modify any other fields, as required.
5. Click the ![]() button to save the notification group. Alternatively, click the Cancel button to dismiss the screen without creating the new notification group.
button to save the notification group. Alternatively, click the Cancel button to dismiss the screen without creating the new notification group.
Delete a Notification Group
1. Click the Docs tab, then click Workflow > Notifications in the secondary menu. The Notifications screen appears.
2. Hover over a notification group in the list, and click the Delete button that appears. A confirmation dialog appears.
3. Click the ![]() button to delete the notification group.
button to delete the notification group.
Alternatively, click the Cancel button to dismiss the dialog without deleting the notification group.
