Manage Documents
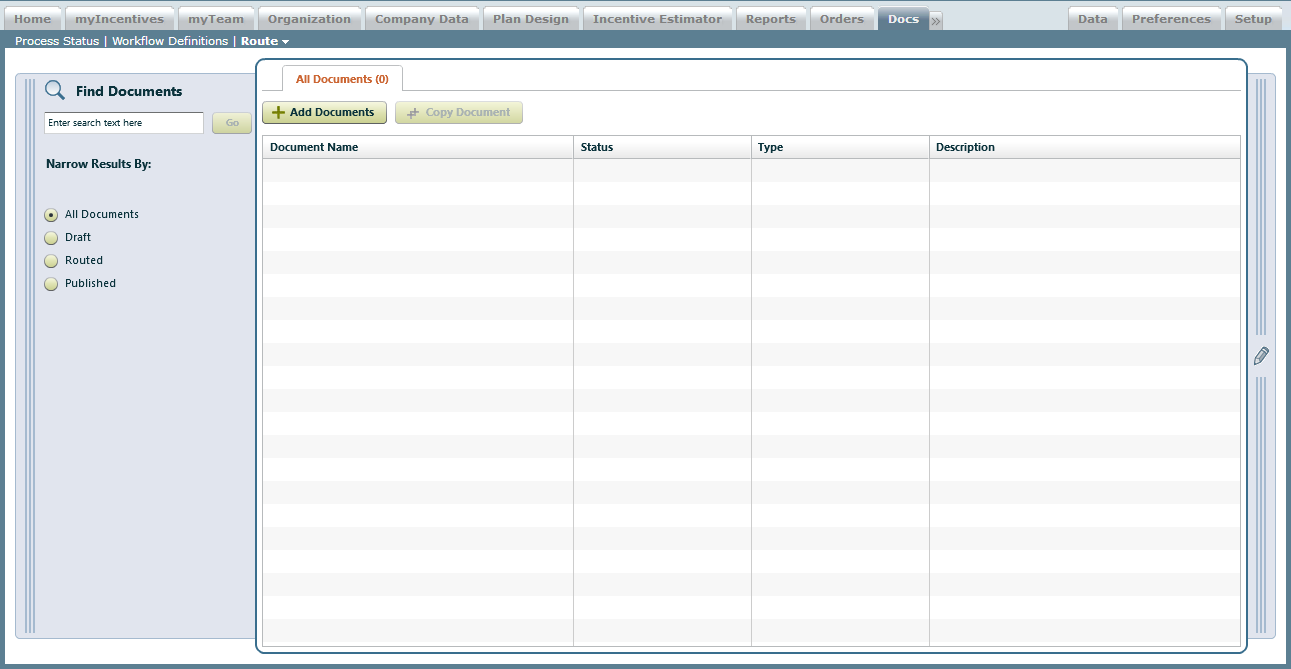
The Documents area enables you to manage Xactly documents within Incent. Within the Documents area, you can create new documents (optionally based on existing documents), modify documents, and delete documents that are no longer being used, as required.
Screen
 Documents Screen
All Fields
The following table describes the information displayed when managing documents:
| Field | Description |
|---|---|
| Name | The name of the document. |
| Status | The status of the document, from among the following: • Draft • Routed |
| Type | The type of the document, from among the following: Attachment, Plan Document, Certification Letter, Payment File (Hierarchy), Payment File (Business Group), and Quota File. |
| Description | A description of the document. |
How to …
This section describes how to manage Xactly documents.
Display All Documents
• Click the Docs tab, then click Route > Documents in the secondary menu. The Documents screen appears.
Find Specific Documents
1. Click the Docs tab, then click Route > Documents in the secondary menu. The Documents screen appears.
2. Click the![]() button on the left to open the Find Documents pane, if necessary.
button on the left to open the Find Documents pane, if necessary.
3. Type part of the document name in the Find Documents field.
note: The Find Documents field does not recognize regular expressions using characters such as * or ?.
4. Click the Go button.
The search results appear as a separate tab in the Results area (with the number of documents found in parentheses).
Filter Documents Based on Status
• Select the corresponding radio button in the Status of Document section of the Find Documents pane.
The search results appear as a separate tab in the Results area (with the number of documents found in parentheses).
Create a Document
1. Click the Docs tab, then click Route > Documents in the secondary menu. The Documents screen appears.
2. Click the![]() button to open the New Document pane.
button to open the New Document pane.
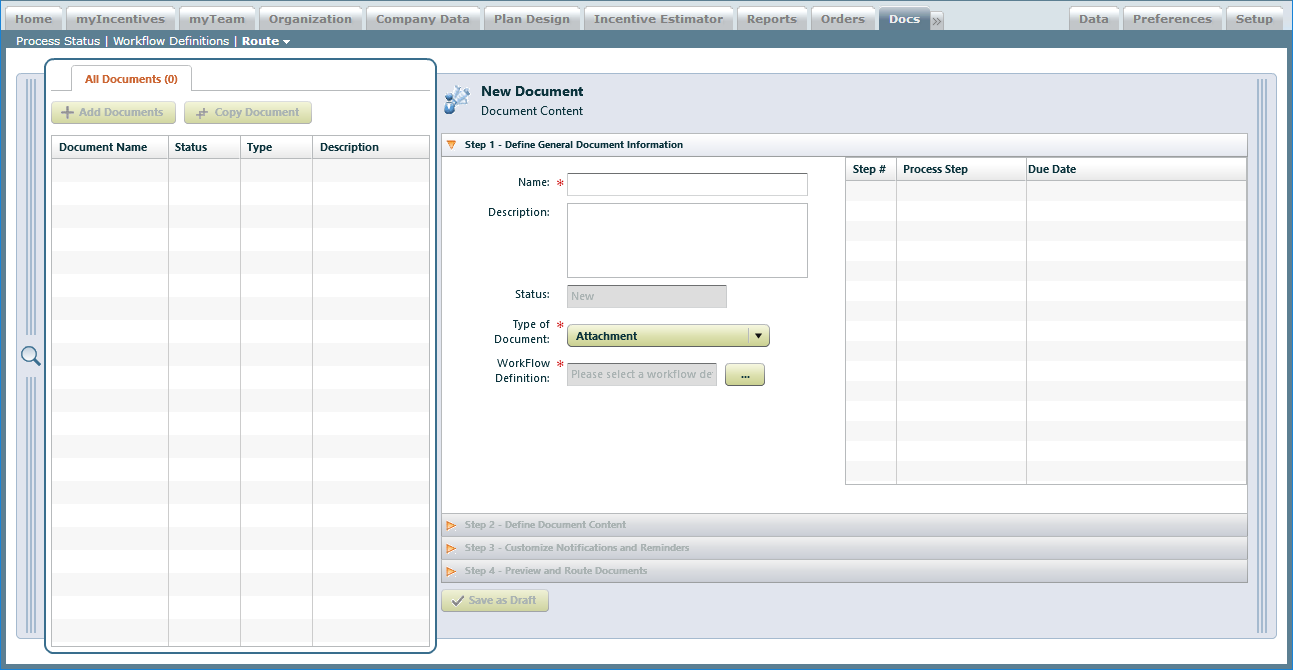
 New Document Panel
3. Type the name of the document (up to 64 characters) in the Name* field.
4. (Optional) Type a description of the document in the Description field.
5. Choose the Type of Document* using the drop-down list.
You can choose from among the following:
• Attachment
• Plan Document
• Certification Letter
• Payment File (Hierarchy)
• Payment File (Business Group)
• Quota File
• User Initiated
6. Choose the Workflow Definition* to associate with the document using the dropdown list.
The workflow definition appears on the right side of the Document Content pane.
7. Choose the due date for workflow steps that require it by clicking the button
and choosing a date using the pop-up calendar.
8. Click the ![]() button. The Step 2: Define Document Content tab
button. The Step 2: Define Document Content tab
automatically opens.
9. Define the document content.
For attachments, do the following:
• Click the![]() button to upload an attachment.
button to upload an attachment.
The upload dialog appears. Click the Browse button, select a file, and click the Submit button. Note that you can upload the following types of attachments:
PDF, CSV, TXT, ZIP, Excel, Word, and PowerPoint format files. The system scans
the uploaded files for viruses, and performs MIME validation. Documents are limited to 1MB.
Click the ![]() button to view the uploaded attachment.
button to view the uploaded attachment.
• To display attachment information, hover over the ![]() button (for one second).
button (for one second).
• To download an attachment, click the ![]() button. A dialog appears allowing you to specify the download location.
button. A dialog appears allowing you to specify the download location.
• To delete an attachment, click the ![]() button. Enter a reason for deleting the attachment in the Delete Attachment dialog that appears, and click OK.
button. Enter a reason for deleting the attachment in the Delete Attachment dialog that appears, and click OK.
For plan documents and certification letters, do the following:
a. Click the ![]() button to select a plan document or certification letter. A dialog
button to select a plan document or certification letter. A dialog
appears showing all available plan documents or certification letters.
b. (Optional) Type a plan document or certification letter name in the Find Plan
Template field and click the OK button to display matching documents.
c. Select a plan document or certification letter from the list and click the ![]()
button. The Plan Document/Certification Letter Name, Plan/Title
Name, and Description fields are automatically populated, as appropriate.
For payment files (hierarchy), do the following:
a. Click the![]() button to select a period in the Period Name* field. A dialog
button to select a period in the Period Name* field. A dialog
appears showing all periods.
b. (Optional) Click the![]() button to select a template in the Template Name
button to select a template in the Template Name
field. A dialog appears showing all templates.
c. Choose a setting for the Payment Detail* field. You can choose from among
the following:
• Direct Reports Only—Displays detailed payment information only for direct reports of the document owner
• Direct Reports and Subordinates—Displays detailed payment information for direct reports of the document owner, and subordinates of the direct reports
• Document Owner Only—Displays detailed payment information for the
document owner only
d. Choose a format in the Download Format* field. You can choose either CSV or TEXT.
e. Choose either Yes or No in the Aggregation* field. Note that this field is read-only
if you chose a custom template earlier.
For payment files (business group), do the following:
a. Click the button to select a period in the Period Name* field. A dialog appears showing all periods.
b. (Optional) Click the button to select a template in the Template Name field. A dialog appears showing all templates.
c. Choose a group for the Business Group* field. The payment file contains payment information for all members of the selected business group.
d. Choose a format in the Download Format* field. You can choose either CSV or TEXT.
e. Choose either Yes or No in the Aggregation* field. Note that this field is read-only if you chose a custom template earlier.
For quota files, do the following:
a. Click the button to select a period in the Quota Period* field. A dialog
appears showing all periods.
b. Choose the level of detail for the quota file data using the Quota Detail* field.
You can choose from among the following options:
• Direct Reports Only—Displays quota information only for direct reports of
the document owner
• Direct Reports and Subordinates—Displays quota information for direct
reports of the document owner, and subordinates of the direct reports
• Document Owner Only—Displays quota information for the document
owner only
c. Choose a format in the Download Format* field. You can choose either CSV or
TEXT.
d. (Optional) Select the Show person content checkbox to specify whether the
output file should contain person content.
For user initiated workflows, choose the format of the document content in the
Format field (either Message or Entry Form). Choosing Entry Form enables sales
representatives to enter order adjustments directly using a forms-based user interface.
10. Click the Step 3: Customize Notifications and Reminders tab to open the corresponding pane.
You can customize the approver notification, workflow responses, and workflow
reminders. You can also add variables to the templates to include dynamic content
in the notifications.
a. Click the![]() button, and choose from among the following options in the menu:
button, and choose from among the following options in the menu:
• Approver Notification—Customize the template that should be sent to
users who need to approve the document.
• Reviewer Notification—Customize the template that should be sent to
users who need to review the document.
• Recall Notification—Customize the recall notification.
b. Click the![]() button, and Decline Response in the menu.
button, and Decline Response in the menu.
Customize the template that should be sent to users.
c. Click the![]() button, and choose from among the following options in the menu:
button, and choose from among the following options in the menu:
• Reminder Notification—Customize the template that should be sent to
users as a reminder.
• Reminder Schedule—Select either “One week before due date” or “One
day before due date.”
11. Click the Step 4: Preview and Route Documents tab to open the corresponding
pane.
a. Choose the organization hierarchy date using the ![]() icon.
icon.
b. Click the![]() button. The Process Preview dialog appears.
button. The Process Preview dialog appears.
c. Click Find Document Owner, select the person from the list. and click the![]()
button.
Verify that the workflow process is as expected. You can drag and drop steps
to reorder the workflow process, as required.
d. Select the document owners to which you need to route the document.
You can specify all people of a specific title, or click the ![]() button to
button to
select specific people.
e. Click the ![]() button to start the document workflow by sending a
button to start the document workflow by sending a
notification to the first user. Click to confirm the dialog that appears.
note: Notifications sent as part of the document workflow indicate the document
initiator as the sender (not the business administrator or the email address specified in
the SUPPORT_EMAIL preference).
Edit an Existing Document
You can modify an existing document that has a status of Draft.
1. Select an existing document from the list. The Document Content pane opens to
the right.
2. Click the Step 1: Define General Document Information tab and edit the available
fields, as required.
3. Click the Step 2: Define Document Content tab and replace the specified document,
as appropriate.
4. Click the Step 3: Customize Notifications and Reminder tab and edit the available
templates, as required.
5. Click the Step 4: Preview and Route Documents tab and verify that the workflow
process is as expected. You can drag and drop steps to reorder the workflow process,
as required.
6. Click the ![]() button to update the document.
button to update the document.
7. Click the ![]() button to start the document workflow by sending a notification
button to start the document workflow by sending a notification
to the first user. Click to confirm the dialog that appears.
Delete a Document
You can delete an existing document that has a status of Draft.
1. Select a document from the list. The Document Content pane opens to the right.
2. Click the ![]() button, and choose Delete from the drop-down menu.
button, and choose Delete from the drop-down menu.
A confirmation dialog appears.
3. Click Yes to confirm the deletion; click the No button to cancel the action.
Create a Document by Copying an Existing Document
You can create a new document by copying an existing document.
1. Select an existing document from the list. The Document Content pane opens to
the right.
2. Click the![]() button to copy the document.
button to copy the document.
3. Type the name of the document in the Name* field.
4. (Optional) Type a description of the document in the Description field.
5. Modify the document configuration, as required.
6. Click the ![]() button.
button.
