Track Documents
You can use the Track Documents area to view and manage routed documents. You can also use the Track Documents area to display details about all documents or only those documents for which you have an associated action item.
The page further offers an advanced search capability, making it easy to find documents based on person, position, and document attributes, and then save those searches for later use.
Screen
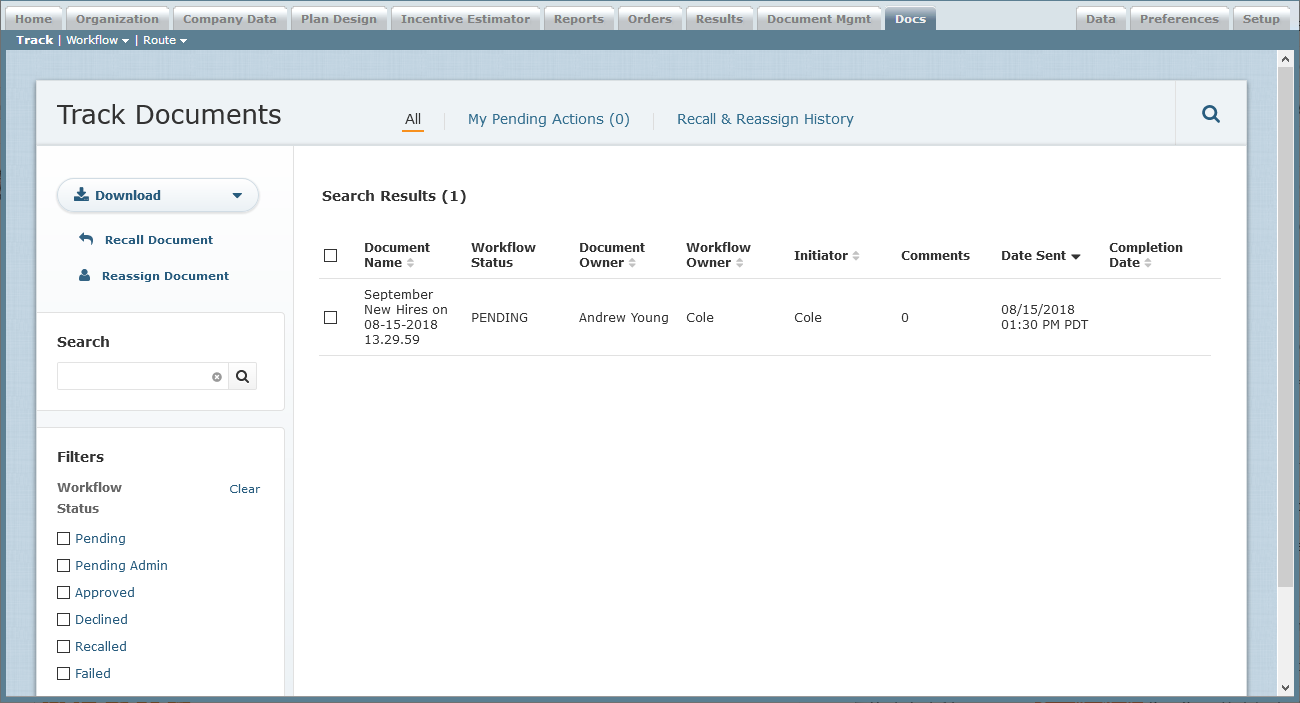 Track Documents Screen
All Columns
The following table describes the information displayed for all documents:
| Column | Description |
|---|---|
| Document Name | The name of the document. |
| Workflow Status | The status of the document. |
| Document Owner | The person (within Incent) that is the subject of the document being routed. |
| Workflow Owner | The owner of the workflow. |
| Initiator | The user that started the workflow. |
| Comments | The number of comments associated with the document. |
| Date Sent | The date on which the document was sent. |
| Completion Date | The date on which the workflow was completed. |
The following table describes the information displayed for pending actions:
| Column | Description |
|---|---|
| Document Name | The name of the document. |
| My Status | The status of the document. |
| Document Owner | The person (within Incent) that is the subject of the document being routed. |
| Workflow Owner | The owner of the workflow. |
| Initiator | The user that started the workflow. |
| Comments | The number of comments associated with the document. |
| Due Date | The due date for the action item. |
| Date Sent | The date on which the action was received. |
The following table describes the information displayed for the recall and reassign history:
| Column | Description |
|---|---|
| Action Type | The action taken, either Recall or Reassign. |
| Action Status | The status of the action. |
| Taken By | The person who initiated the recall or reassign action. |
| Date | The date and time when the action was taken. |
| Successes | The number of recall or reassign actions that was successfully completed. |
| Errors | The number of errors resulting from the recall or reassign actions. |
How to…
This section describes how to track documents.
Display All Documents
1. Click the Docs tab. The Track Documents screen appears.
2. To find specific documents, type part of the name in the Search text box, and click the ![]() button. The search results appear.
button. The search results appear.
Click the ![]() button to clear the Search text box and reset the search results.
button to clear the Search text box and reset the search results.
3. To filter the documents, select the appropriate check boxes in the Filters section. To reset the filter, click the Clear button.
4. To display details about a document, click a document in the list.
Click the Track Status tab to show the tracked status of the document.
5. To display document information on a single page, hover over a document in the list and click the View button that appears. The document information appears.
Click the ![]() button to download the plan document as a PDF file.
button to download the plan document as a PDF file.
Click the ![]() button to return to the list of documents.
button to return to the list of documents.
Display My Pending Actions
1. Click the Docs tab. The Track Documents screen appears.
2. Click the My Pending Actions link. The My Pending Actions screen appears.
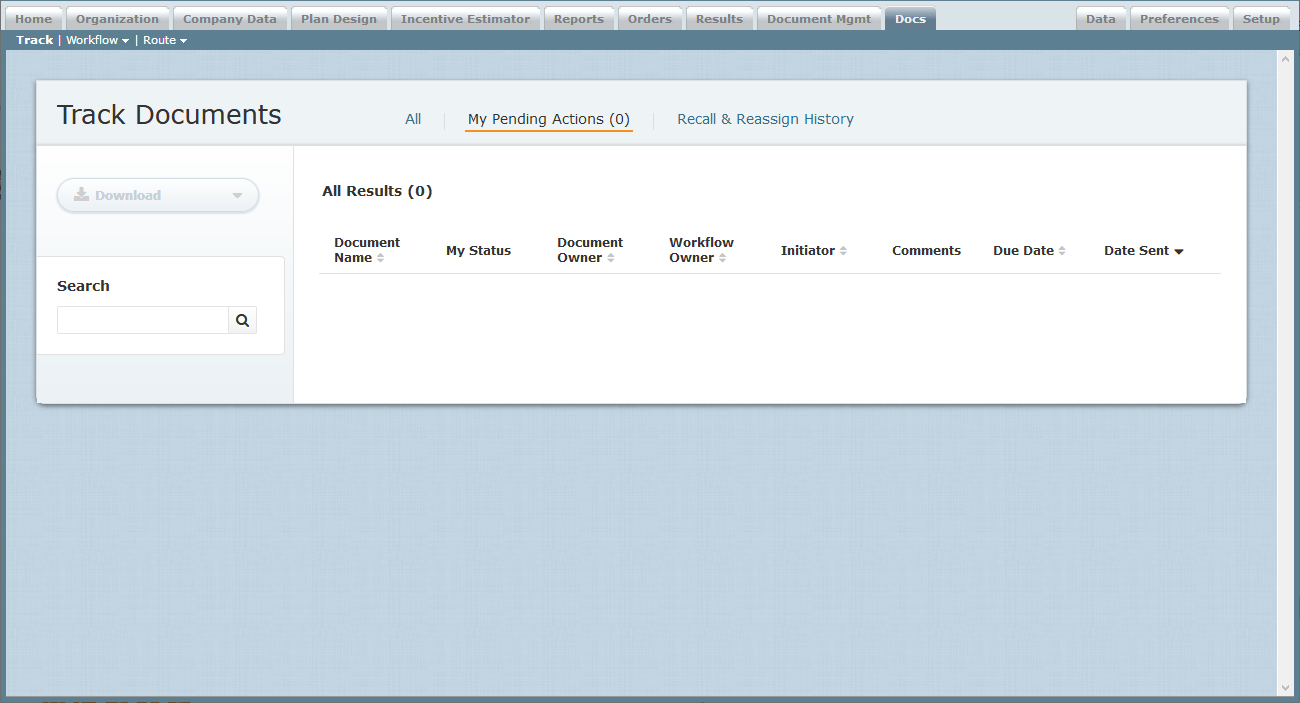 My Pending Actions Screen
2. To find specific documents, type part of the name in the Search text box, and click the ![]() button. The search results appear.
button. The search results appear.
Click the ![]() button to clear the Search text box and reset the search results.
button to clear the Search text box and reset the search results.
3. To display details about a document, click a document in the list.
Click the Track Status tab to show the tracked status of the document.
4. To display document information on a single page, hover over a document in the list and click the View button that appears. The document information appears.
Click the ![]() button to return to the list of documents.
button to return to the list of documents.
Recall or Reassign Documents
You can recall multiple documents or reassign the workflow owner of one or more documents.
1. Click the Docs tab. The Track Documents screen appears.
2. To recall one or more documents, do the following:
• To recall a single document, hover over the document in the list and click the Recall button that appears.
• To recall multiple documents, select the documents in the list, click the ![]() button, and choose Selected Pending Results from the menu that appears.
button, and choose Selected Pending Results from the menu that appears.
• To recall all pending documents, click the ![]() button and choose All Pending Results from the menu that appears.
button and choose All Pending Results from the menu that appears.
The Recall Document dialog appears. Do the following:
a. In the Comments field, type a comment related to the document recall.
b. Click the ![]() button.
button.
3. To reassign one or more documents, do the following:
• To reassign a single document, hover over the document in the list and click the Reassign button that appears.
• To reassign multiple documents, select the documents in the list, click the ![]() button, and choose Selected Pending Results from the menu that appears.
button, and choose Selected Pending Results from the menu that appears.
• To reassign all pending documents, click the ![]() button and choose All Pending Results from the menu that appears.
button and choose All Pending Results from the menu that appears.
The Reassign Document dialog appears. Do the following:
a. In the New Workflow Owner field, choose the person to which the document is to be assigned.
b. Click the ![]() button.
button.
4. Click the Recall & Reassign History link to display all recalled and reassigned documents. The Recall & Reassign History screen appears.
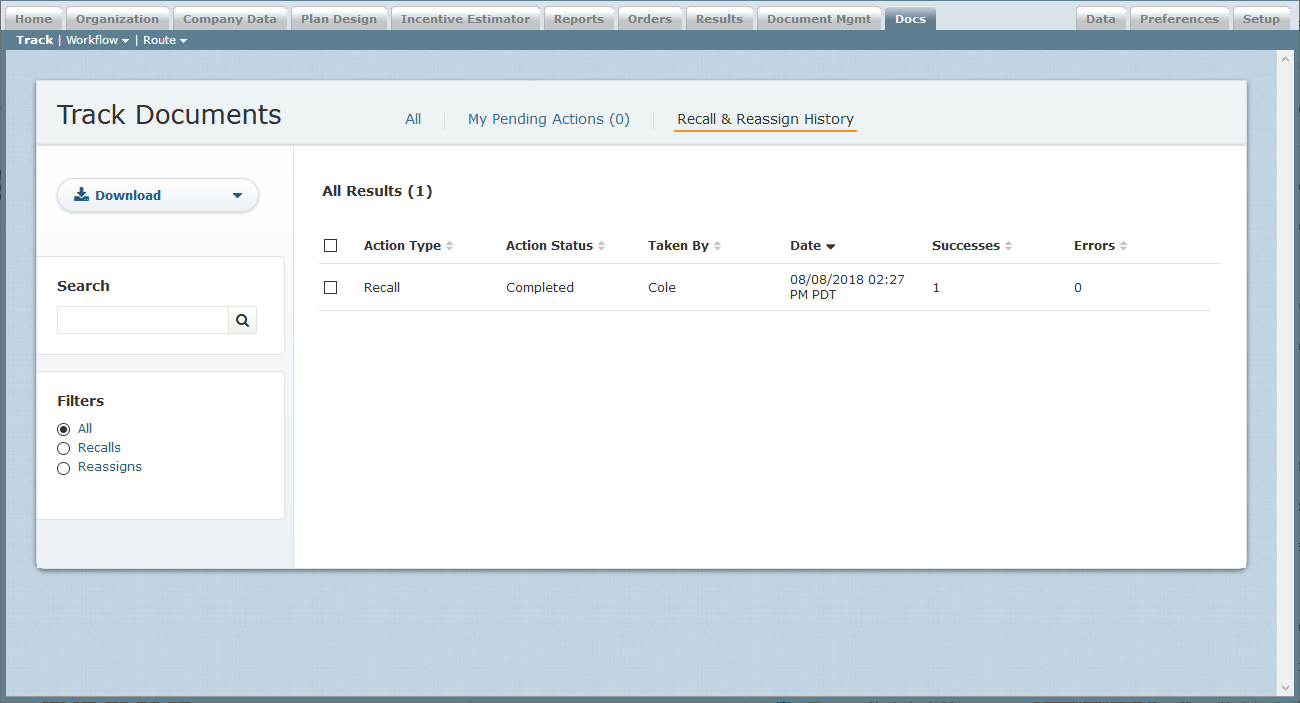 Recall & Reassign History Screen
Do the following:
• To display details about a document, click a document in the list.
• To display a status report for a document, hover over a document in the list and click the View button that appears.
To download recall and reassign history information, do the following:
• To download multiple histories, select the results in the list, click the ![]() button, and choose Selected Results from the menu that appears.
button, and choose Selected Results from the menu that appears.
• To download all histories, click the ![]() button and choose All Results from the menu that appears.
button and choose All Results from the menu that appears.
A dialog appears allowing you to save the file to your local machine.
Download Document Status or Comments
1. Click the Docs tab. The Track Documents screen appears.
2. (Optional) Search for the corresponding documents, as needed.
You can use a saved search, as appropriate.
3. Click the ![]() button, and choose the items to download using the drop-down menu that appears.
button, and choose the items to download using the drop-down menu that appears.
Choose from among the following options to download the document status or comments as either a comma-separated value (CSV) or text (TXT) format file:
• Status (CSV)
• Status (TXT)
• Comments (CSV)
• Comments (TXT)
4. Save the file to your local machine using the dialog that appears.
Manage Saved Searches
You can save searches that you need to perform regularly.
1. Click the ![]() button (near the top right of the screen) to show the saved searches menu.
button (near the top right of the screen) to show the saved searches menu.
2. To view your saved searches, click View Saved Searches in the drop-down menu. The Saved Searches dialog appears.
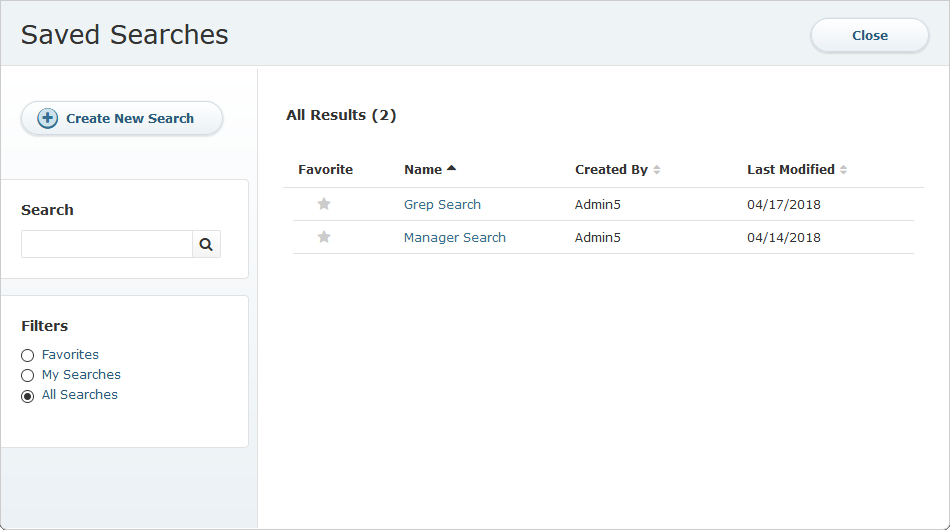 Saved Searches Screen
3. To find specific saved searches, type part of the name in the Search text box, and click the ![]() button. The results appear.
button. The results appear.
Click the ![]() button to clear the Search text box and reset the results.
button to clear the Search text box and reset the results.
4. To filter the saved searches, select the appropriate radio button in the Filters section.
5. To edit a saved search, hover over the search in the list and click the Edit button that appears. The Edit Saved Search screen appears.
Modify the fields, as needed, and click the ![]() button to save and apply (run) the new search. The search results appear.
button to save and apply (run) the new search. The search results appear.
6. To copy a saved search, hover over the search in the list and click the Copy button that appears. The Create Saved Search screen appears.
Type a new name for the saved search and modify the fields, as needed. Click the ![]() button to save and apply (run) the new search. The search results appear.
button to save and apply (run) the new search. The search results appear.
7. To delete a saved search, hover over the search in the list and click the Delete button that appears. A confirmation dialog appears. Click OK to delete the saved search.
8. To run a saved search, click the search in the list. The search results appear.
Create a New Saved Search
1. Click the ![]() button and choose Create New Saved Search in the drop-down menu that appears.
button and choose Create New Saved Search in the drop-down menu that appears.
Alternatively, click the ![]() button when viewing the Saved Searches screen. The Create Saved Search screen appears.
button when viewing the Saved Searches screen. The Create Saved Search screen appears.
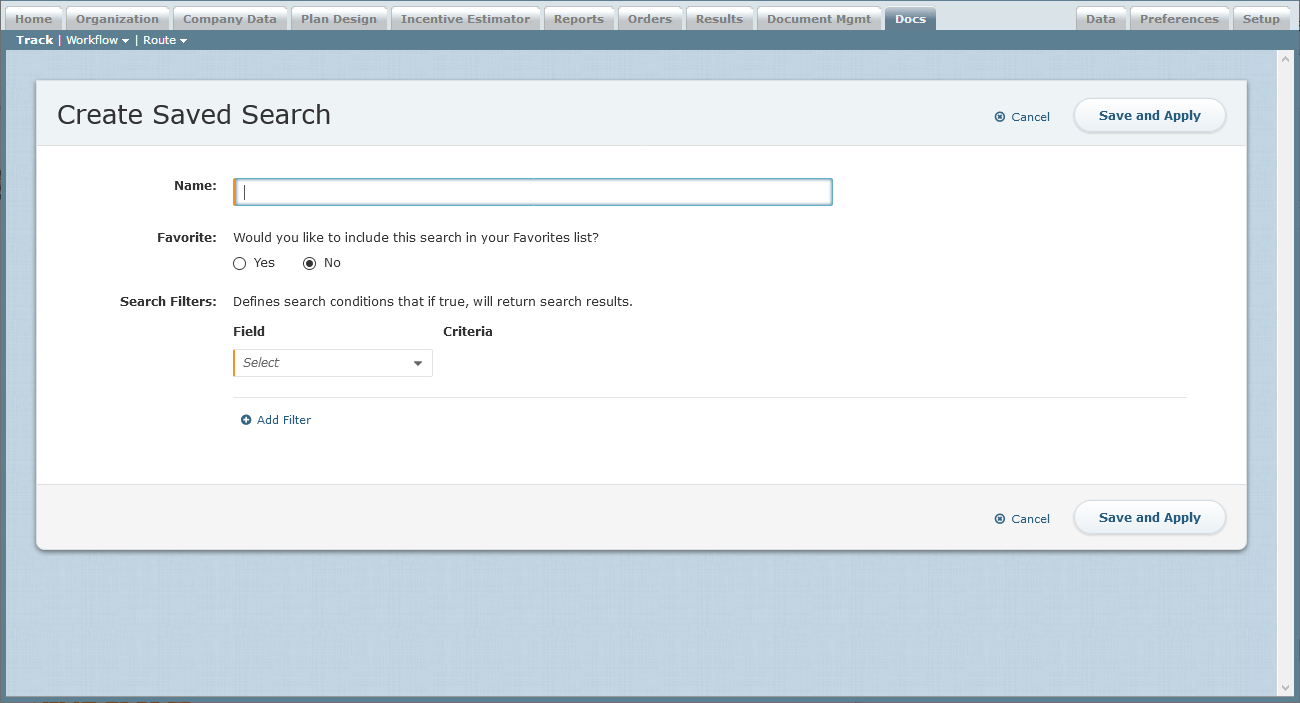 Create Saved Search Screen
2. In the Name field, type the name of the new search.
3. In the Favorite field, select whether to include the search in your Favorites list.
4. In the Search Filters field, specify the conditions for the saved search.
Do the following:
a. Select a field using the drop-down list.
b. Select a criteria using the drop-down list.
c. Type or select a value to complete the search filter definition.
Click the ![]() button to add a new search filter.
button to add a new search filter.
5. Click the ![]() button to save and apply (run) the new search. The search results appear.
button to save and apply (run) the new search. The search results appear.
Run a Recent Saved Search
1. Click the ![]() button (near the top right of the screen) to show the saved searches menu.
button (near the top right of the screen) to show the saved searches menu.
2. Click a search in the Recent Searches section of the drop-down menu. The search results appear.
