Document Management Templates > Personal Content
The Personal Content option allows you to define content at a Person level that will be
added to the Plan Document. Any personal content information that you add will
appear below the Introduction content in the Plan Document.
For example, you might want to include territory descriptions, names accounts lists, or
compensation samples.
note: Personal Content templates are assigned to People within Incent. Business
group administrators can only create Personal Content templates if they are assigned
to business groups that are associated with the latest active version of the corresponding
Person record.
Screen
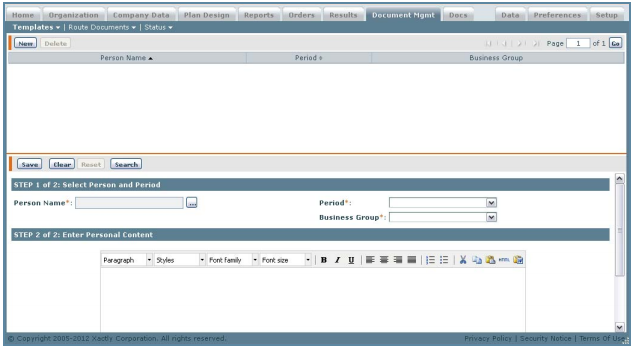
Personal Content Screen
All Fields
The following table describes the information you need to specify when managing
personal content templates:
| Section | Field | Description |
|---|---|---|
| Step 1 | Person Name | The name of the person for whom you are adding personal content. |
| Period | The period for the template. | |
| Business Group | The business group for the template. | |
| Step 2 | Personal Content | The text of the personal content. There is a 500,000 character limit (with formatting) and a 75,000 character limit (without formatting). |
How to…
This section describes how to manage personal content.
Add Personal Content to the Plan Document
1. Click the Document Mgmt tab, then click Templates > Personal Content. The Personal
Content screen appears.
Step 1 of 2: Select Person and Period
2. Click the ![]() button next to the Person Name* field. The Select a Person screen
button next to the Person Name* field. The Select a Person screen
appears.
3. Select a Person and click the OK button. The person’s name appears in the
Person Name* field.
4. Choose a Period* from the drop-down list. This is the period for which the Plan
Document applies.
5. Choose a Business Group* from the drop-down list.
Step 2 of 2: Enter Personal Content
6. Enter the content that you want to appear in the Plan Document. (What you
enter will be displayed after the Introduction content.)
You can use the HTML-based editor when creating and editing the content,
selecting formatting options using a convenient task bar. You can also use the
Paste from Word button to paste richly-formatted content created using
Microsoft Word.
The following table describes the task bar buttons.
| Icon | Description |
|---|---|
| Set the paragraph format. | |
| Set the paragraph style. | |
| Set the font for the selected text. | |
| Set the font size for the selected text. | |
| Bold the selected text. | |
| Set the selected text as italic. | |
| Underline the selected text. | |
| Insert an image at the current location. You can specify the image URL, image description, alignment, dimensions, border, and vertical and horizontal space surrounding the image. |
|
| Left justify the text. | |
| Center justify the text. | |
| Right justify the text. | |
| Full justify the text. | |
| Create a numbered list. | |
| Create a bulleted list. | |
| Cut the selected text. | |
| Copy the selected text. | |
| Past the text in the clipboard. | |
| Paste content copied from Microsoft Word. |
note: Note the following about the HTML editor:
In certain circumstances, content might not display identically in both Mozilla Firefox
and Microsoft Internet Explorer. For example, line spacing might appear differently
in the two browsers. Similarly, font size varies between Firefox and Internet
Explorer, among other differences.
Also, you cannot add HTML code directly using the editor. For example, adding will not save as a table (Internet Explorer does not render table borders correctly). More importantly, do not add
HTML comments as this can impact the production of PDF versions of the document.
In addition, content copied from Microsoft Word and pasted into the text editor
using the Paste from Word button may appear in a slightly different format. Specifically,
the font weight (bold, normal, and so on) may change and tables may
appear in a different format.
Finally, the editor does not support all special characters available in Microsoft
Word (when cutting and pasting). The editor does, however, support all special
characters input directly using the keyboard.
7. Click Save.