Document Management Templates > Plan Document
You can use the Plan Documents area to create and manage plan document templates.
For each template, you can specify and configure the type of information to display including introductory and summary information, along with specific plan details such as quota, commission rate, and bonus information, among others.
You can also define versions of each template to match the business languages active for your organization. Finally, you can assign plan documents to a plan, title, or position.
How Incent Determines the Quotas and Rate Tables to Display
Incent uses the following approach to determine the specific quotas and rate tables to display on a person’s plan document:
- For a quota to appear, the quota must match the year of the plan document template.
- Quotas and rate tables assigned by position appear on plan documents. Specifically, quotas and rate tables assigned by position do not need to be used in commission rules to have them appear on plan documents.
- Quotas and rate tables assigned to a person’s plan through a rate table or highest rate commission rule appear and show the most specific information available,from among the following: position, title, or plan values.
Quotas or rate tables assigned by title, and not associated with a person’s plan through a commission rule, do not appear on plan documents.
Screen
 Plan Document Templates Screen
All Fields
The following table describes:
| Field | Description |
|---|---|
| Name | The name of the plan document template. This name is visible only to administrators. |
| Description | A description of the plan document template. |
| Year | The year for which the plan document template applies. |
| Type | The type of Incent entity to which the plan document is to be assigned, from among the following: • Plan • Title • Position |
| Assignment | The entity to which the plan document is to be assigned. |
| Languages | The language versions for which the plan document is available. |
Customizable Sections
The following table describes the default sections that you can customize when managing plan document templates:
| Section | Description |
|---|---|
| Logo | Your organization’s logo. |
| Plan Summary | A summary of the plan, optionally including information such as the region, manager, title, company, currency, OTE (On Target Earnings), and more. |
| Introduction | An introduction to the plan. |
| Quota | The administrator-selected quotas associated with the plan, together with introductory and concluding text. |
| Commission Rates | The administrator-selected commission rates associated with the plan, together with introductory and concluding text. |
| Bonuses | The bonuses associated with the plan, together with introductory and concluding text. |
| Draws | The draws associated with the plan, together with introductory and concluding text. |
| Sales Club | A short description of the sales club associated with the plan. |
| General Terms and Conditions | A short description of the terms and conditions associated with the plan. |
| Signature | The legal text regarding the signature, along with whether the manager and person, or just the person, needs to approve when routing with Document Management. |
note: You can add (and remove) sections, as required, including text blocks, quotas, commission rates, bonuses, and personal content (content that is specific to a person instead of a plan).
How to…
This section describes how to manage plan document templates.
Display All Plan Document Templates
Click the Document Mgmt tab, then click Templates > Plan Documents in the secondary menu. The Templates screen appears.
- To find specific templates, type part of the name in the SearchTemplates text box, and click the
 button. The search results appear. Click the
 button to clear the SearchTemplates text box and reset the search results.
 - To filter the templates for a specific year, choose the year using the Sales Plan Year drop-down list.
- To filter the templates by type, select the appropriate items using the Type radio buttons and check boxes. The list updates automatically based on your selection.
- To display the plan assignment for a template, click the name of the template and, if necessary, click the Assignment tab.
- To display the summary for a template, click the name of the template and, if necessary, click the Summary tab.
- Use the page navigation buttons to navigate between the pages of plan document template results.
Create a Plan Document Template
1. Click the Document Mgmt tab, then click Templates > Plan Documents in the secondary menu. The Templates screen appears.
2. Click the ![]() button. The Template Builder screen appears.
button. The Template Builder screen appears.
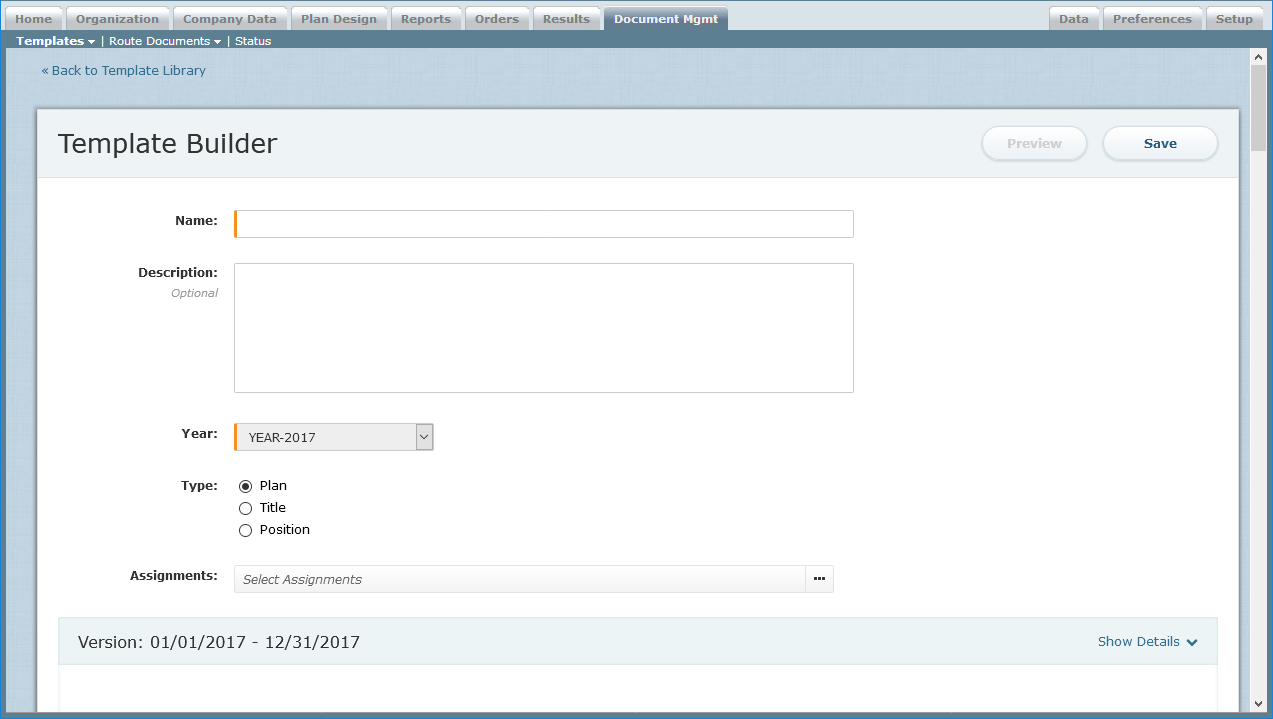 Plan Document Template Builder
Click the << Back to Template Library link to return to the main screen without saving the new template.
3. In the Name field, type a name for the template.
4. (Optional) In the Description field, type a description of the template.
5. In the Year field, choose the year for which the plan document template applies.
6. In the Type field, select the type of Incent entity to which the plan document is to be assigned
You can choose from among the following:
• Plan
• Title
• Position
7. (Optional) In the Assignment field, select the corresponding plans, titles, or positions (matching the type you selected in the previous step).
8. In the Languages field, specify the languages for which you want to define plan document template versions.
Click the Select Languages link to select one or more languages from the list that appears. Tabs appear in the Plan Document section of the page for each language.
Click the ![]() button to remove the corresponding language. Xactly Incent routes plan documents in the language specified for the user in the Setup > Users area (using the Language field of the General Information section).
button to remove the corresponding language. Xactly Incent routes plan documents in the language specified for the user in the Setup > Users area (using the Language field of the General Information section).
note: The Languages field only appears on the Template Builder screen when the TRANSLATION_WORKBENCH preference is enabled (set to Yes in the Setup > Preferences area). The languages that appear in the field are those defined using the BUSINESS_LANGUAGES_ACTIVE preference. By default, English (United States) is always selected and cannot be removed.
9. Select the tab for the plan document language version that you want to customize.
For example, select the English (United States) tab to edit that plan document version.
10. To add a logo to the plan document, hover over the Add Logo icon and click the Add Logo button that appears.
Select the appropriate logo file in the dialog that appears.
note: You can only add a logo to the English (United States) version of a plan document.
11. To add a new section to the template, hover over an existing section and click the ![]() button that appears above or below the section. The Add Section pane appears.
button that appears above or below the section. The Add Section pane appears.
 Add Section
note: You can only add sections to the English (United States) version of a plan document.
In the Select Type field, choose the type of section you want to add. You can choose from among the following sections:
• Text Block—Allows you to add arbitrary text to the template. Note that you do not need to specify a title for a text block. Creating text blocks without a title allows you to add paragraphs of text to a plan document, in a sequence, and then show or hide each paragraph using conditional logic.
• Quota—Adds quota-related information to the template.
• Commission Rates—Adds commission rates-related information to the template.
• Bonuses—Adds bonus-related information to the template.
• Personal Content—Adds applicable personal content, if available. If no personal content is defined, the section is not displayed in the plan document.
• Attach PDF—Allows you to attach a single PDF file to the template. Note that the attached file must be a PDF file (no other format is accepted).
• Pay Curves—Adds pay curve information to the template.
• PDF Footer—Allows you to add a dynamic footer to the plan document PDF view.
note: In cases when a PDF file is attached to the template and the user downloads the plan document as a PDF file, both PDF files are downloaded (packaged together as a ZIP file).
You can also add a section that you previously removed from the template by choosing the appropriate section in the Previously Deleted field. Click the![]() button to dismiss the panel without adding a new section.
button to dismiss the panel without adding a new section.
12. To move a section, hover over the appropriate section, click the ![]() button, and choose an option in the drop-down menu that appears.
button, and choose an option in the drop-down menu that appears.
You can choose from among the following options:
• Move to Top
• Move Up
• Move Down
• Move to Bottom
note: You can only move sections for the English (United States) version of a plan document.
13. To remove a section, hover over the appropriate section and click the ![]() button. A confirmation dialog appears.
button. A confirmation dialog appears.
Click the ![]() button to remove the section from the template. Alternatively, click the
button to remove the section from the template. Alternatively, click the![]() button to dismiss the dialog without removing the section.
button to dismiss the dialog without removing the section.
note: You can only remove sections from the English (United States) version of a plan document.
14. To edit the Plan Summary, hover over the section and click the ![]() button. The Edit Plan Summary Section panel appears.
button. The Edit Plan Summary Section panel appears.
note: For languages other than English (United States), you can only modify the Title field.
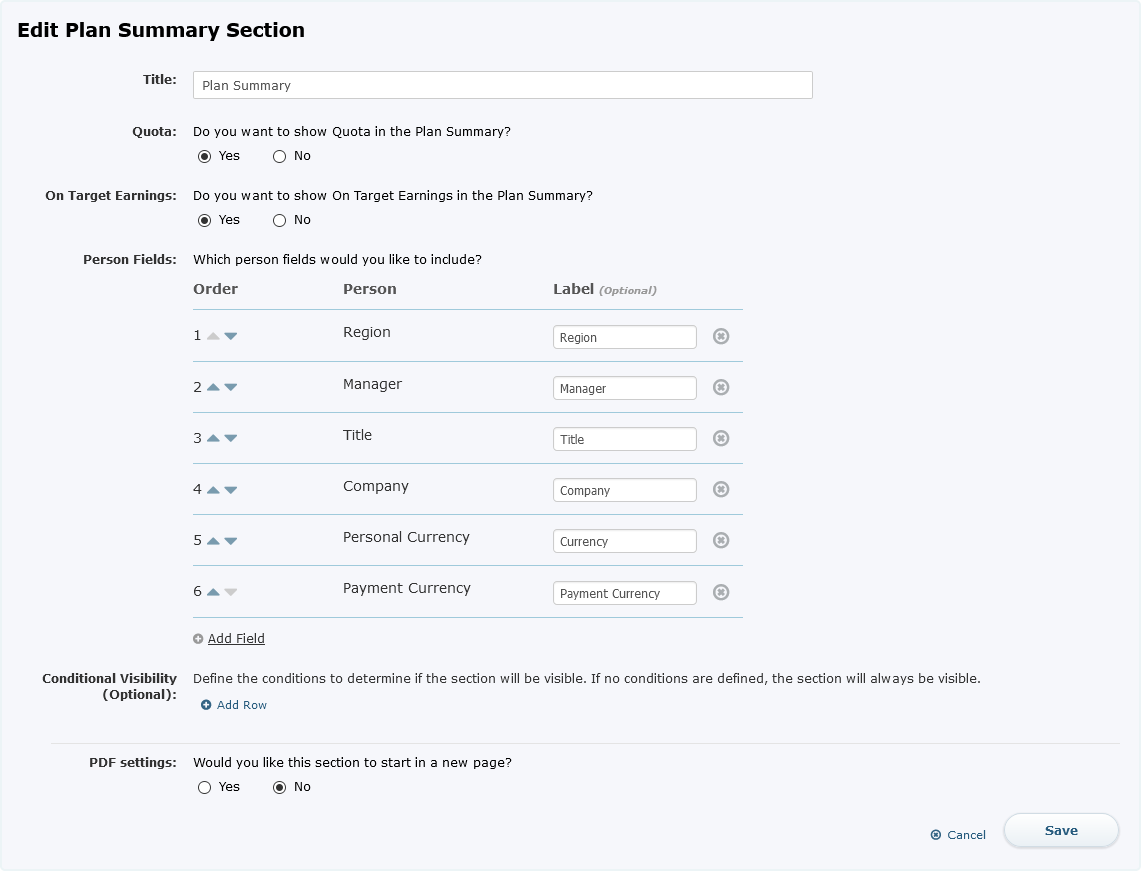 Edit Plan Summary Section
Do the following:
a. (Optional) In the Title field, type a new title for the section.
b. In the Quota field, specify whether you want to display the quota in the Plan Summary section.
c. In the On Target Earnings field, specify whether you want to show on target earnings in the Plan Summary section.
d. In the Person Fields field, specify the personal information to display in the Plan Summary section.
To add a field to the section, click the![]() button. The Select Fields dialog appears. Select the appropriate fields and click the
button. The Select Fields dialog appears. Select the appropriate fields and click the![]() button.
button.
To remove a field from the summary section, click the ![]() button for the corresponding field.
button for the corresponding field.
To change the order in which the fields appear, drag and drop a field to the new position. Alternatively, you can use the arrow buttons to move fields up and down accordingly.
(Optional) To change the label of a field, type the new label in the corresponding text box.
e. (Optional) In the Conditional Visibility field, define the conditions to determine if the section will be visible.
Click the ![]() button and specify the condition parameters. You can add conditions based on the person, position, plan, or workflow. Continue adding conditions, as needed. Note that if you do not define a condition, the section is always visible.
button and specify the condition parameters. You can add conditions based on the person, position, plan, or workflow. Continue adding conditions, as needed. Note that if you do not define a condition, the section is always visible.
f. (Optional) In the PDF settings field, specify whether to have this section start on a new page in the PDF file.
g. Click the ![]() button to save your customizations. Alternatively, click
button to save your customizations. Alternatively, click ![]() the button to dismiss the panel without saving your changes.
the button to dismiss the panel without saving your changes.
15. To edit the Introduction, hover over the section and click the![]() button. The Edit Introduction Section panel appears.
button. The Edit Introduction Section panel appears.
note: For languages other than English (United States), you can only modify the Title and Text fields.
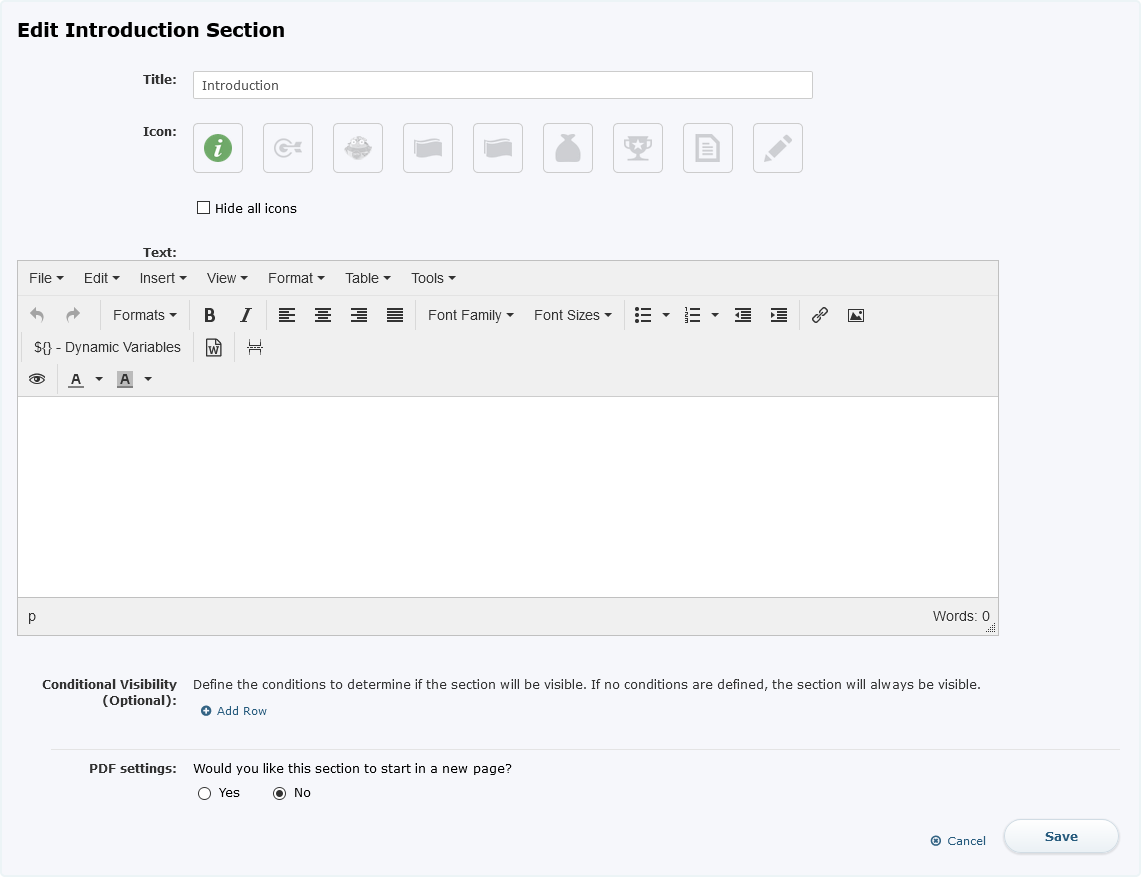 Edit Introduction Section
Do the following:
a. (Optional) In the Title field, type a new title for the section.
b. In the Icon field, select an icon to help identify the section.
Select the Hide all icons checkbox to prevent an icon from displaying with the section.
c. In the Text field, type the text to appear in the Introduction.
You can use the HTML-based editor when creating and editing the content, selecting formatting options using a convenient task bar. Alternatively, you can add text by doing the following:
• Copying and pasting text from an external editor. When pasting text, you can use the Ctrl-V or Cmd-V keys or the ![]() (Paste) button.
(Paste) button.
• Convert the text to HTML, choose Tools > Source code, and paste the HTML into the editor.
note: Content copied or imported from Microsoft Word into the HTML-based editor may appear in a slightly different format. You might consider clearing all formatting before copying or importing and then reapplying the styling in the HTML-based editor.
To add context-sensitive, dynamic variables into the introduction, click the Dynamic Variables button in the task bar. The Insert Dynamic Variable dialog appears. Choose an object type from among the following:
• Pay Curve
• Plan
• Person
• Position
• Rate Table
• Quota
• Quota Relationship
Select a corresponding object attribute using the drop-down list that appears, and click the ![]() button.
button.
When using the editor, be aware of the following:
• Styles in Word that look similar might appear considerably changed in the HTML-based editor.
• Table formatting might appear differently in a web browser compared to a PDF file. Consider using left-alignment for tables and not specifying a value for the height and width.
• Tabs might not be correctly copied and imported from Word to the HTML-based editor. Consider using a browser add-on that supports tabs.
• Numbered lists with text on separate lines in between are not imported correctly.
• Import documents that contain images; copy and paste will not correctly transfer images.
• Headers and footers in Word are not imported or copied.
• Background images (including highlighting) are not imported or copied.
Also note that, in certain circumstances, content might not display identically in Mozilla Firefox, Google Chrome, and Microsoft Internet Explorer. For example, line spacing and font sizes might appear differently in Firefox and Internet Explorer.
d. (Optional) In the Conditional Visibility field, define the conditions to determine if the section will be visible.
Click the ![]() button and specify the condition parameters. You can add conditions based on the person, position, plan, or workflow. Continue adding conditions, as needed. Note that if you do not define a condition, the section is always visible.
button and specify the condition parameters. You can add conditions based on the person, position, plan, or workflow. Continue adding conditions, as needed. Note that if you do not define a condition, the section is always visible.
e. (Optional) In the PDF settings field, specify whether to have this section start on a new page in the PDF file.
f. Click the![]() button to save your customizations. Alternatively, click
button to save your customizations. Alternatively, click ![]() the button to dismiss the panel without saving your changes.
the button to dismiss the panel without saving your changes.
16. To edit the Quota section, hover over the section and click the![]() button. The Edit Quota Section panel appears.
button. The Edit Quota Section panel appears.
note: For languages other than English (United States), you can only modify the Title, Introduction Text, and Additional Text fields
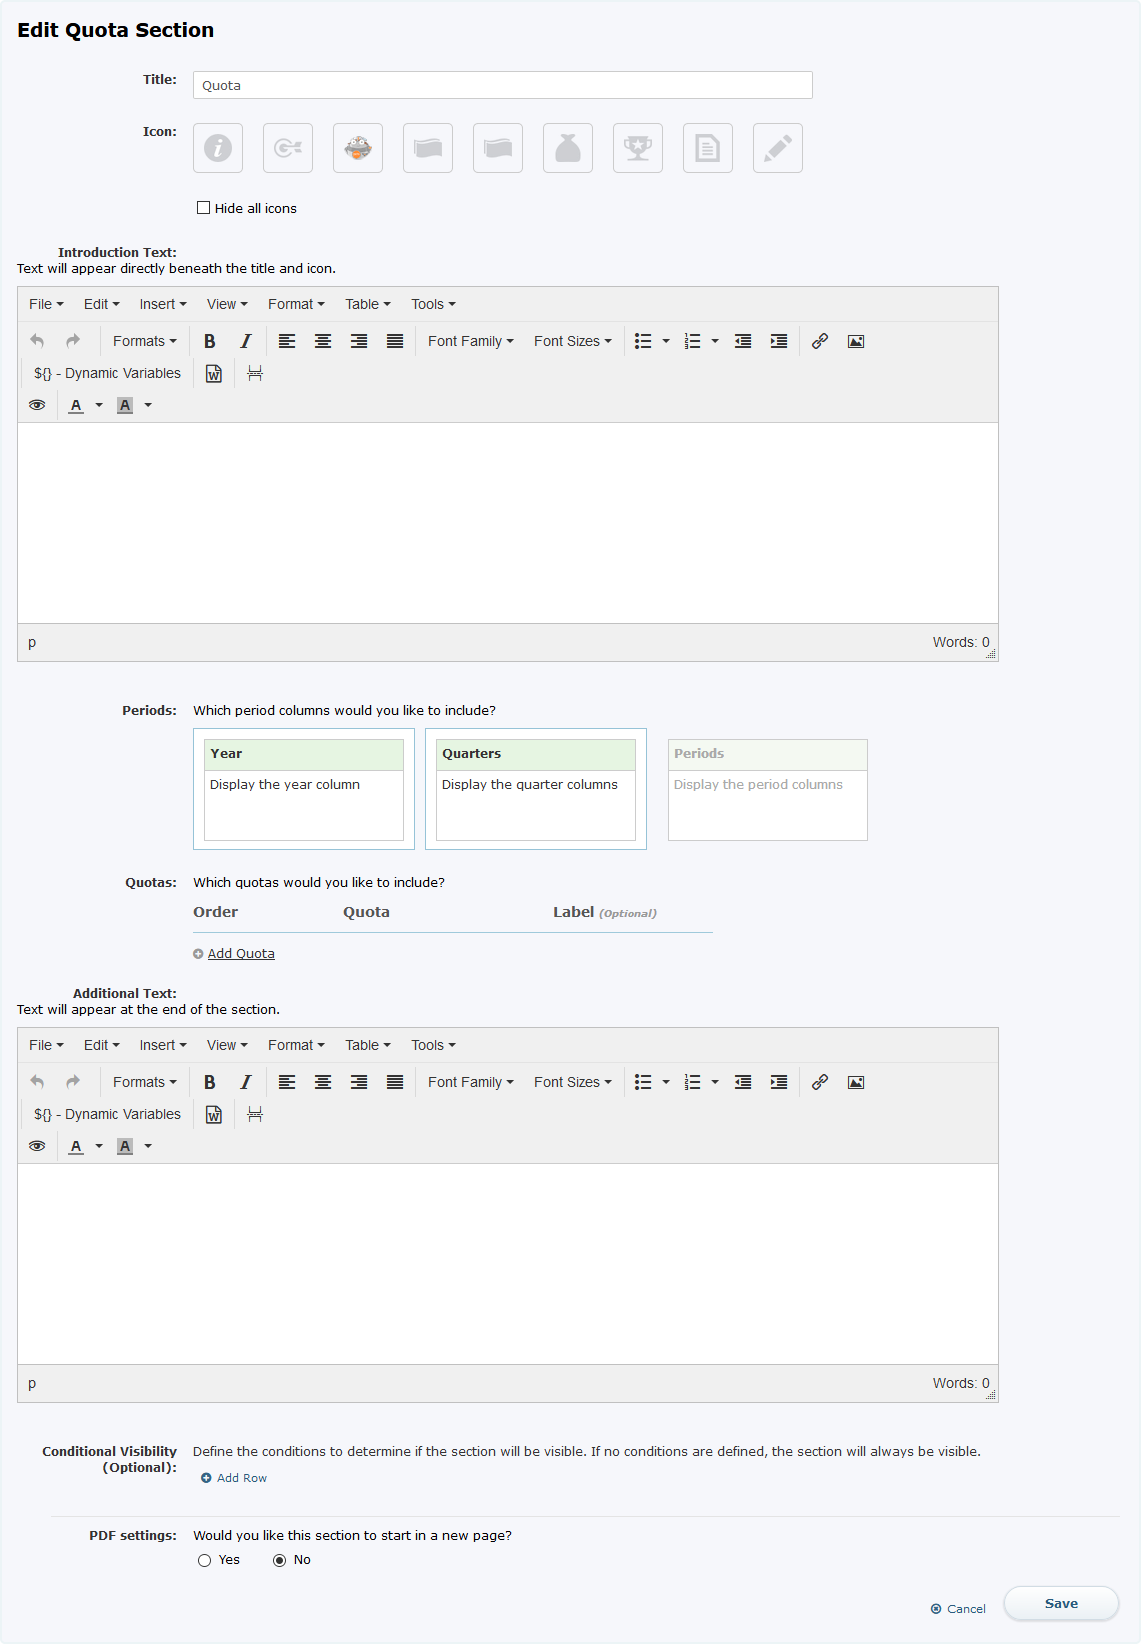 Edit Quota Section
Do the following:
a. (Optional) In the Title field, type a new title for the section.
b. In the Icon field, select an icon to help identify the section.
Select the Hide all icons checkbox to prevent an icon from displaying with the section.
c. (Optional) In the Introduction Text field, type the text to appear directly beneath the title and icon.
d. In the Periods field, select the appropriate icons to display the year, quarter, and period columns.
e. In the Quotas field, specify the quotas that you would like to include.
To add a field to the section, click the ![]() button. The Select Quotas dialog appears. Select the appropriate quotas and click the
button. The Select Quotas dialog appears. Select the appropriate quotas and click the![]() button.
button.
To remove a field from the section, click the ![]() button for the corresponding field.
button for the corresponding field.
To change the order in which the fields appear, drag and drop a field to the new position. Alternatively, you can use the arrow buttons to move fields up and down accordingly.
(Optional) To change the label of a field, type the new label in the corresponding text box.
f. (Optional) In the Additional Text field, type the text to appear directly beneath the quota.
g. (Optional) In the Conditional Visibility field, define the conditions to determine if the section will be visible.
Click the ![]() button and specify the condition parameters. You can add conditions based on the person, position, plan, or workflow. Continue adding conditions, as needed. Note that if you do not define a condition, the section is always visible.
button and specify the condition parameters. You can add conditions based on the person, position, plan, or workflow. Continue adding conditions, as needed. Note that if you do not define a condition, the section is always visible.
h. (Optional) In the PDF settings field, specify whether to have this section start on a new page in the PDF file.
i. Click the ![]() button to save your customizations. Alternatively, click
button to save your customizations. Alternatively, click ![]() the button to dismiss the panel without saving your changes.
the button to dismiss the panel without saving your changes.
17. To edit the Commission Rates section, hover over the section and click the![]() button. The Edit Commission Rates Section panel appears.
button. The Edit Commission Rates Section panel appears.
note: For languages other than English (United States), you can only modify the Title, Introduction Text, and Additional Text fields
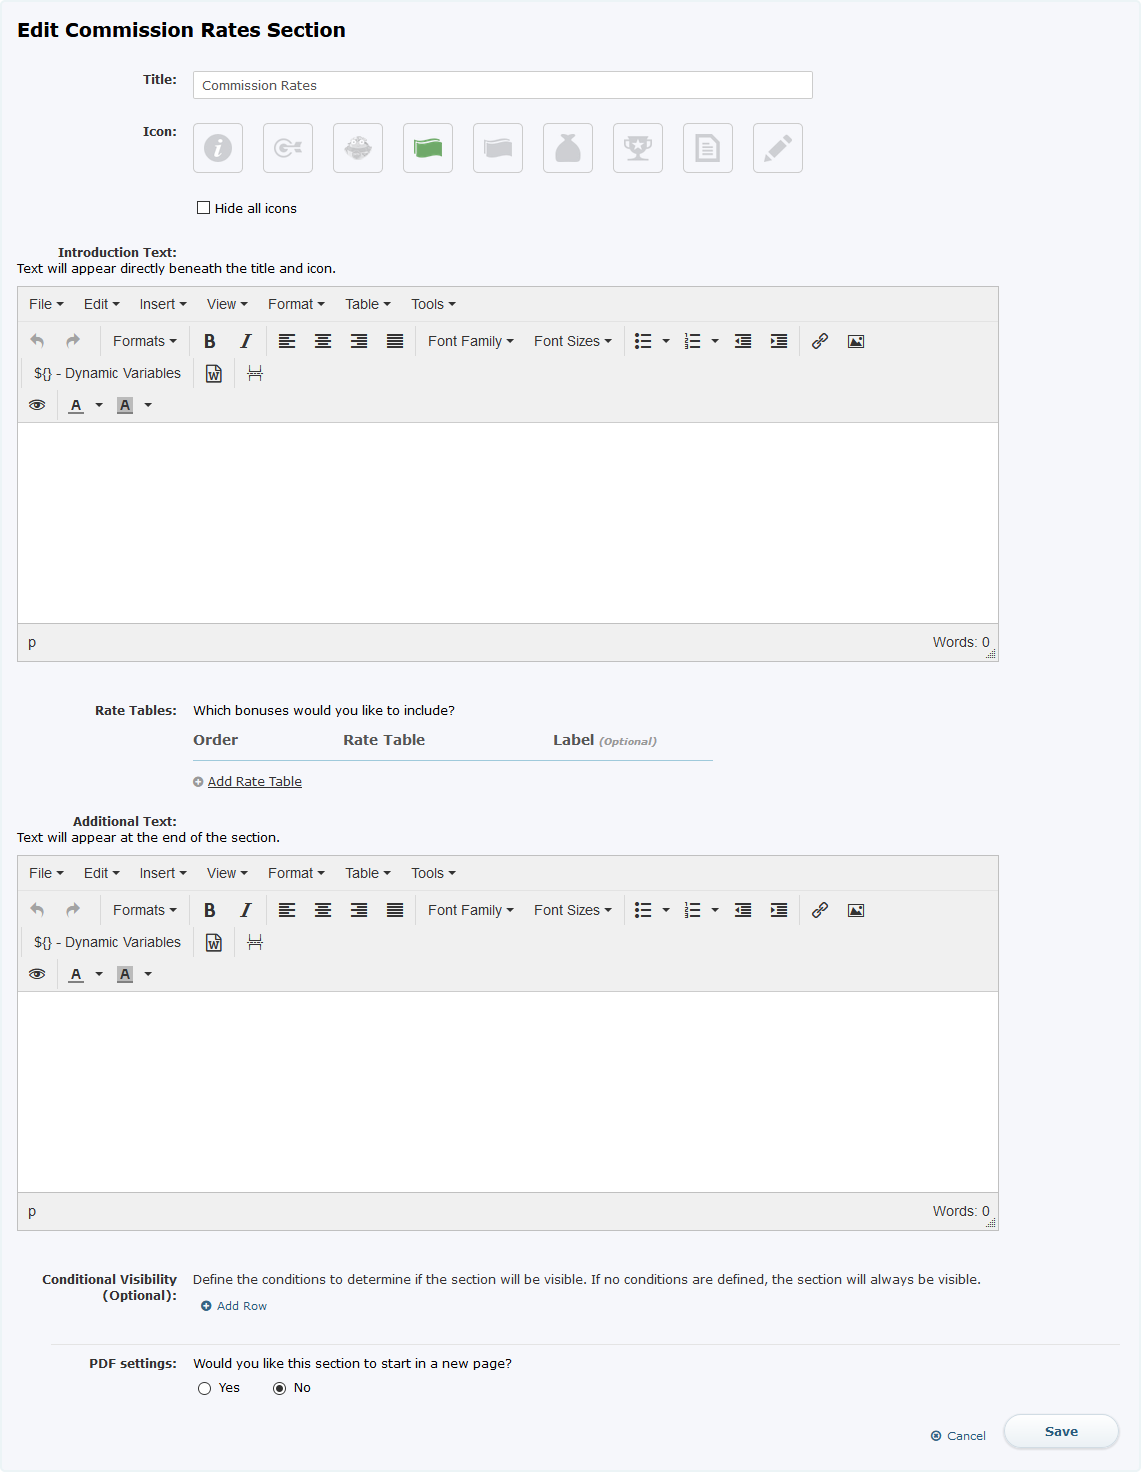 Edit Commission Rates Section
Do the following:
a. (Optional) In the Title field, type a new title for the section.
b. In the Icon field, select an icon to help identify the section.
Select the Hide all icons checkbox to prevent an icon from displaying with the section.
c. (Optional) In the Introduction Text field, type the text to appear directly beneath the title and icon.
d. In the Rate Tables field, specify the rate tables that you would like to include.
To add a rate table to the section, click the ![]() button. The Select Commission dialog appears. Select the appropriate rate tables and click the
button. The Select Commission dialog appears. Select the appropriate rate tables and click the ![]() button.
button.
To remove a rate table from the section, click the ![]() button for the corresponding rate table.
button for the corresponding rate table.
To change the order in which the rate tables appear, drag and drop an entry to the new position. Alternatively, you can use the arrow buttons to move entries up and down accordingly.
(Optional) To change the label of a rate table, type the new label in the corresponding text box.
e. (Optional) In the Additional Text field, type the text to appear directly beneath the rate tables.
f. (Optional) In the Conditional Visibility field, define the conditions to determine if the section will be visible.
Click the ![]() button and specify the condition parameters. You can add conditions based on the person, position, plan, or workflow. Continue adding conditions, as needed. Note that if you do not define a condition, the section is always visible.
button and specify the condition parameters. You can add conditions based on the person, position, plan, or workflow. Continue adding conditions, as needed. Note that if you do not define a condition, the section is always visible.
g. (Optional) In the PDF settings field, specify whether to have this section start on a new page in the PDF file.
h. Click the![]() button to save your customizations. Alternatively, click the
button to save your customizations. Alternatively, click the![]() button to dismiss the panel without saving your changes.
button to dismiss the panel without saving your changes.
18. To edit the Bonuses section, hover over the section and click the![]() button. The Edit Bonuses Section panel appears.
button. The Edit Bonuses Section panel appears.
note: For languages other than English (United States), you can only modify the Title, Introduction Text, and Additional Text fields.
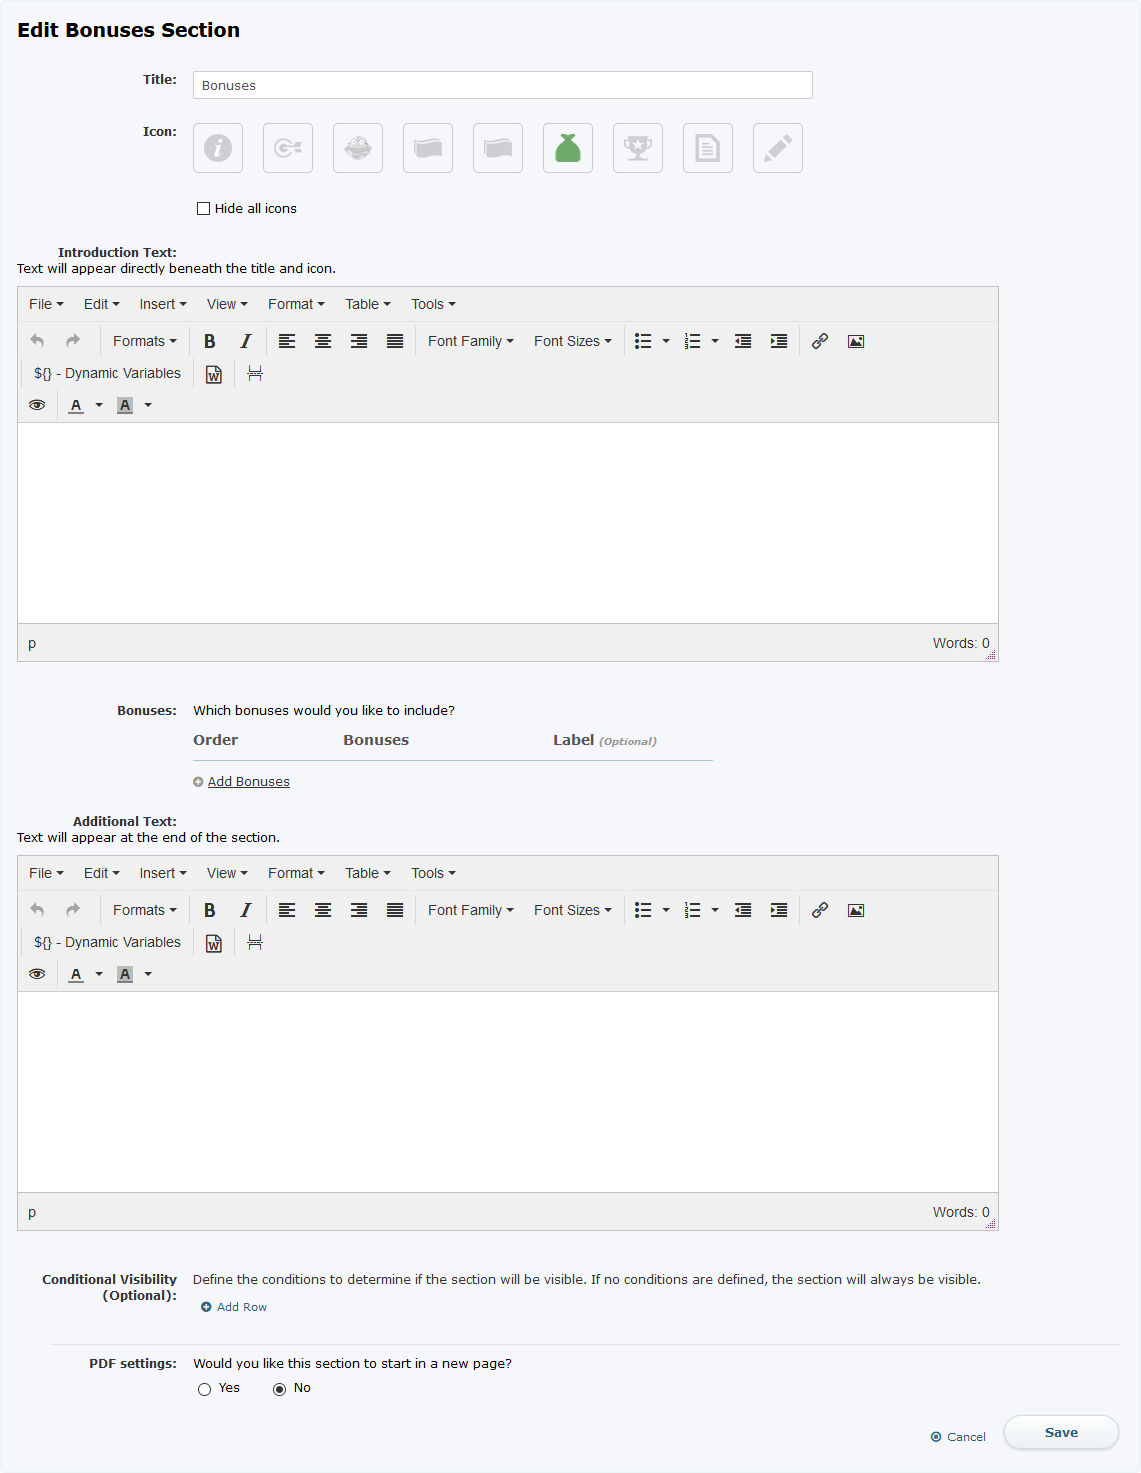 Edit Bonuses Section
Do the following:
a. (Optional) In the Title field, type a new title for the section.
b. In the Icon field, select an icon to help identify the section.
Select the Hide all icons checkbox to prevent an icon from displaying with the section.
c. (Optional) In the Introduction Text field, type the text to appear directly beneath the title and icon.
d. In the Bonuses field, specify the bonuses that you would like to include.
To add a bonus to the section, click the![]() button. The Select Bonus dialog appears. Select the appropriate bonuses and click the
button. The Select Bonus dialog appears. Select the appropriate bonuses and click the![]() button.
button.
To remove a bonus from the section, click the ![]() button for the corresponding bonus.
button for the corresponding bonus.
To change the order in which the bonuses appear, drag and drop an entry to the new position. Alternatively, you can use the arrow buttons to move entries up and down accordingly.
(Optional) To change the label of a bonus, type the new label in the corresponding text box.
e. (Optional) In the Additional Text field, type the text to appear directly beneath the bonuses.
f. (Optional) In the Conditional Visibility field, define the conditions to determine if the section will be visible.
Click the ![]() button and specify the condition parameters. You can add conditions based on the person, position, plan, or workflow. Continue adding conditions, as needed. Note that if you do not define a condition, the section is always visible.
button and specify the condition parameters. You can add conditions based on the person, position, plan, or workflow. Continue adding conditions, as needed. Note that if you do not define a condition, the section is always visible.
g. (Optional) In the PDF settings field, specify whether to have this section start on a new page in the PDF file.
h. Click the![]() button to save your customizations. Alternatively, click the
button to save your customizations. Alternatively, click the ![]() button to dismiss the panel without saving your changes.
button to dismiss the panel without saving your changes.
19. To edit the Draws section, hover over the section and click the![]() button. The Edit Draws Section panel appears.
button. The Edit Draws Section panel appears.
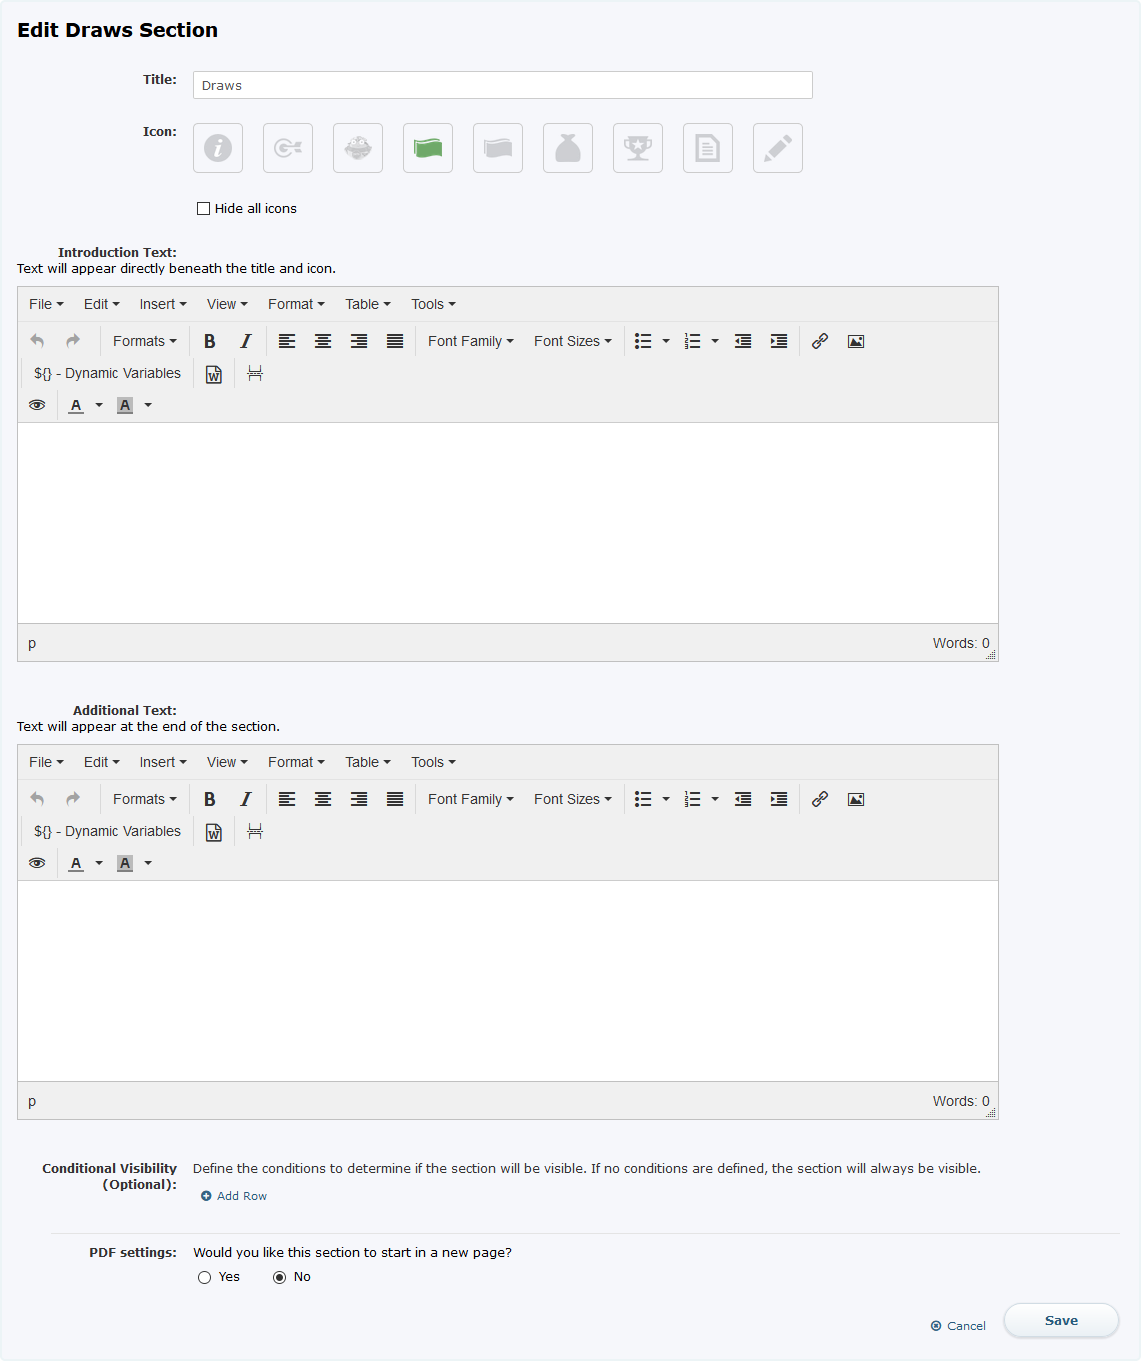 Edit Draws Section
note: For languages other than English (United States), you can only modify the Title, Introduction Text, and Additional Text fields.
Do the following:
a. (Optional) In the Title field, type a new title for the section.
b. In the Icon field, select an icon to help identify the section.
Select the Hide all icons checkbox to prevent an icon from displaying with the section.
c. (Optional) In the Introduction Text field, type the text to appear directly beneath the title and icon.
d. (Optional) In the Additional Text field, type the text to appear directly beneath the draws.
e. (Optional) In the Conditional Visibility field, define the conditions to determine if the section will be visible.
Click the ![]() button and specify the condition parameters. You can add conditions based on the person, position, plan, or workflow. Continue adding conditions, as needed. Note that if you do not define a condition, the section is always visible.
button and specify the condition parameters. You can add conditions based on the person, position, plan, or workflow. Continue adding conditions, as needed. Note that if you do not define a condition, the section is always visible.
f. (Optional) In the PDF settings field, specify whether to have this section start on a new page in the PDF file.
g. Click the![]() button to save your customizations. Alternatively, click the
button to save your customizations. Alternatively, click the![]() button to dismiss the panel without saving your changes.
button to dismiss the panel without saving your changes.
20. To edit the Pay Curves section, add the section and then hover over the newly-added section and click the![]() button. The Edit Pay Curves Section panel appears.
button. The Edit Pay Curves Section panel appears.
note: For languages other than English (United States), you can only modify the Title, Introduction Text, and Additional Text fields
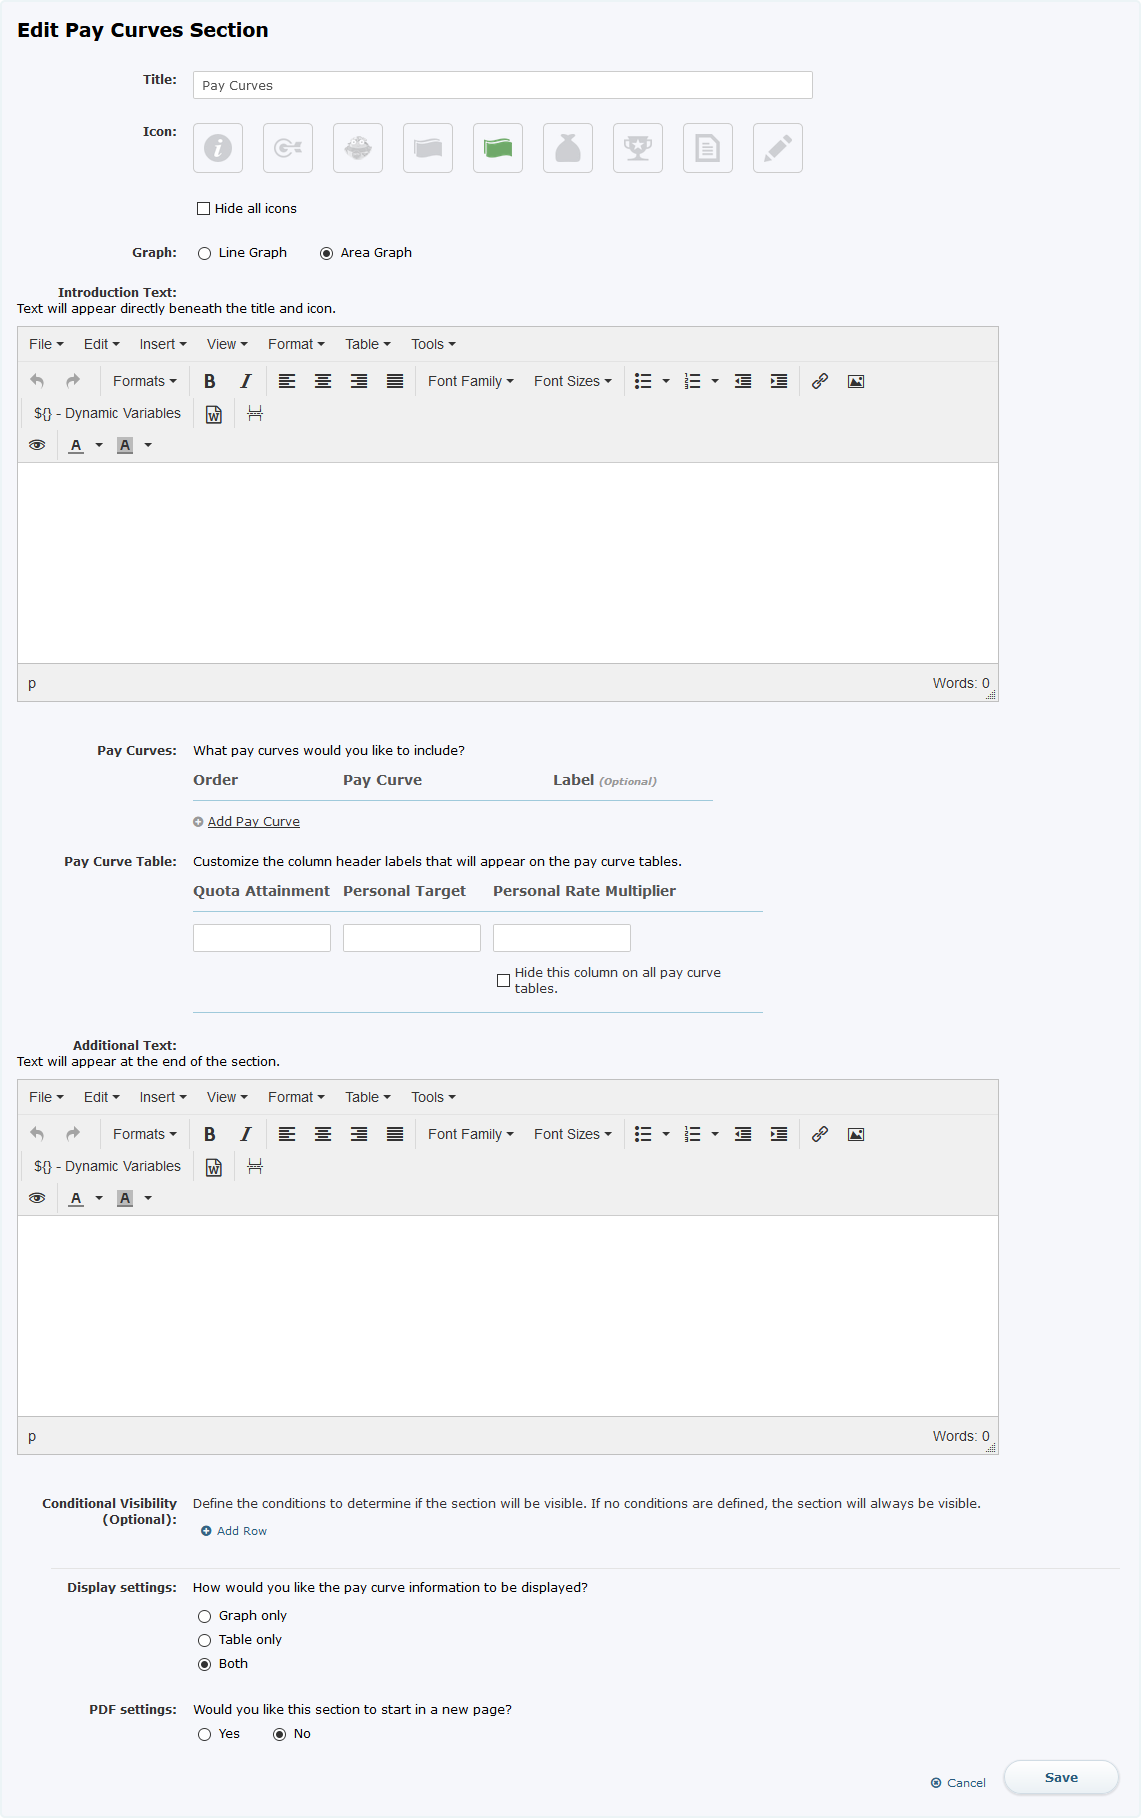 Edit Pay Curves Section
Do the following:
a. (Optional) In the Title field, type a new title for the section.
b. In the Icon field, select an icon to help identify the section.
Select the Hide all icons checkbox to prevent an icon from displaying with the section.
c. (Optional) In the Introduction Text field, type the text to appear directly beneath the title and icon.
d. In the Pay Curves field, specify the pay curves that you would like to include.
To add a field to the section, click the ![]() button. The Select Pay Curve dialog appears. Select the appropriate pay curves and click the
button. The Select Pay Curve dialog appears. Select the appropriate pay curves and click the ![]() button.
button.
To remove a field from the section, click the ![]() button for the corresponding field.
button for the corresponding field.
To change the order in which the fields appear, drag and drop a field to the new position. Alternatively, you can use the arrow buttons to move fields up and down accordingly.
(Optional) To change the label of a field, type the new label in the corresponding text box.
e. In the Pay Curve Table field, customize the column header labels that will appear on the pay curve tables.
You can customize the headers for quota attainment, person target, and personal rate multiplier. You can also choose to hide the personal rate multiplier column on all pay curve tables.
f. (Optional) In the Additional Text field, type the text to appear directly beneath the pay curve.
g. (Optional) In the Conditional Visibility field, define the conditions to determine if the section will be visible.
Click the ![]() button and specify the condition parameters. You can add conditions based on the person, position, plan, or workflow. Continue adding conditions, as needed. Note that if you do not define a condition, the section is always visible.
button and specify the condition parameters. You can add conditions based on the person, position, plan, or workflow. Continue adding conditions, as needed. Note that if you do not define a condition, the section is always visible.
h. (Optional) In the PDF settings field, specify whether to have this section start on a new page in the PDF file.
i. Click the ![]() button to save your customizations. Alternatively, click
button to save your customizations. Alternatively, click ![]() the button to dismiss the panel without saving your changes.
the button to dismiss the panel without saving your changes.
21. To edit the Quota Relationships section, add the section and then hover over the newly-added section and click the![]() button. The Edit Quota Relationships Section panel appears.
button. The Edit Quota Relationships Section panel appears.
note: For languages other than English (United States), you can only modify the Title, Introduction Text, and Additional Text fields
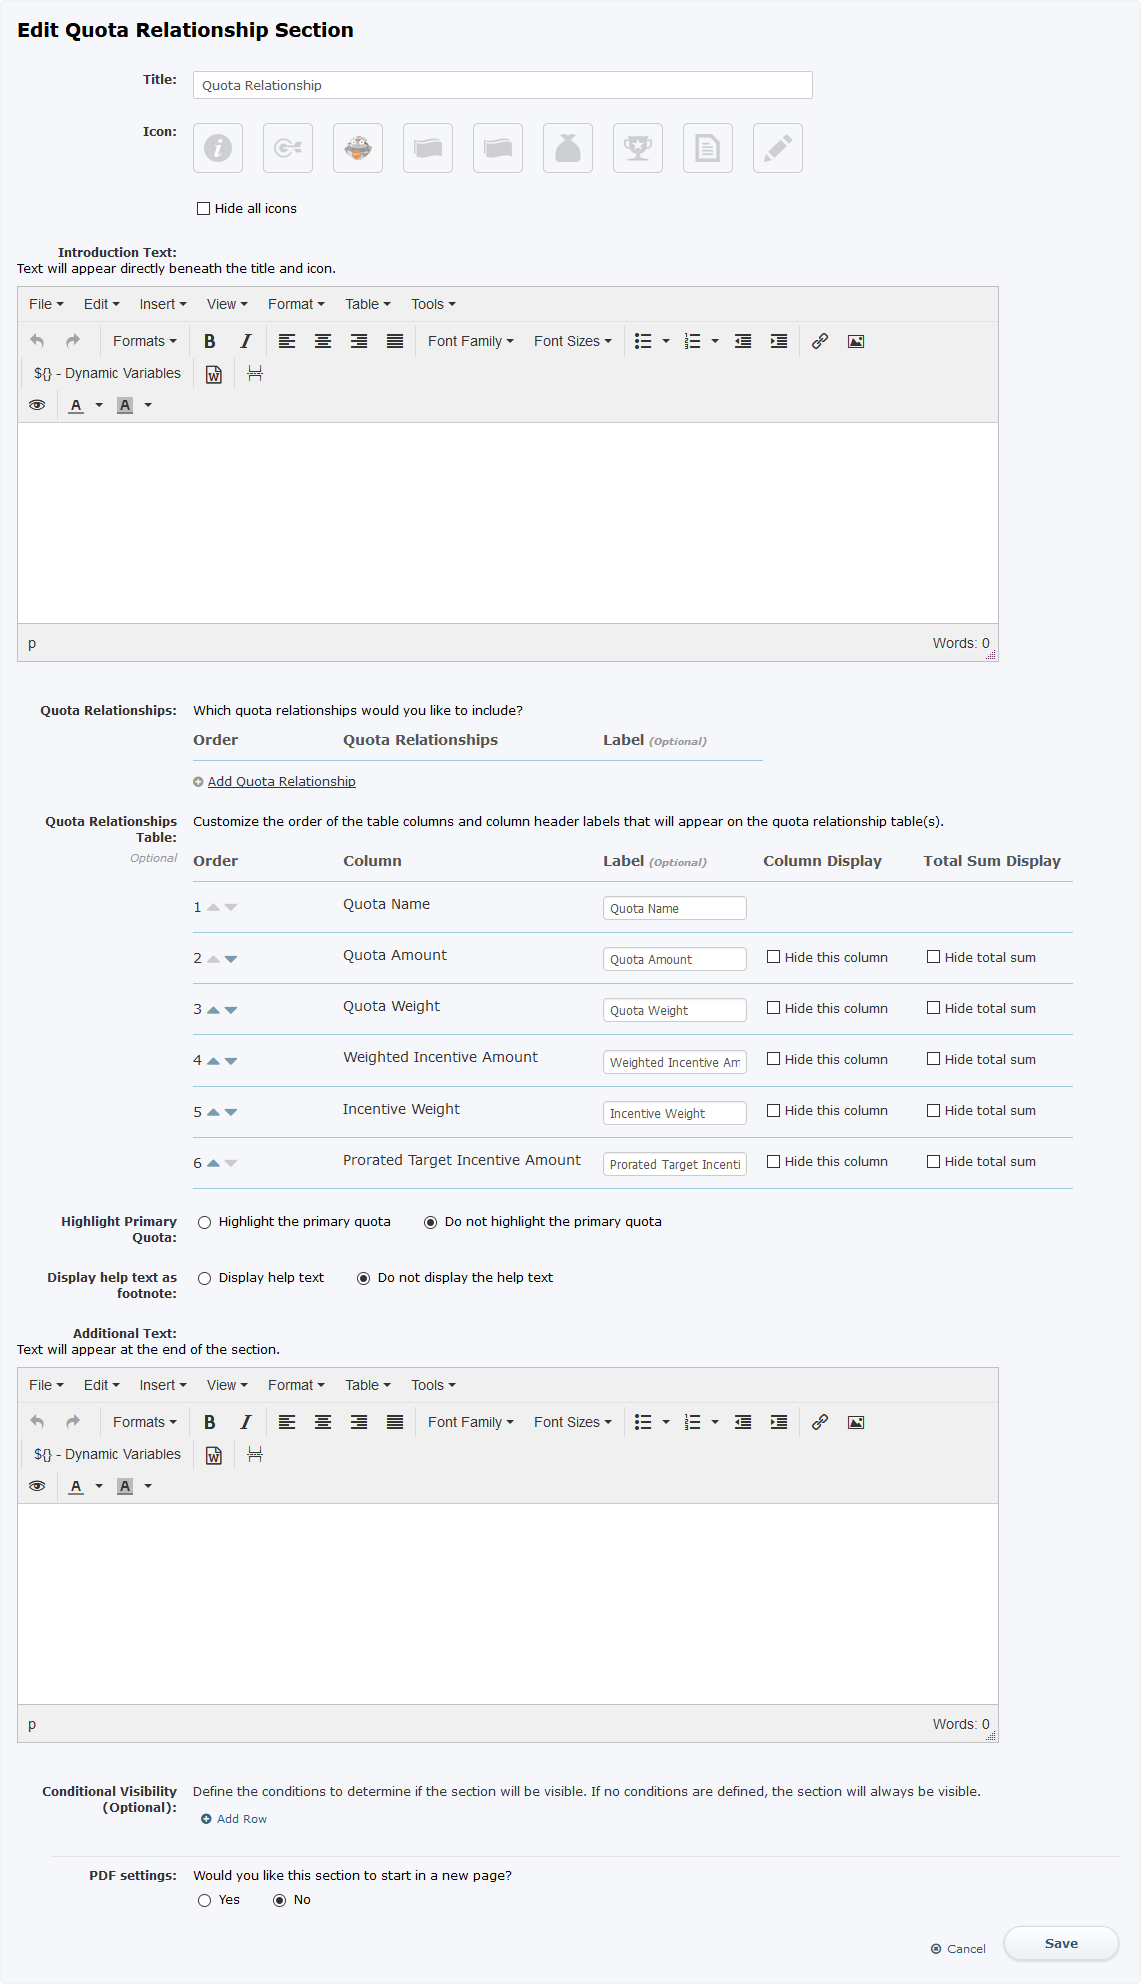 Edit Quota Relationship Section
Do the following:
a. (Optional) In the Title field, type a new title for the section.
b. In the Icon field, select an icon to help identify the section.
Select the Hide all icons checkbox to prevent an icon from displaying with the section.
c. (Optional) In the Introduction Text field, type the text to appear directly beneath the title and icon.
d. In the Quota Relationships field, specify the quota relationships that you would like to include.
To add a field to the section, click the ![]() button. The Select Quota Relationships dialog appears. Select the appropriate quota relationships and click the
button. The Select Quota Relationships dialog appears. Select the appropriate quota relationships and click the ![]() button.
button.
To remove a field from the section, click the ![]() button for the corresponding field.
button for the corresponding field.
To change the order in which the fields appear, drag and drop a field to the new position. Alternatively, you can use the arrow buttons to move fields up and down accordingly.
(Optional) To change the label of a field, type the new label in the corresponding text box.
e. In the Quota Relationships Table field, customize the order of the columns and header labels that will appear on the quota relationship tables.
You can customize the header labels for Quota Name, Quota Amount, Quota Weight, Weighted Incentive Amount, Incentive Weight, and Prorated Target Incentive Amount. You can also choose to hide specific columns as well as the display of the total sum for the columns.
f. (Optional) In the Additional Text field, type the text to appear directly beneath the quota relationship.
g. (Optional) In the Conditional Visibility field, define the conditions to determine if the section will be visible.
Click the ![]() button and specify the condition parameters. You can add conditions based on the person, position, plan, or workflow. Continue adding conditions, as needed. Note that if you do not define a condition, the section is always visible.
button and specify the condition parameters. You can add conditions based on the person, position, plan, or workflow. Continue adding conditions, as needed. Note that if you do not define a condition, the section is always visible.
h. (Optional) In the PDF settings field, specify whether to have this section start on a new page in the PDF file.
i. Click the ![]() button to save your customizations. Alternatively, click
button to save your customizations. Alternatively, click ![]() the button to dismiss the panel without saving your changes.
the button to dismiss the panel without saving your changes.
22. To edit the PDF Footer section, add the section and then hover over the newly-added section and click the![]() button. The Edit PDF Footer Section panel appears.
button. The Edit PDF Footer Section panel appears.
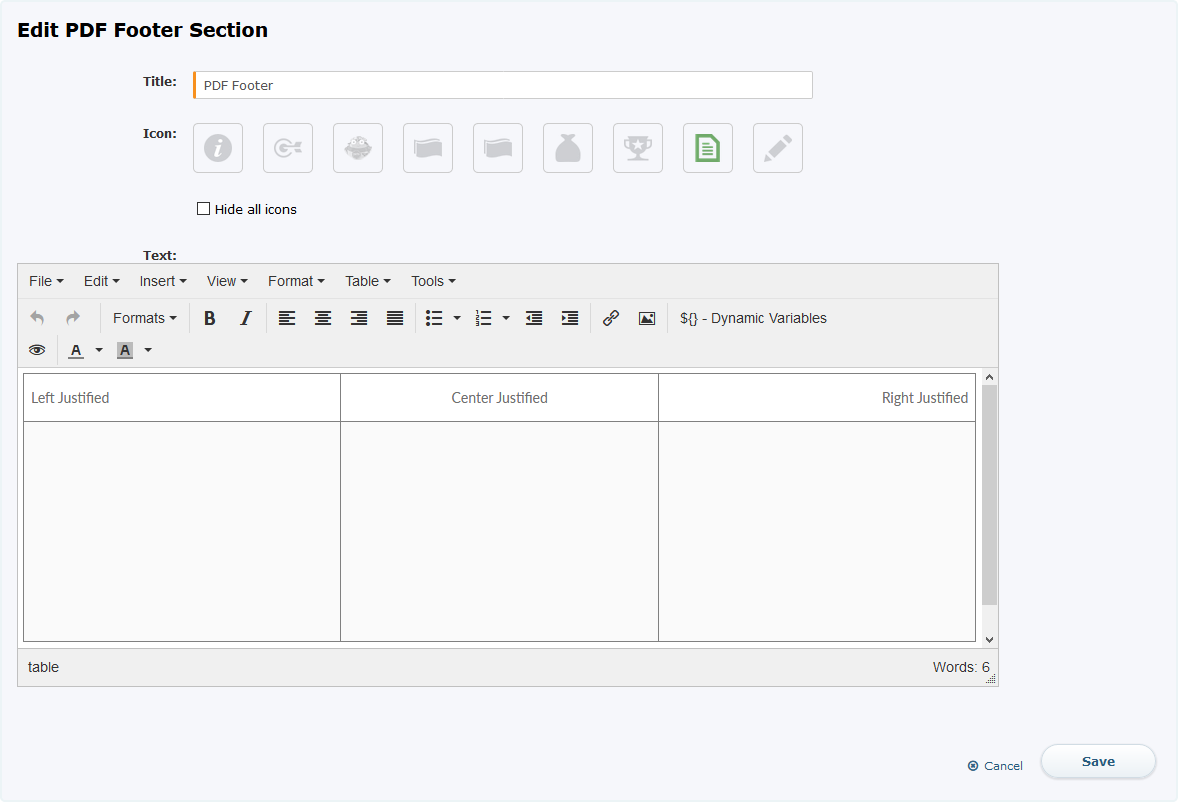 Edit PDF Footer Section
Do the following:
a. (Optional) In the Title field, type a new title for the section.
b. In the Icon field, select an icon to help identify the section.
Select the Hide all icons checkbox to prevent an icon from displaying with the section.
c. In the Text field, type the text to appear in the PDF footer.
You can type text to appear as left, center, and right justified using the corresponding columns. Optionally, to add context-sensitive, dynamic variables into the text, click the Dynamic Variables button in the task bar. The Insert Dynamic Variable dialog appears. Choose an object type and corresponding object attribute, and click the ![]() button.
button.
d. Click the ![]() button to save your customizations. Alternatively, click
button to save your customizations. Alternatively, click ![]() the button to dismiss the panel without saving your changes.
the button to dismiss the panel without saving your changes.
23. Configure any additional sections that appear in the plan document, such as Sales Club, General Terms and Conditions, and Signature.
You can optionally add a text block after the signature block, if needed.
note: For languages other than English (United States), you can only modify the Title and Text fields.
24. Click the ![]() button to save the template. Alternatively, click the
button to save the template. Alternatively, click the ![]() button to dismiss the page without saving your changes.
button to dismiss the page without saving your changes.
Preview a Template
You can display a preview of the template as a particular person would see it.
1. Click the Document Mgmt tab, then click Templates > Plan Documents in the secondary menu. The Templates screen appears.
2. Hover over a template in the list, and click the Edit button that appears. The Template Builder screen appears.
3. Click the ![]() button. The Preview page appears.
button. The Preview page appears.
 Plan Document Template Preview
Do the following:
a. In the Select Person field, and select the person for which you want to preview the plan document. Click the![]() button.
button.
b. In the Hierarchy Date field, modify the date as appropriate.
The date you select determines the version of the plan document used to generate the content. If you have multiple versions of the plan document, the version matching the hierarchy date is used.
c. Review the statement.
d. Click the ![]() button to return to the Template Builder screen.
button to return to the Template Builder screen.
Edit a Plan Document Template
1. Click the Document Mgmt tab, then click Templates > Plan Documents in the secondary menu. The Templates screen appears.
2. Hover over a template in the list, and click the Edit button that appears. The Template Builder screen appears.
3. Modify the fields, as required, or add a new version.
To show the existing versions, click the Show Version Details button.
To add a new version, click the ![]() button and choose the effective start date. Optionally, add a description describing the purpose of the new version.
button and choose the effective start date. Optionally, add a description describing the purpose of the new version.
4. Modify the plan document sections, as needed.
5. Click the ![]() button to save the template.
button to save the template.
Copy a Plan Document Template
1. Click the Document Mgmt tab, then click Templates > Plan Documents in the secondary menu. The Templates screen appears.
2. Hover over a template in the list, and click the Copy button that appears. The Template Builder screen appears.
3. In the Name field, type a new name for the template.
4. (Optional) In the Description field, type a description of the template.
5. In the Year field, choose the year for which the plan document template applies.
6. In the Type field, select the type of Incent entity to which the plan document is to be assigned
You can choose from among the following:
• Plan
• Title
• Position
7. In the Assignment field, select the corresponding plans, titles, or positions (matching the type you selected in the previous step).
8. Modify the plan document sections, as needed.
9. Click the ![]() button to save the template.
button to save the template.
Delete a Plan Document Template
1. Click the Document Mgmt tab, then click Templates > Plan Documents in the secondary menu. The Templates screen appears.
2. Hover over a template in the list, and click the Delete button that appears. A confirmation dialog appears.
3. Click the ![]() button to delete the template. Alternatively, click the
button to delete the template. Alternatively, click the ![]() button to dismiss the dialog without deleting the template.
button to dismiss the dialog without deleting the template.
