Incentive Estimator
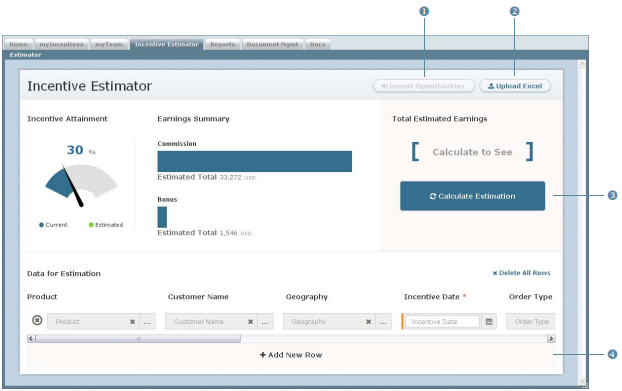
You can use the Incentive Estimator area to estimate incentive compensation based on current plans and attainment.
important: The Incentive Estimator requires that you have direct credit from sample
orders.
Estimator Actions
1. Import Opportunities—Import sales opportunities from your Salesforce account
2. Upload Excel—Upload an Excel spreadsheet of sample orders
3. Estimate—Calculate the estimated commission, bonus, and credit based on sample orders
4. Add Row—Add a new row for entering sample orders into the application

Incentive Estimator Screen
All Fields
The following table describes the information you need to specify when estimating incentive compensation:
| Field | Description |
|---|---|
| Product | The name of product. |
| Customer Name | The name of the customer. |
| Geography | The name of the geography. |
| Incentive Date | The Incentive Date when the payment will be released. |
| Order Type | The sample order type. |
| Quantity | The sample order quantity. |
| Amount | The sample order amount. |
| Amount UnityType | The unity type for the sample order. |
| Discount | The sample order discount (as a percentage). |
How to…
This section describes how to estimate your incentives. To estimate incentives you need to create at least one sample order by doing one of the following:
- Manually entering sample orders
- Importing opportunities
- Uploading sample orders from Excel
Manually Enter Sample Orders
1. Click the Incentive Estimator tab. The Estimator screen appears.
2. In the Data for Estimation section, click the ![]() button to add a new row, if necessary.
button to add a new row, if necessary.
3. (Optional) In the Product field, click the ![]() button. The Select Product dialog appears. Select the appropriate product in the list and click the
button. The Select Product dialog appears. Select the appropriate product in the list and click the ![]() button. The product appears in the field.
button. The product appears in the field.
note: To remove an entry, click the![]() button in the corresponding field.
button in the corresponding field.
4. (Optional) In the Customer Name field, click the![]() button. The Select Customer dialog appears. Select the appropriate customer in the list and click the
button. The Select Customer dialog appears. Select the appropriate customer in the list and click the![]() button. The customer appears in the field.
button. The customer appears in the field.
5. (Optional) In the Geography field, click the![]() button. The Select Geography dialog appears. Select the appropriate geography in the list and click the
button. The Select Geography dialog appears. Select the appropriate geography in the list and click the![]() button. The geography appears in the field.
button. The geography appears in the field.
6. In the Incentive Date* field, click the ![]() button and select the incentive date of when the payment should be estimated.
button and select the incentive date of when the payment should be estimated.
note: The incentive date is the date used to calculate the commissions and
bonuses for the order.
7. (Optional) In the Order Type field, click the![]() button. The Select Order Type dialog appears. Select the appropriate order type in the list and click the
button. The Select Order Type dialog appears. Select the appropriate order type in the list and click the![]() button. The order type appears in the field.
button. The order type appears in the field.
8. (Optional) In the Quantity field, type the quantity ordered.
9. In the Amount* field, type the order amount, and choose a unit type from the drop-down list.
10. (Optional) In the Discount field, type the discount amount.
11. Add additional rows, as necessary, by clicking the![]() button.
button.
To delete a row, click the ![]() button for the corresponding row. To delete all rows of data, click the
button for the corresponding row. To delete all rows of data, click the ![]() button.
button.
Import Opportunities
important: You must have a Salesforce account to import opportunities.
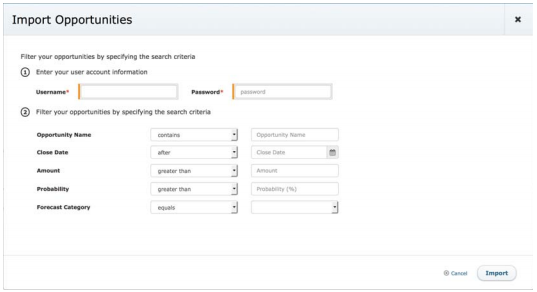
1. Click the![]() button. The Import Opportunities screen appears.
button. The Import Opportunities screen appears.

Import Opportunities Dialog
2. Enter your Salesforce account information.
Do the following:
a. In the Username field, type your Salesforce user name.
a. In the Password field, type the password for the account.
3. (Optional) Define the filter criteria for importing your opportunities.
Table 1: Import Salesforce Opportunity Fields
| Opportunity Name | The name of the opportunity in Salesforce. |
| Close Date | The opportunity close date in Salesforce. |
| Amount | The amount of the opportunity in Salesforce. |
| Probability (%) | The probability of the opportunity closing in Salesforce. |
| Forecast Category | The forecast category with which to (optionally) filter the Salesforce.com opportunities imported into Incent. |
note: When setting the Amount field, be aware that specifying a “greater than” amount can cause the application to return products that, individually, are less than the amount you specified.
For example, if a $10000 opportunity consists of 10 products of $1000 each, and you select an amount of >$9000, the application may return all 10 products in an Estimator List, even though individually each of them is not greater than $9000.
4. Click the ![]() button.
button.
Upload Sample Orders from Excel
You can create sample orders by uploading the orders from a Microsoft Excel file.
1. Click the ![]() button.
button.
2. Click the Click here link to download the Excel template file.
Depending on your browser, a dialog might appear allowing you to specify where to save the file.
3. Edit the template file, and specify the sample orders. Save the file.
note: All required fields in the Excel file, are marked with an asterisk (*).
4. Click the ![]() button and locate the template file you would like to upload.
button and locate the template file you would like to upload.
5. Click the ![]() button.
button.
Estimate Incentives
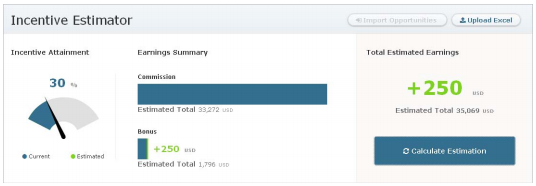
• Click the  button. The estimation results appear.

Incentive Estimator Results
Hovering over the commission or bonus charts displays a pop-up showing the current and estimated values for each.
note: If your incentive calculation is 0, make sure that you entered all required data for your compensation plan.
The data you enter for a sample orders is dependent on your compensation plan. Please contact your administrator if you have questions.
