Orders > Process Status
You can use the Process Status area to manage processing in Xactly Incent using a convenient and powerful process queue. You do this by adding specific batches and other processes to the process status queue—along with optional control entries—and then have the application process the queue sequentially.
The process status queue is similar in concept to a printer queue. With a printer queue, documents you submit for printing are added to the queue, and output in the sequence in which the documents were added. This allows you to add multiple documents for printing and have the system automatically process the documents without your intervention.
The process status queue operates in a similar fashion—allowing you to queue several batches and other processes for processing—only with additional options and greater control.
Process Status Pages
The Process Status area offers the following pages:
- Queue—Allows you to manage the process queue, including batches and other entries present in the queue
- Batches—Allows you to manage batches of orders, including creating new batches and adding one or more batches to the queue for processing
- History—Displays a list of all processes completed through the queue
Common Process Status Workflow
When using the Process Status area, you typically complete a workflow similar to the following to manage the queue and specify how batches are processed.
1. Using the Queue page in the Orders > Process Status area, check the current status of the queue.
Optionally, you can manually pause the queue to allow yourself to add batches (and other processes) to the queue and reorder items in the queue while the queue is paused.
2. Using the Batches page, locate the batches that you need to add to the processing queue.
You can search for specific batches as well as filter batches by period and current status. You can also optionally create new batches, as needed.
When adding batches to the queue, you can specify the type of processing to perform (such as calculating through credits or incentives and resetting to pre-credits or pre-incentives).
3. Using the Queue page, optionally add one or more pauses or email notifications anywhere in the queue. Rearrange the order of the batches, as needed.
4. On the Queue page, start the processing when ready. You can also manually pause processing at any time, if needed.
5. Using the History page, periodically verify that processes were completed as expected. You can also use the page to see a running history of all processing (for auditing purposes).
note: Access to the Process Status area is set in the Setup > Roles area. Administrators with read-only access to the Process Status area can display information but cannot add, modify, or remove items (such as batches) in the area. Administrators with read-write access can perform all operations.
note: You cannot edit or delete either staged order or processed order items while a batch is being validated. The status of the batch changes from Validated or Validation Failed to New when an order is added to the batch, an order is modified in a batch, or an order is deleted from a batch.
Xactly Incent supports credit or incentive calculations using batch sizes up to 25,000 order items.
Screen
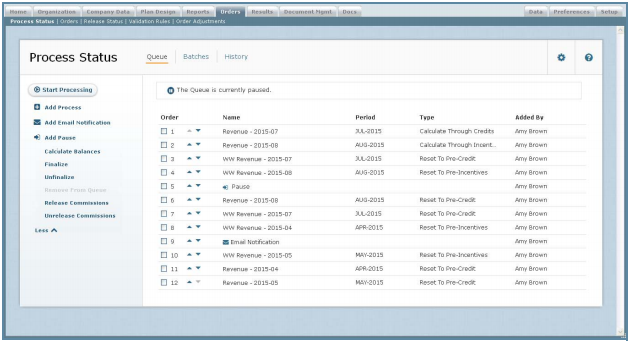 Process Status Screen
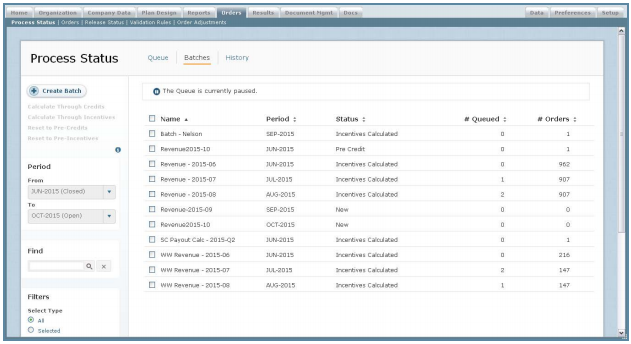
Queue
The following table describes the information displayed when managing the process status queue:
| Field | Description |
|---|---|
| Order | The order in which the batches are to be processed. |
| Name | The name of the process. |
| Period | The period to which the batch of orders apply. |
| Type | The process type, from among the following: • Calculate Through Credits • Calculate Through Incentives • Reset to Pre-Credits • Reset to Pre-Incentives • Release Held Commissions • Delete Selected Staged Orders • Delete Staged Orders in Period • Delete Staged Orders in Batch • Delete Selected Processed Orders • Delete Processed Orders in Period • Delete Processed Orders in Batch |
| Added By | The user that added the process to the process queue. |
Batches
The following table describes the information displayed when managing batches:
| Field | Description |
|---|---|
| Name | The name of the batch. |
| Period | The period to which the batch of orders apply. |
| Status | The current status of the processing. |
| # Queued | The number of times the batch appears in the process queue. |
| # Orders | The number of orders in the batch. |
History
The following table describes the information displayed when managing the process status history:
| Field | Description |
|---|---|
| Name | The name of the process. |
| Period | The period to which the batch of orders apply. |
| Type | The process type, from among the following: • Calculate Through Credits • Calculate Through Incentives • Reset to Pre-Credits • Reset to Pre-Incentives • Release Held Commissions • Delete Selected Staged Orders • Delete Staged Orders in Period • Delete Staged Orders in Batch • Delete Selected Processed Orders • Delete Processed Orders in Period • Delete Processed Orders in Batch |
| Processed By | The user that added the process to the process queue. |
| Date Processed | The date and time when the process was processed. |
How to…
This section describes how to manage the process status queue and associated batches.
Manage the Process Status
Click the Orders tab. The Process Status screen appears. Alternatively, if you are already in the Orders area, click Process Status in the secondary menu.
- To display the process status queue, click the Queue button. The processes in the
queue appear.
For more information about managing the process status queue, see “Manage the Queue.” - To display and manage the batches available for processing, click the Batches button.
For more information about managing order batches, see “Manage Batches.” - To display the processing history, click the History button.
For more information about viewing the processing history, see “Display the Processing History.”
Manage the Queue
The Queue page lists the processes (and other entries) that are queued for processing. You can use the Queue page to display the process queue, show and download details, and reorder entries in the queue, as required.
You can also start and stop queue processing, and optionally add one or more email notifications and processing pauses (to pause processing at specific points in the queue). Finally, you can remove entries from the queue, as needed.
Display the Process Queue
Click the Queue button. The processes in the queue appear.
- To reorder items in the queue, drag an entry and drop it in the new location.
Alternatively, click the and
and buttons to move items up and down the list respectively.
 - To display the steps in a process group, click the corresponding entry in the list. The entry expands to show the associated steps. To hide process group steps, click the entry again.
- To display more options, click the
 button (on the left).
To display fewer options, click the button.
Start (or Pause) Processing the Queue
1. Click the Queue button. The batches in the queue appear.
2. To enable processing through errors, click the ![]() button, and select the Yes, continue processing if errors are encountered radio button.
button, and select the Yes, continue processing if errors are encountered radio button.
When this setting is enabled, processing continues even when errors are encountered. When disabled, processing stops if errors are encountered. Alternatively, select the No, stop processing if errors are encountered radio button.
3. To start processing the queue, click the ![]() button. The queue starts processing immediately.
button. The queue starts processing immediately.
4. To pause queue processing, click the![]() button. The queue stops processing after the current batch is processed.
button. The queue stops processing after the current batch is processed.
Add Batches to the Queue
You can add one or more batches to the queue for processing.
1. Click the Queue button. The process queue appear.
2. Hover over the ![]() button, and choose Add Batch in the menu that appears. The Process Status > Batches screen appears.
button, and choose Add Batch in the menu that appears. The Process Status > Batches screen appears.
3. Select the batches to include as part of a single process in the queue.
If you select multiple batches on the page, you can display your selection as a continuous list by choosing the Selected radio button in the Select Type section of the Filters pane.
4. Choose how to process the selected batches.
You can choose from among the following options (by clicking the corresponding button in the command pane on the left):
• Calculate Through Credits—Calculates the batch through to credits. You can use this with batches in New or Pre-Credit state that have no finalized orders.
• Calculate Through Incentives—Calculates the batch through to incentives. You can use this with batches in New, Pre-Credit, or Calculated Through Credits state that have no finalized orders.
• Reset to Pre-Credits—Resets the batch to pre-credits. You can use this with batches in Calculated Through Credits, Calculated Through Incentives, or Reset to Pre-Incentives state.
• Reset to Pre-Incentives—Resets the batch to pre-incentives. You can use this with batches in Calculated Through Incentives state that have no finalized orders.
5. Click the Queue button. The batches in the queue appear.
note: You can add the same batch to the queue multiple times. You might do this to calculate a batch through credits and calculate the same batch through incentives, for instance. The # Queued column on the Batches page shows how many times the corresponding batch appears in the queue.
Add Process Groups to the Queue
You can add one or more process groups to the queue for processing.
1. Click the Queue button. The process queue appear.
2. Hover over the ![]() button, and choose Add Processing Group(s) in the menu that appears. The Add Process Group dialog appears.
button, and choose Add Processing Group(s) in the menu that appears. The Add Process Group dialog appears.
3. In the Period field, choose the period that you need to process using the drop-down list.
4. In the Process Group field, specify the process groups that you need to process. Start typing the name of a process group in the text box and choose a process group that appears in the drop-down. Alternatively, click the Select Items link and select one or more process groups in the dialog that appears.
5. If you don’t need to override external process parameters when processing, click the ![]() button to add the process groups to the queue.
button to add the process groups to the queue.
In cases when you do need to override external parameters, select the check box in the External Parameters field and click the ![]() button. The Update Parameters dialog appears.
button. The Update Parameters dialog appears.
6. Specify the parameters to override by selecting the corresponding check boxes and typing a new value for each parameter, as required.
7. Click the![]() button to add the process groups to the queue.
button to add the process groups to the queue.
Run a Single Period Process
You can add a single period process to the queue for processing.
1. Click the Queue button. The process queue appear.
2. Hover over the ![]() button, and choose Run Single Period Process in the menu that appears. The Run Single Period Process (SPP) dialog appears.
button, and choose Run Single Period Process in the menu that appears. The Run Single Period Process (SPP) dialog appears.
3. In the Period field, choose the period that you need to process using the drop-down list.
4. If you don’t need to override external process parameters when processing, click the![]() button to add the single period process to the queue.
button to add the single period process to the queue.
In cases when you do need to override external parameters, select the check box in the External Parameters field and click the![]() button. The Update Parameters dialog appears.
button. The Update Parameters dialog appears.
5. Specify the parameters to override by selecting the corresponding check boxes and typing a new value for each parameter, as required.
6. Click the![]() button to add the single period process to the queue.
button to add the single period process to the queue.
Add Email Notification
You can add an entry to the queue to have Xactly Incent send an email notification when it reaches the specified location in the queue.
1. Click the Queue button. The batches in the queue appear.
2. Click the ![]() button. The Create Email Notification dialog appears.
button. The Create Email Notification dialog appears.
3. In the Send To field, choose either Me or All Admins using the drop-down list.
4. In the Subject field, type the subject of the email notification.
5. In the Body field, type the body of the email notification message.
6. Click the![]() button to create the email notification and add it to the queue. Alternatively, click the
button to create the email notification and add it to the queue. Alternatively, click the ![]() button to dismiss the dialog without creating the notification.
button to dismiss the dialog without creating the notification.
The email notification appears at the bottom of the queue. To position the notification in another location, drag the email notification entry and drop it in the new location.
You can also click the ![]() and
and ![]() buttons to move the email notification up and down the list respectively.
buttons to move the email notification up and down the list respectively.
Add a Pause to the Queue
You can specify that the queue pause processing at specific places. The queue stays in the paused state until you manually restart processing.
1. Click the Queue button. The batches in the queue appear.
2. Click the ![]() button. The pause entry appears at the bottom of the queue.
button. The pause entry appears at the bottom of the queue.
3. To position the pause in another location, drag the pause entry and drop it in the new location.
You can also click the ![]() and
and ![]() buttons to move the pause entry up and down the list respectively.
buttons to move the pause entry up and down the list respectively.
The queue stops processing when it reaches this entry. To restart processing, click the![]() button. The queue starts processing immediately.
button. The queue starts processing immediately.
Remove Entries from the Queue
1. Click the Queue button. The entries in the queue appear.
2. Select one or more entries in the list by selecting the corresponding check boxes.
3. Click the ![]() button. A confirmation dialog appears.
button. A confirmation dialog appears.
Click the ![]() button to remove the selected entries. Alternatively, click the
button to remove the selected entries. Alternatively, click the![]() button to dismiss the dialog without removing the entries.
button to dismiss the dialog without removing the entries.
Calculate Balances
You can calculate draw and balance carry forward balances for payments in a period for one or more business groups.
1. Click the Queue button. The entries in the queue appear.
2. Click the![]() button. The Calculate Balances dialog appears.
button. The Calculate Balances dialog appears.
 Calculate Balances Dialog
3. In the Period field, choose the period for which you would like to calculate balances.
4. In the Business Groups field, specify the business groups for which you would like to calculate balances.
You can select specific business groups or choose to include all business groups.
5. Click the ![]() button. The calculate balance process is added to the process queue.
button. The calculate balance process is added to the process queue.
Finalize a Period
You can create a process to finalize a period directly from the Queue page, allowing you to prioritize the process in the queue.
1. Click the Queue button. The entries in the queue appear.
2. Click the ![]() button. The Finalize dialog appears.
button. The Finalize dialog appears.
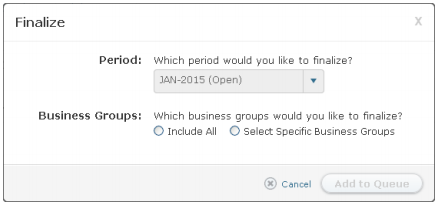 Finalize Dialog
note: The Finalize button is inactive (gray) when a finalize or unfinalize event is already present in the queue.
3. In the Period field, choose the period to finalize using the drop-down list.
4. In the Business Groups field, select the business groups to finalize.
Do the following:
• Select the Include All radio button to finalize all business groups for the period.
• Select the Select Specific Business Groups radio button to specify one or more business groups to finalize.
Click the Select Business Group button and select the business groups using the dialog that appears.
5. Click the ![]() button Alternatively, click the
button Alternatively, click the ![]() button to dismiss the dialog without adding the finalize process to the queue.
button to dismiss the dialog without adding the finalize process to the queue.
Unfinalize a Period
You can create a process to unfinalize the latest finalized period directly from the Queue page, allowing you to prioritize the process in the queue as necessary.
note: Administrators need to set the Business Administration (Unfinalize) privilege (in the Setup > Roles area) to activate the Unfinalize button. This privilege can only be set for Business Administrator and Business Group Administrator roles.
1. Click the Queue button. The entries in the queue appear.
2. Click the ![]() button. The Unfinalize dialog appears showing the period that you can unfinalize.
button. The Unfinalize dialog appears showing the period that you can unfinalize.
note: The Unfinalize button is inactive (gray) when a finalize or unfinalize event is already present in the queue.
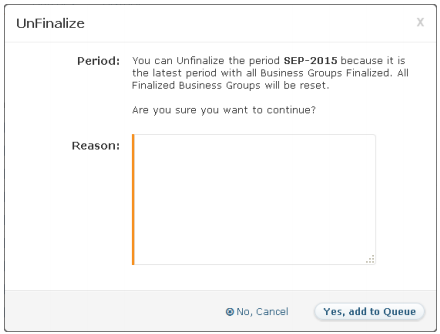 Unfinalize Dialog
3. In the Reason field, type a reason for unfinalizing the period.
4. Click the ![]() button Alternatively, click the
button Alternatively, click the ![]() button to dismiss the dialog without adding the unfinalize process to the queue.
button to dismiss the dialog without adding the unfinalize process to the queue.
Release Held Commissions
You can create a process to release held commissions directly from the Queue page, allowing you to prioritize the process in the queue.
1. Click the Queue button. The entries in the queue appear.
2. Click the ![]() button. The Release Held Commission dialog appears.
button. The Release Held Commission dialog appears.
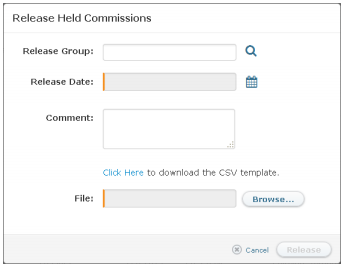 Release Held Commission Dialog
3. In the Release Group field, click the ![]() button. The Select Release Group dialog appears.
button. The Select Release Group dialog appears.
Select the appropriate release group in the list. You can also search for release groups using the Find Release Group text box. Click the ![]() button. Alternatively, you can create a new release group and select that, if required.
button. Alternatively, you can create a new release group and select that, if required.
4. In the Release Date field, click the ![]() button. A calendar pop-up appears. Select a date using the calendar.
button. A calendar pop-up appears. Select a date using the calendar.
5. In the Comment field, type a comment related to the release group, as needed.
6. Click the Click Here link to download a CSV template file that contains a list of fields you need to complete to identify the held commissions to release.
Depending on your browser, a dialog might appear allowing you to specify where to save the file.
7. Edit the template file, and specify the held commissions to release. Save the file.
8. In the File field, click the ![]() button and locate the template file you would like to upload.
button and locate the template file you would like to upload.
9. Click the ![]() button to add the release held commissions process to the queue.
button to add the release held commissions process to the queue.
Alternatively, click the ![]() button to cancel the operation without adding the process to the queue.
button to cancel the operation without adding the process to the queue.
Manage Batches
The Batches page lists all batches of orders defined in Xactly Incent. You can use the page to find and display batches, view and download diagnostic details, and add one or more batches to the queue, specifying the type of processing.
You can also optionally create new batches, edit and copy exiting batches, or delete batches from the application, as required.
Display Available Batches
Click the Batches button. The batches in the queue appear
 Process Status Batches Screen
• To display the batches for a period range, choose the appropriate From and To periods using the corresponding drop-down lists in the Period pane.
• To find specific batches, type part of the name in the Find Batches text box, and click the![]() button. The search results appear.
button. The search results appear.
Click the ![]() button to clear the Find text box and reset the search results.
button to clear the Find text box and reset the search results.
• To display the batches that you have already selected, choose the Selected radio button in the Select Type section of the Filters pane.
Alternatively, you can revert to displaying all batches (selected and unselected) by choosing the All radio button.
• To filter the batches by status, select one or more options in the Filters pane.
You can select to display batches with the following statuses:
• All
• New
• Validated
• Validation Failed
• Calculate Through Credits
• Calculate Through Incentives
• Pre-Credits
• In Process
Select the All checkbox to select all batch statuses; alternatively, deselect the All checkbox to deselect all batch statuses in the Filters pane.
• To display batch details, click an entry in the list and, if necessary, click the Details tab.
• To display diagnostics related to a batch, click an entry in the list and, if necessary, click the Diagnostics tab.
To download detailed diagnostic information for the batch, do the following:
a. Click the Download Details button. The Download Diagnostic Details dialog appears.
b. In the File Name field, type a name for the download file.
c. In the File Type field, choose the file format, either CSV (Comma Separated Value) or TEXT.
d. Click the![]() button Alternatively, click the
button Alternatively, click the ![]() button to dismiss the dialog without downloading the file. To download the rules for the batch, do the following:
button to dismiss the dialog without downloading the file. To download the rules for the batch, do the following:
a. Click the Download Rules button. The Download Rules dialog appears.
b. In the File Name field, type a name for the download file.
c. In the File Type field, choose the file format, either CSV (Comma Separated Value) or TEXT.
d. Click the![]() button Alternatively, click the
button Alternatively, click the![]() button to dismiss the dialog without downloading the file.
button to dismiss the dialog without downloading the file.
Add Batches to the Queue
1. Click the Batches button. The batches in the queue appear.
2. Filter the batches displayed, as required.
3. Select the batches to include as part of a single process in the queue.
If you select multiple batches on the page, you can display your selection as a continuous list by choosing the Selected radio button in the Select Type section of the Filters pane.
4. After selecting the appropriate batches, choose the type of process to create with the selected batches.
You can create the following types of processes by clicking on the corresponding button on the command pane (on the left):
• Calculate Through Credits—Calculates the batch through to credits. You can use this with batches in New or Pre-Credit state that have no finalized orders.
• Calculate Through Incentives—Calculates the batch through to incentives. You can use this with batches in New, Pre-Credit, or Calculated Through Credits state that have no finalized orders.
• Reset to Pre-Credits—Resets the batch to pre-credits. You can use this with batches in Calculated Through Credits, Calculated Through Incentives, or Reset to Pre-Incentives state.
• Reset to Pre-Incentives—Resets the batch to pre-incentives. You can use this with batches in Calculated Through Incentives state that have no finalized orders.
Create a New Batch
You can create batches of orders to manage validation and calculation processing.
note: A batch can only contain order items from a single incentive period. If an uploaded order does not have an associated batch name, the application assigns a system-generated name.
1. Click the Batches button. The batches in the queue appear.
2. Click the![]() button.
button.
3. In the Name field, type the name of the new batch.
4. (Optional) In the Description field, type a description for the batch, as appropriate.
5. In the Period field, choose the appropriate period using the drop-down list. This is the period to which the batch of orders apply.
6. In the Batch Type field, click the Select Batch Type button. The Select Batch Type dialog appears.
Select a batch type and click the ![]() button.
button.
7. Click the![]() button to save the batch.
button to save the batch.
Alternatively, click the ![]() button to dismiss the dialog without saving the batch.
button to dismiss the dialog without saving the batch.
Edit a Batch
1. Click the Batches button. The batches in the queue appear.
2. Hover over a batch name in the list, and click the![]() button that appears. The Edit a Batch dialog appears.
button that appears. The Edit a Batch dialog appears.
3. In the Description field, type a description for the batch, as appropriate.
4. Click the ![]() button to save the batch.
button to save the batch.
Alternatively, click the ![]() button to dismiss the dialog without saving
button to dismiss the dialog without saving
the batch.
Copy a Batch
1. Click the Batches button. The batches in the queue appear.
2. Hover over a batch name in the list, and click the ![]() button that appears. The Copy a Batch dialog appears.
button that appears. The Copy a Batch dialog appears.
3. In the Name field, modify the name of the copied batch.
4. In the Period field, choose the appropriate period using the drop-down list. This is the period to which the batch of orders apply.
5. (Optional) In the Description field, type a description for the copied batch, as appropriate.
6. Click the![]() button to save the copied batch.
button to save the copied batch.
Alternatively, click the![]() button to dismiss the dialog without saving the copied batch.
button to dismiss the dialog without saving the copied batch.
Delete a Batch
1. Click the Batches button. The batches in the queue appear.
2. Hover over a batch name in the list, and click the![]() button that appears. A confirmation dialog appears.
button that appears. A confirmation dialog appears.
3. Click the![]() button to delete the batch.
button to delete the batch.
Alternatively, click the![]() button to dismiss the dialog without deleting the batch.
button to dismiss the dialog without deleting the batch.
Display the Processing History
The History page displays a list of all processes processed through the queue. You can use this page to confirm that one or more queued processes completed processing as expected.
note: The ![]() icon indicates that the process encountered an error during processing. You can display diagnostics associated with the process and, optionally, download diagnostics details, as needed.
icon indicates that the process encountered an error during processing. You can display diagnostics associated with the process and, optionally, download diagnostics details, as needed.
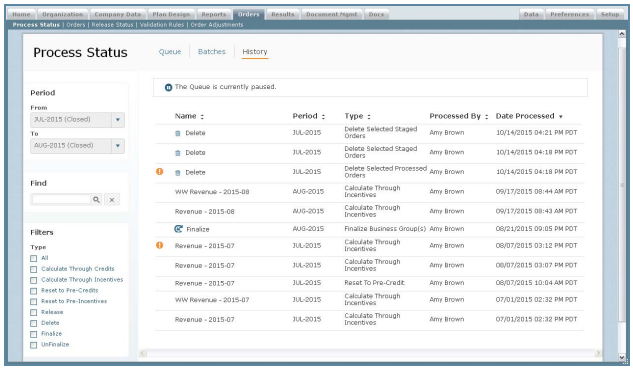 Process Status History Screen
To display the processing history, do the following:
Click the History button. The processing history appears.
• To display the processing history for a period range, choose the appropriate From and To periods using the corresponding drop-down lists in the Period pane.
• To find specific processes, type part of the name in the Find text box, and click the ![]() button. The search results appear.
button. The search results appear.
Click the ![]() button to clear the Find text box and reset the search results.
button to clear the Find text box and reset the search results.
• To filter the processes by type, select one or more options in the Filters pane.
You can select to display entries that have been processed in the following ways:
• Calculate Through Credits
• Calculate Through Incentives
• Reset to Pre-Credits
• Reset to Pre-Incentives
• Release
• Delete
Click the Select button to select all process types; alternatively, click the Unselect All button to deselect all process types in the Filters pane.
• To display details, click an entry in the list and, if necessary, click the Details tab.
• To display diagnostics related to a process, click an entry in the list and, if necessary, click the Diagnostics tab.
To download detailed diagnostic information for the process, do the following:
a. Click the Download Details button. The Download Diagnostic Details dialog appears.
b. In the File Name field, type a name for the download file.
c. In the File Type field, choose the file format, either CSV (Comma Separated Value) or TEXT.
d. Click the ![]() button Alternatively, click the
button Alternatively, click the![]() button to dismiss the dialog without downloading the file.
button to dismiss the dialog without downloading the file.
To download the rules for the batch, do the following:
a. Click the Download Rules button. The Download Rules dialog appears.
b. In the File Name field, type a name for the download file.
c. In the File Type field, choose the file format, either CSV (Comma Separated Value) or TEXT.
d. Click the![]() button Alternatively, click the
button Alternatively, click the ![]() button to dismiss the dialog without downloading the file.
button to dismiss the dialog without downloading the file.
Manage Prior Period Processing
Prior period processing is the means by which Incent allows you to reprocess prior periods to generate retroactive adjustments to results, known as prior period adjustments (PPA). These adjustments might become necessary because of changes to compensation plans, updates to transactional data (such as orders), or the evolution of reference data in your organization.
note: Prior period processing is disabled by default. Contact Xactly Support to have PPP enabled for your organization. In addition, PPP requires several prerequisites before you can use the feature. For more information about prior period processing, see the Xactly Incent Concepts Guide.
You can use the Orders > Process Status area to run and manage prior period processing.
1. Specify the process groups that should be included in prior period processing by selecting the Prior Period Processing (PPP) option when defining or editing a process group (in the Setup > Configure > Process Groups area).
note: You need Read-Write capability for the Setup Tab > Process Groups privilege in the Setup > Roles area to be able to select the process groups to include when PPP is run.
Process groups are essential to using prior period processing, and offer you the ability to create a consistent set of instructions for reprocessing. You can specify the order in which process groups are processed by setting the priority in the Setup > Configure > Process Groups area. The process groups are processed in the order in which they appear on this page.
2. Download the changes to prior periods to determine whether prior period processing is necessary.
In the Orders > Process Status > PPP area, click the ![]() button to download changes as a Microsoft Excel spreadsheet. The spreadsheet identifies all changes in the system since the last time you ran PPP.
button to download changes as a Microsoft Excel spreadsheet. The spreadsheet identifies all changes in the system since the last time you ran PPP.
You can then use this information to determine the appropriate PPP range. The Orders > Process Status > PPP area also displays how many times you have run PPP for the period.
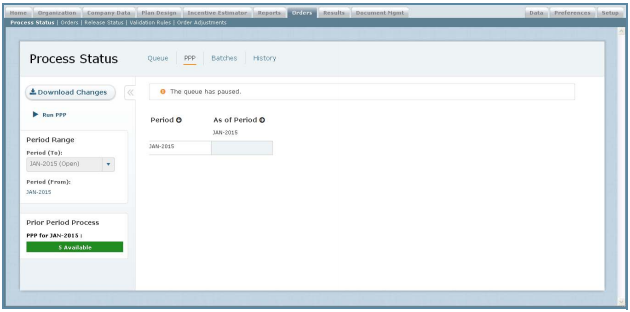 Process Status PPP Screen
3. Ensure that commission releases are up-to-date.
If you have held commissions, you need to release the commissions before running PPP.
4. Verify that prior periods are finalized (closed) up to the current period.
PPP recalculates from the oldest period you select to the first open period in your environment.
5. Click the ![]() button to run prior period processing (in the Orders > Process Status > PPP area). The Run Prior Period Process dialog appears.
button to run prior period processing (in the Orders > Process Status > PPP area). The Run Prior Period Process dialog appears.
Do the following:
a. In the Include Current Period field, specify whether to process the current period.
b. In the Earliest Period to Reprocess field, choose how far back you would like to reprocess.
c. Specify whether to override external parameters.
Overriding external parameters allows you to specify run-time parameters for external processes defined in the process groups.
PPP reprocesses closed periods and creates new versions of the results using the instructions you provided in the selected process groups.
note: You need Read-Write capability for the Orders Tab > Process Status privilege in the Setup > Roles area to be able to run prior period processing using the process queue.
As with any process added to the process queue, PPP must finish before the next process can start. You might therefore want to start a longer PPP run during noncritical times.
note: While PPP allows you to reprocess up to 12 periods, you should restrict the range of periods to reprocess to the minimum necessary. Xactly recommends only running PPP for three prior periods or less, where applicable.
Also, the number of times you can run PPP for a period is restricted. Xactly recommends running PPP as part of your reconciliation process at the end of a quarter or just before preparing your payment files.
Finally, refrain from making changes to reference data—such as rules, formulas, rate tables, exchange rates, quotas, or other plan design elements, as well as person records and organization hierarchy— while PPP is running as these changes could inadvertently be used as part of the reprocessing.
6. Monitor the prior period processing using the process queue.
You can check the process queue in the Orders > Process Status > Queue area.
7. Check the prior period adjustments completed during prior period processing.
You can use the Orders > Process Status > PPP area to review the aggregates of changes over a period of time, drill down for details, and filter across result types (as well as people, earning groups, and business groups). The page displays a grid representing a period and the optional prior periods. Blue shaded cells are the first open period—this is typically the period you are currently calculating. White cells represent past periods with icons showing what has happened in each period, as follows:
• An “O” identifies the current open period
• An unlocked Icon ![]() shows that you have run PPP for those periods, but they are not yet finalized
shows that you have run PPP for those periods, but they are not yet finalized
• A locked icon ![]() shows you that the period is completed and closed.
shows you that the period is completed and closed.
When PPP is run, all changes are applied to a new version of the results, which are rolled forward to the current period. This maintains the integrity of your original results—which were used to pay your team—and allows you to show a comparison between the original and later calculations, as these calculations might affect incentives.
note: PPP does not change the payment history in Incent. Payments completed in closed periods remain unchanged. Instead, PPP allows administrators to recalculate payments and bring that payment information forward into the current period.
PPP can store up to 12 versions of any period. This means that you can reprocess the prior 11 periods to adjust for changes. For example, if the current period is June, you could reprocess results starting with the prior July.
After processing is complete, you can show how the July data was calculated in August, September, and so on, using the As of Period drop-down list in the Results area of Incent, displaying each of those versions of July data and what changed over time.
 Credits Search with “As of Period” Option
8. (Optional) Check the processed orders “as of” specific periods in the Orders > Orders > Processed area.
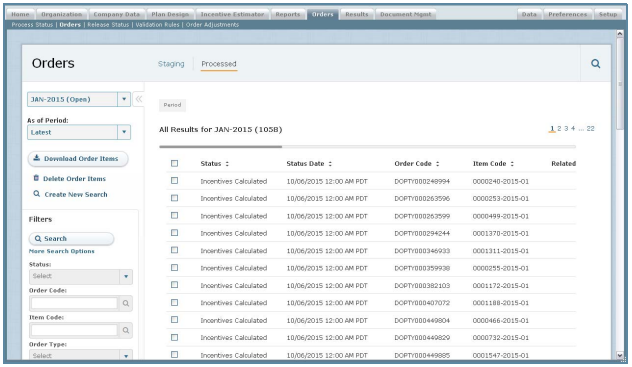 Processed Orders with “As of Period” Option