Orders > Validation Rules
The Validation Rules area enables administrators to define rules to validate order transactions before submitting the data to credit and incentive calculations. The Validation area enables you to define rules describing format and data relationship requirements and to automatically validate the data against these rules.
The Validation area therefore enables you to specify additional requirements to the following standard validations provided by Incent:
- System Error: Participant Not Assigned To A Position
- System Error: Employee ID/Person Name Does Not Exit
- System Error: Split Amount % Does Not Exist
- System Error: Person Not On A Valid Comp Plan
The validation rules are applied to data in the Order Staging area and can include both standard and user-defined custom fields.
The Validation Rules area has the following actions:
- New—Used to create new validation rules.
- Delete—Used to delete existing validation rules.
Screen
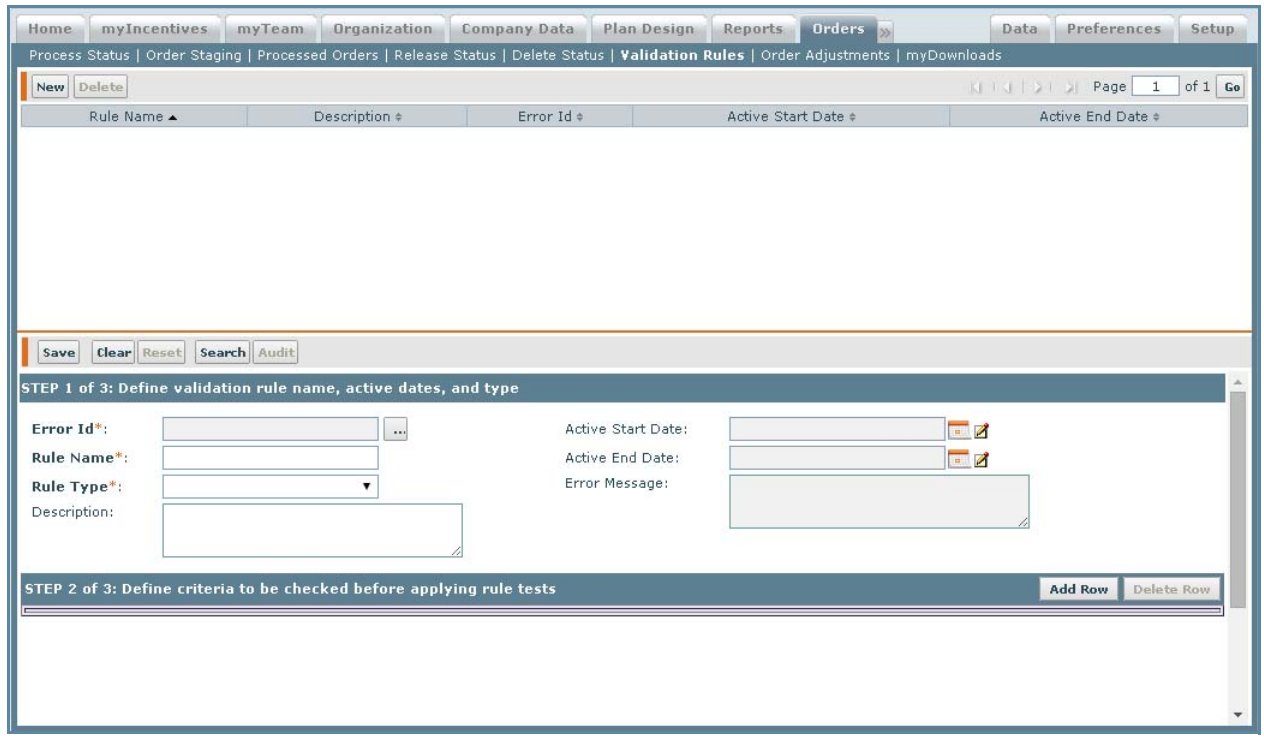
 Validation Rules Screen
All Fields
The following table describes the information you need to specify when performing validations:
| Field | Description |
|---|---|
| Error Id | The error ID, which identifies the error message associated with failed validations of this rule. |
| Rule Name | The name of the validation rule. |
| Rule Type | The rule type, currently Custom. |
| Description | A description of the validation. |
| Active Start Date | The validation start date. |
| Active End Date | The validation end date. |
| Error Message | The error message associated with the Error Id. |
| Add Row | Used to define the criteria to be checked before applying the rule tests. |
How to…
This section describes how to define rules to validate order transactions before submitting the data to credit and incentive calculations.
Manage Validation Rules
This section describes how to manage validation rules.
Create a Validation Rule
You can create a validation rule to test data that has been imported into the Order Staging area. You can do this to validate order data to ensure that it is accurate and complete for the purposes of credit, incentive and payment calculations.
note: You must define one or more validation error messages before creating a validation rule. See Create a Validation Error Message for more information. You can search for validation rules using the Error ID, Rule Name, and Rule Type fields.
To create a validation rule, do the following:
1. Click the Orders tab, then click Validation Rules in the secondary menu. The Validation Rules screen appears.
2. Click the New button.
Step 1: Define validation rule name, active dates, and type
3. Specify basic information about the rule by doing the following:
a. Click the![]() button next to the Error Id* field, select the appropriate error identifier, and click OK. This is the error message associated with failed validations of this rule. Verify that the proper message appears in the Error Message field. Error IDs are defined in Setup > Type Codes > Error Messages.
button next to the Error Id* field, select the appropriate error identifier, and click OK. This is the error message associated with failed validations of this rule. Verify that the proper message appears in the Error Message field. Error IDs are defined in Setup > Type Codes > Error Messages.
b. Enter the Rule Name*. This is the user-assigned name of the validation rule.
c. Choose the Rule Type* using the drop-down menu.
d. Specify the Active Start Date and Active End Dates for the rule by clicking the ellipsis and choosing the respective dates. The active dates are related to when the validation takes place.
Step 2: Define criteria to be checked before applying rule tests
4. Click the Add Row button and define the criteria to be checked before applying the rule tests by completing the following:
a. Choose StagingOrderItem using the drop-down menu.
b. Click the![]() button next to the adjacent field, select a StagingOrderItem field, and click OK.
button next to the adjacent field, select a StagingOrderItem field, and click OK.
c. Choose a comparison operator in the adjacent field using the drop-down menu.
d. In the adjacent field, enter the comparison data directly, or click the ![]() button to select a field and click OK.
button to select a field and click OK.
You can specify multiple criteria to check against by adding additional rows. If the criteria in Step 2 are met for the order item, the rule tests defined in Step 3 are applied. If the criteria are not met, the validation rule is skipped for the order and the order is considered validated.
If you do not specify criteria in this step, the rule tests defined in the next step are applied to every order by default.
Step 3: Rule tests to be applied
5. Click the Add Row button and define the rule tests to be applied by completing the following:
a. Choose StagingOrderItem or RelatedOrderItem using the drop-down menu.
b. Click the![]() button next to the adjacent field, select a StagingOrderItem or RelatedOrderItem field, and click OK.
button next to the adjacent field, select a StagingOrderItem or RelatedOrderItem field, and click OK.
c. In the adjacent field, choose a comparison operator using the drop-down menu.
d. In the adjacent field, enter the comparison data directly, or click the ![]() button to select a field and click OK.
button to select a field and click OK.
You can specify multiple rule tests to apply by adding additional rows.
6. Click the Save button. The newly created validation rule appears in the Results Pane area.
Edit a Validation Rule
You can modify the description, active start date, active end date, and the criteria and rule tests of a validation rule. To modify a validation rule, do the following:
1. Select the validation rule from the list in the Results Pane area.
2. Make changes to the appropriate fields.
3. Click the Save button.
Delete a Validation Rule
You can delete a validation rule. To delete a validation rule, do the following:
1. Select the validation rule from the list in the Results Pane area.
2. Click the Delete button. A message appears asking you to confirm the deletion.
3. Click the OK button, to confirm the deletion or click the Cancel button to cancel the action.
Manage Validation Error Messages
This section describes how to manage validation error messages.
Create a Validation Error Message
You can define error messages for validation rules that test data that has been imported into the Order Staging area.
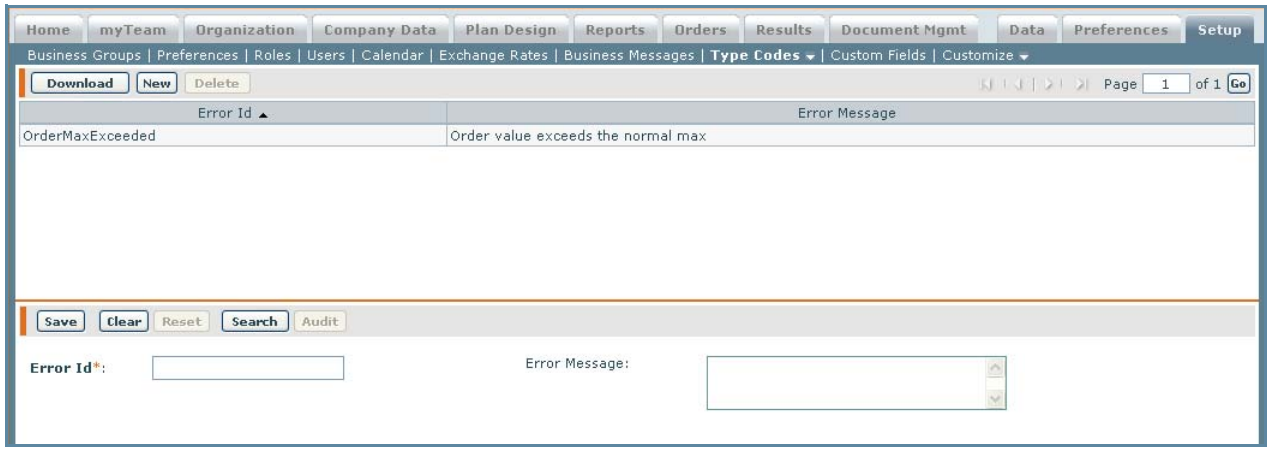
 Error Messages Screen
To create a validation rule error message, do the following:
1. Click the Setup tab, then click Type Codes > Error Messages in the secondary menu. The Error Messages screen appears.
2. Click the New button.
3. Enter the Error Id*. This is the identifier of the error that is being created.
4. (Optional) Enter a description in the Description field. This is the description ofthe error being created.
5. Click the Save button. The newly created error appears in the Results Pane area.
Edit a Validation Error Message
You can modify an existing validation error message. To modify a validation error message, do the following:
1. Select the error message from the list in the Results Pane area.
2. Make changes to the appropriate fields.
3. Click the Save button.
Delete a Validation Error Message
You can delete an existing validation error message. To delete a validation error message, do the following:
1. Select the error message from the list in the Results Pane area.
2. Click the Delete button. A message appears asking you to confirm the deletion.
3. Click the OK button, to confirm the deletion or click the Cancel button to cancel the action.
Download the Error Message Type Codes
You can download the error message Type Codes to a file on your local machine. To download the error message Type Codes, do the following:
1. Click the Setup tab, then click Type Codes > Error Messages in the secondary menu. The Error Messages screen appears.
2. Click the Download button. The File Download screen appears.
• To open the file, click the Open button to open and check the error message Type Codes.
• To save the file to your local drive, click the Save button. A file browser appears. Type a file name, choose a location, and click the Save button.
Set the Compensation Plan Check Preference
You can activate the active compensation plan validation. This checks if the person or persons on an order are on a plan for the specified order incentive period.
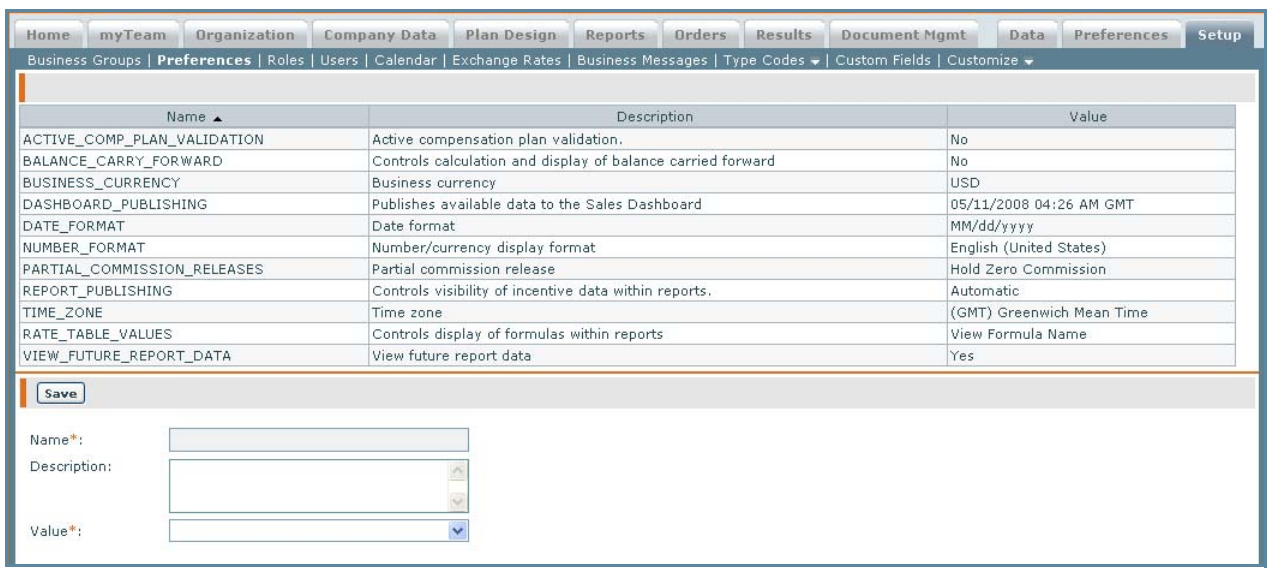
 Preferences
To activate this validation, do the following:
1. Click the Setup tab, then click Preferences in the secondary menu. The Preferences screen appears.
2. Select ACTIVE_COMP_PLAN_VALIDATION from the list.
3. Choose Yes from the Value drop-down list.
4. Click Save.
