Incent Administrator Plan Design Commission Rules
Commission rules define rules that calculate a commission based on a credit amount for the user on a given Order Item.
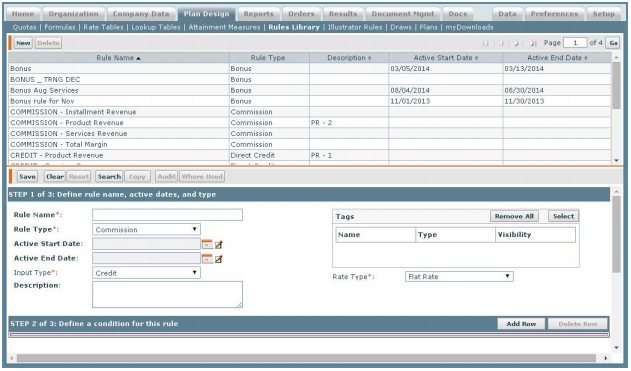
Commission Rule Screen
All Fields
The following table describes the information you can specify when managing commission
rules:
| Section | Field | Description |
|---|---|---|
| Step 1 | Rule Name | The name of the rule. The maximum length is 64 characters. |
| Rule Type | The type of rule, in this case Commission. | |
| Active Start Date | The active start date for the rule. | |
| Active End Date | The active end date for the rule. | |
| Input Type | The input type, in this case Credit. | |
| Rate Type | The rate type, from among the following: • Flat Rate • Rate Table • Highest Rate |
|
| Description | A Description of the rule. | |
| Tags | The tags associated with the rule (as defined in the Setup > Tags area). |
|
| Attainment Measure | Defines which credits should be applied to quota credits to determine attainment and tier. |
|
| Step 2 | Add Row | Add a condition for a rule. |
| Step 3 | Result Name | The name of the result. |
| Rate | A value or a formula can be entered here to be used as the rate at which commissions will be paid. If a formula is selected it pulls from the formulas that were defined in “Step 2: Define a condition for this rule” |
|
| Value UnityType | The value UnitType in which the commission result is calculated. |
|
| Maximum | The maximum value allowed for the commission when a numeric result is created. |
|
| Minimum | The minimum value allowed for the commission when a numeric result is created. |
|
| Quota | The quota that credit amounts (both direct and indirect) are credited against. |
|
| Quota Period | The period value to use from the quota. | |
| Step 3 | Earning Group | The earning group for the commission. This list is defined in Setup > Configure > Earning Group. |
| Hold Period | The unit (days, months, quarters, years), date, or date formula specified in the Hold field. |
|
| Hold | The number of days, months, quarters, years, or a specific date (depending on the HoldPeriod field) that the commission should be held before being released. |
|
| Reason Code | Used to track different types of credits such as bonuses and commissions. This list is defined in Setup > Configure > Reason Code. |
How to…
This section describes how to manage commission rules.
Search Commission Rules
1. Click the Plan Design tab, then click Rules Library in the secondary menu. The Rules Library screen appears.
2. (Optional) Specify the search criteria in the corresponding fields.
3. (Optional) In the Tags field, click the Select button to show the tags dialog box appears. Select the tags to use in the search and click the Apply Selected Tags to Rule button.
4. Click the Search button. The matching rules appear in the results area.
Create a Commission Rule
1. Click the Plan Design tab, then click Rules Library in the secondary menu. The Rules Library screen appears.
2. Click the New button.
Step 1: Define rule name, active dates, and type
3. Enter a rule name in the Rule Name field. This is the name of the rule that is being created.
4. Select Commission from the Rule Type drop-down list. This is the type of rule that is being created.
5. (Optional) Enter or select the Active Start Date (this is the active start date for the rule) by selecting the calendar icon and clicking on a date.
6. (Optional) Enter or select the Active End Date (this is the active end date for the rule) by selecting the calendar icon and clicking on a date.
Note: The Order Item Incentive Date must fall within the Active Start Date and Active End Date for the rule to take effect.
7. Select an Input Type from the drop-down list. This is the result type that is the input for a commission rule.
8. (Optional) Enter a description of the rule being created in the Description field.
9. (Optional) In the Tags field, add or remove the tags associated with the rule.
Do the following:
• To add or remove tags, click the Select button. The Select Rules Tag dialog box appears.
Select the tags you want to associate with the rule and click the Apply Selected Tags to Rule button. You can also find specific tags (using the Find Tags search box), and create new tags, as required. You can associate up to 50 tags with a rule.
For more information about managing tags, see the Tags section of the Reference Guide.
• To remove all tags associated with the rule, click the Remove All button. Exercise caution when removing all associated tags because this action does not ask for confirmation.
10. In the Rate Type field, choose the rate type for the commission rule using the dropdown list. Changing the value of the Rate Type field causes any information that you have typed in the other fields to be cleared.
You can choose from among the following options:
• Flat Rate—Uses a value or formula to calculate commission
• Rate Table—Derives the rate from a rate table and quota by determining the attainment
Each credit calculated in a rate table commission rule increases the attainment and the rate for each credit is looked up, based on the credits processed through the commission rule that meets the attainment measure criteria
• Highest Rate—Uses the highest rate tier. When the first credit of a batch is processed using the highest rate commission rule, the total attainment of all credits meeting the attainment measure criteria is calculated and the corresponding rate is used for each credit calculation in the highest rate commission rule and batch.
note: Selecting either Rate Table or Highest Rate causes a new field called Attainment Measure to appear.
11. In the Attainment Measure field, click the ![]() button. The Select Attainment Measure
button. The Select Attainment Measure
screen appears.
The attainment measure is used to evaluate which tier value of the rate table is used to calculate the commission. This field is only available if you choose Rate Table or Highest Rate in the Rate Type field.
Select an attainment measure in the list, and click the ![]() button.
button.
You can also search/filter attainment measures, and create, copy, or delete measures, as required. For more information on this section, see the Attainment Measures portion of the Reference Guide.
Step 2: Define a condition for this rule
The result of a condition determines whether or not the rule can be computed for a given order. This is not a required function however; you can create a rule with no conditions, which will activate results on every order.
12. Scroll down and define a condition for the rule by clicking the Add Row button.
note: “IF” automatically appears in the first column and cannot be changed. If you add more rows, the choices will change to AND & OR.
13. (Optional) Select a condition from each column’s drop-down list.
note: Depending on what condition you choose from the second column’s dropdown list, the next column’s drop-down list changes to choices that pertain to the first condition selected.
Step 3: Define result(s) created when the condition is true
The result is initiated when the condition in Step 2: Define a condition for this rule is true and an order is placed. There can be multiple results associated with a rule.
14. Enter a result name in the Result Name field. This is the name of the individual result that will be created.
15. Select a rate or rate table for the rule. To select a formula for Flat Rate rules, click the ![]() button next to the Rate field. The Select a Formula screen will appear. Select a formula and click the OK button.
button next to the Rate field. The Select a Formula screen will appear. Select a formula and click the OK button.
To select a rate table for Rate Tables and Highest Rates, click the![]() button next to the Rate Table field. The Select a Rate Table screen will appear. Select a rate table and click the OK button.
button next to the Rate Table field. The Select a Rate Table screen will appear. Select a rate table and click the OK button.
16. Select a Value UnitType* from the drop-down list. This is the value UnitType in which the commission will be calculated.
17. (Optional) Enter a value or click the button next to the Maximum field.
If you click the![]() button next to the Maximum field, the Select a Formula screen appears. Select a Formula and click the OK button. The formula will then appear in the Maximum field.
button next to the Maximum field, the Select a Formula screen appears. Select a Formula and click the OK button. The formula will then appear in the Maximum field.
note: If you define multiple results, Incent uses the maximum value only against the first result. Also, setting the maximum value to 0 (zero), or specifying a formula that evaluates to 0, causes negative results to return a value of 0. To enable negative result values, set the maximum value to 0.01.
18. (Optional) For Flat Rate rules, enter a value or click the![]() button next to the Minimum field.
button next to the Minimum field.
If you click the button next to the Minimum field, the Select a Formula screen appears. Select a Formula and click the OK button. The formula appears in the Minimum field.
19. For Rate Table rules and Highest Rate rules, click the ![]() button next to the Quota* field. The Select a Quota screen will appear. Select a quota and click the OK button The quota appears in the Quota field.
button next to the Quota* field. The Select a Quota screen will appear. Select a quota and click the OK button The quota appears in the Quota field.
20. For Rate Table rules and Highest Rate rules, choose a quota period using the Quota Period* field. The choices are MONTHLY, QUARTERLY, YEARLY, Quarter-to-Date (QTD), and Year-to-Date (YTD).
21. (Optional) Select an Earning Group from the drop-down list.
22. (Optional) Choose a Hold Period from the drop-down list. This represents the unit (days, months, quarters, years), date, or date formula specified in the Hold field.
See “Hold Period Use Cases and Example”
23. Enter or choose the Hold value. The Hold value specifies how long the commission should be held from the incentive date before being released. If you chose Days, Months, Quarters, or Years in the Hold Period field, enter a numeric value. If you chose Date in the Hold Period field, do one of the following:
• Click the calendar icon and then click the OK button.
• Click the calendar icon and double-click a date.
• Click the ![]() , button, select a date formula, and click OK.
, button, select a date formula, and click OK.
note: If the Hold field is zero or empty, the commission will be calculated based on the incentive date of the order. See Hold Period Use Cases and Example.
24. (Optional) Select a Reason Code from the drop-down list.
25. Click the Save Result button. The newly created result will appear in the List of Results section on the left.
note: If you want to create more than one result, click the New Result button and repeat from Step 3 above.
26. Click the Save button. The newly created Commission now appears in the Results Pane area.
Edit a Commission Rule
note: If a rule needs to edited and the Hold Period field (located in Step 1: Define rule name, active dates, and type) is left blank, the Hold field (located in Step 3: Define result(s) created when the condition is true) will automatically become blank when the rule is saved.
Modifying Step 1: Define rule name, active dates, and type
The Rule Name and Rule Type cannot be modified once the rule has been created. The only way to modify these fields is to delete and recreate the rule.
1. Select a Commission rule from the list.
2. Select and edit the fields that require changes.
3. Click the Save button.
Modifying Step 2: Define a condition for this rule
1. Select a Commission rule from the list.
2. Scroll to the Step 2 condition area.
3. Select and edit the fields that require changes.
4. Click the Save button.
Modifying Step 3: Define result(s) created when the condition is true
note: The Result Name, Rate Table, Quota, and Quota Period fields cannot be modified once the result has been created. The only way to modify these field is to delete and recreate the result.
1. Select a Commission rule from the list.
2. Scroll down to the Step 3 results area.
3. Select a result from the List of Results. The selected result is highlighted and appears in the Result Name field.
4. Select and edit the fields that require changes.
5. Click the Save Result or Save button.
Delete a Commission Rule
1. Select a Commission rule from the list.
2. Click the Delete button. A message will appear asking “Do you really want to delete the selected item?”.
3. Click the OK button to confirm the deletion, or click the Cancel button to cancel the action.
Delete a Condition
1. Select a Commission rule from the list.
2. Scroll to the Step 2 condition area.
3. Select a condition.
4. Click the Delete Row button. A message appears asking “Do you really want to delete the selected item?”.
5. Click the OK button to confirm the deletion, or click the Cancel button to cancel the action.
6. Click the Save button.
Delete a Result
note: At least one result needs to be associated with the rule for the rule to exist.
1. Select a Commission Rule from the Results Pane. The selected commission is highlighted.
2. Scroll to the Step 3 results area.
3. Click a result in the List of Results. The selected result is highlighted and appears in the Result Name field.
4. Click the Delete Result button. A message will appear asking “Do you really want to delete the selected item?”.
5. Click the OK button to confirm the deletion or click the Cancel button to cancel the action.
6. Click the Save button.
Create a New Commission Rule by Copying an Existing Rule
1. Select an Commission rule from the list.
2. Click the Copy button.
3. Type a new name in the Rule Name field.
4. Change the settings (including the conditions and results) for the rule, as required. For more information about modifying conditions and results, see “Edit a Commission Rule”
5. Click the Save button. The newly created rule appears in the Results Pane.