Plan Design > Plans
You can use the Plans area to define incentive compensation plans by selecting various
rules and associating them with users through titles and/or positions.
Screen
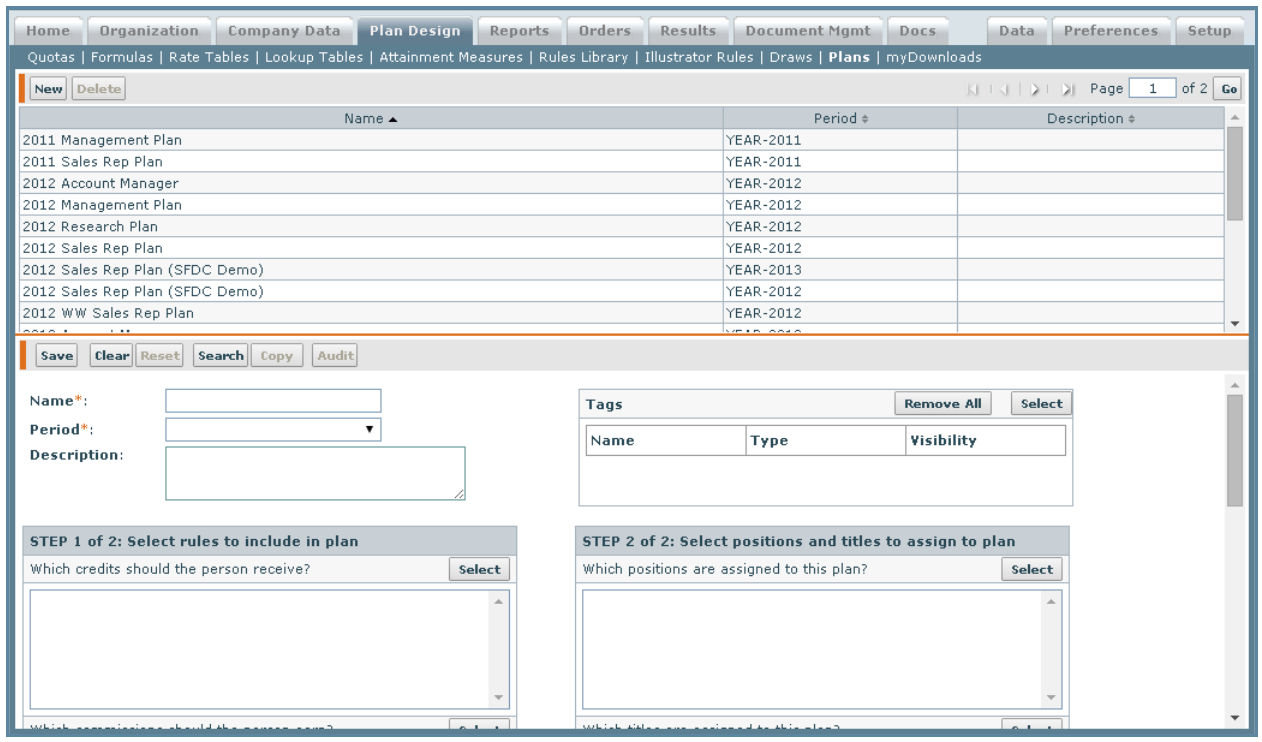
Plans Screen
All Fields
The following table describes the information you can specify when managing plans
| Field | Description |
|---|---|
| Name | The name of the plan. The maximum length is 64 characters. |
| Period | The yearly period for the plan |
| Description | A description of the plan. |
| Tags | The tags associated with the plan (as defined in the Setup > Tags area). |
| Plan Rules | The credit, commission, bonus, or illustrator commission rules (along with rule tags) to assign to the plan. |
| Plan Position and Title Assignments | The positions and titles to assign to the plan. |
How to…
This section describes how to manage plans.
Search Plans
1. Click the Plan Design tab, then click Plans in the secondary menu. The Plans
screen appears.
2. (Optional) Specify the search criteria in the corresponding fields.
3. (Optional) In the Tags field, click the Select button. The Select General Tags dialog
appears.
Select the tags to use in the search and click the Apply Selected Tags to Rule button.
4. Click the Search button. The matching rules appear in the results area.
Create a Plan
1. Click the Plan Design tab, then click Plans in the secondary menu. The Plans
screen appears.
note: A position or title can only be assigned to one plan, for a given year, at a
time. If two plans in the same year have a position and title for the same participant,
the plan with the position is used.
2. Click the New button.
3. In the Name* field, type the name of the new plan.
4. (Optional) In the Description field, type a description of the plan.
5. (Optional) In the Tags field, add or remove the tags associated with the plan.
Do the following:
• To add or remove tags, click the Select button. The Select General Tags dialog
appears.
Select the tags you want to associate with the plan and click the Apply
Selected Tags to Plan button. You can also find specific tags (using the Find
Tags search box), or create and upload new tags, as required.
note: You can associate up to 50 tags with a plan.
For more information about managing tags, see “Tags”
• To remove all tags associated with the plan, click the Remove All button. Exercise
caution when removing all associated tags because this action does not
ask for confirmation.
STEP 1 of 2: Select the Rules to Include in the Plan
note: You need to assign at least one rule to a plan.
6. Click the Select button next to the corresponding plan rule type (Credit, Commission,
Bonus, or Illustrator Commission). The Select Items dialog appears.
For each plan type, the dialog contains the full list of credits (direct and indirect),
commissions, or bonus rules, as appropriate.
note: Incent does not support both a Highest Rate commission rule and a Rate
Table commission rule in the same plan.
Select the items to add to the plan. The following actions are available:
Table 12: Plan Rules and Plan Assignment Actions
| The Double Left Arrow lets you move all items from the Available list to the Assigned list. You do not need to select a credit, commission, or bonus in order to move them. |
|
| The Single Left Arrow lets you move individual items from the Available list to the Assigned list. You must select an item to move it. |
|
| The Single Right Arrow lets you move individual items from the Assigned list to the Available list. You must select an item to move it. |
|
| The Double Right Arrow lets you move all credits from the Assigned list to the Available list. You do not need to select a credit, commission or bonus in order to move them. |
note: You can select more than one Credit, Commission, Bonus, or Illustrator Commission
rule to assign to a plan. Double-clicking on a rule moves the rule to either
the Assigned or Available list, as appropriate.
Also, you can select a maximum of six Illustrator Commission rules for a plan. The
order you add the Illustrator Commission rules to the list determines the display
order in the Plan Illustrator pod. To reorder the list, remove the rules and re-add
them in the required order.
Click the OK button.
7. In the Rule Tags field, select the rule tags to add to the plan by clicking the Select
button. The Select Rules Tags dialog appears.
Select the rule tags and click the Apply Selected Tags to Plan button. You can also
find specific tags (using the Find Tags search box), and create new tags, as
required.
note: You can associate up to 50 tags with a plan.
STEP 2 of 2: Select the Positions and Titles to Assign to the Plan
8. Click the Select button, located to the right of Position Plan Assignments. A pop-up
box appears with a list of positions that were created.
9. Select a position from the Available Positions area.
10. Click the Single Left Arrow to move the position from the Available Positions area
to the Assigned Positions area.
note: You can select more than one position to assign to the plan. Only available
positions will be displayed. If a position is already assigned to a plan, in the same
year, it will not be in the Available Positions list.
11. Click the OK Button. The position is now located in the Position Plan Assignments
area.
12. Click the Select button, located to the right of Titles Plan Assignments. A pop-up
box appears with a list of titles that were created.
13. Select a title from the Available Titles area.
14. Click the Single Left Arrow to move the position from the Available Titles area to
the Assigned Titles area.
note: You can select more than one title to assign to the plan. Only available titles
will be displayed. If a title is already assigned to a plan, in the same year, it will not
be in the Available Titles list. If a person is assigned by position and title to different
plans, only the plan assigned by position will be used.
If a person’s Position and Title are assigned to plans within the same year, the
application uses the plan assigned by Position and ignores the plan assigned by
Title.
15. Click the OK Button. The title is now located in the Title Plan Assignments area.
16. Click the Save button. The newly created plan appears in the Results Pane area.
Create a New Plan by Copying an Existing Plan
1. Select a Plan from the Results Pane.
2. Click the Copy button.
Assign a new plan name and period, and change the attached rules and plan
assignments, as required.
3. Click the Save button. The newly created plan appears in the Results Pane area.
Edit a Plan
note: The Name field cannot be changed.
1. Click the Clear button to remove any plans that are still showing.
2. Select a Plan from the Results Pane area.
3. Select and edit the fields that require changes.
4. Click the Save button.
Delete a Plan
1. Select a Plan from the Results Pane area.
2. Click the Delete button. A message appears asking “Do you really want to delete
the selected item?”.
3. Click the OK button to confirm the deletion, or click the Cancel button to cancel
the action.