Plan Design > Rate Tables
The Rate Tables area allows setting commission rates based on attainment goals. Rate
Tables are used in commission rules, as defined in the Plan Design > Rules Library area.
Rate Tables can be created with any number of tiers, which include a low and high
attainment level and the value (rate) at which the commission will be paid.
Note the following:
• Rate Tables can be defined at the Plan (Default), Title, or Position levels.
• Rate Tables values are typically used in the commission rules, but can also be used
in formulas.
• The Rate Tables name and values appear on user reports.
note: Business group administrators can only search, view, create, modify, upload,
download, audit, and delete rate tables (connected to a position) that are associated
with business groups to which the administrators themselves are assigned. However,
any administrator can edit Plan and Title assignments and their associated
values.
Screen
Rate Tables Screen
All Fields
The following table describes the information you can specify when managing rate tables:
| Section | Field | Description |
|---|---|---|
| Main | Name | The name of the rate table. The maximum length is 96 characters. |
| Attainment UnitType | The UnitType in which the low and high attainment is measured. | |
| Description | A description of the rate table. | |
| Tags | The tags associated with the rate table (as defined in the Setup > Tags area). | |
| Rate Tier | Low | The lowest value for the tier, calculated using the Attainment UnitType. |
| High | The highest value for the tier, calculated using the Attainment UnitType. | |
| Default | The default rate for the tier. |
How to…
This section describes how to manage rate tables.
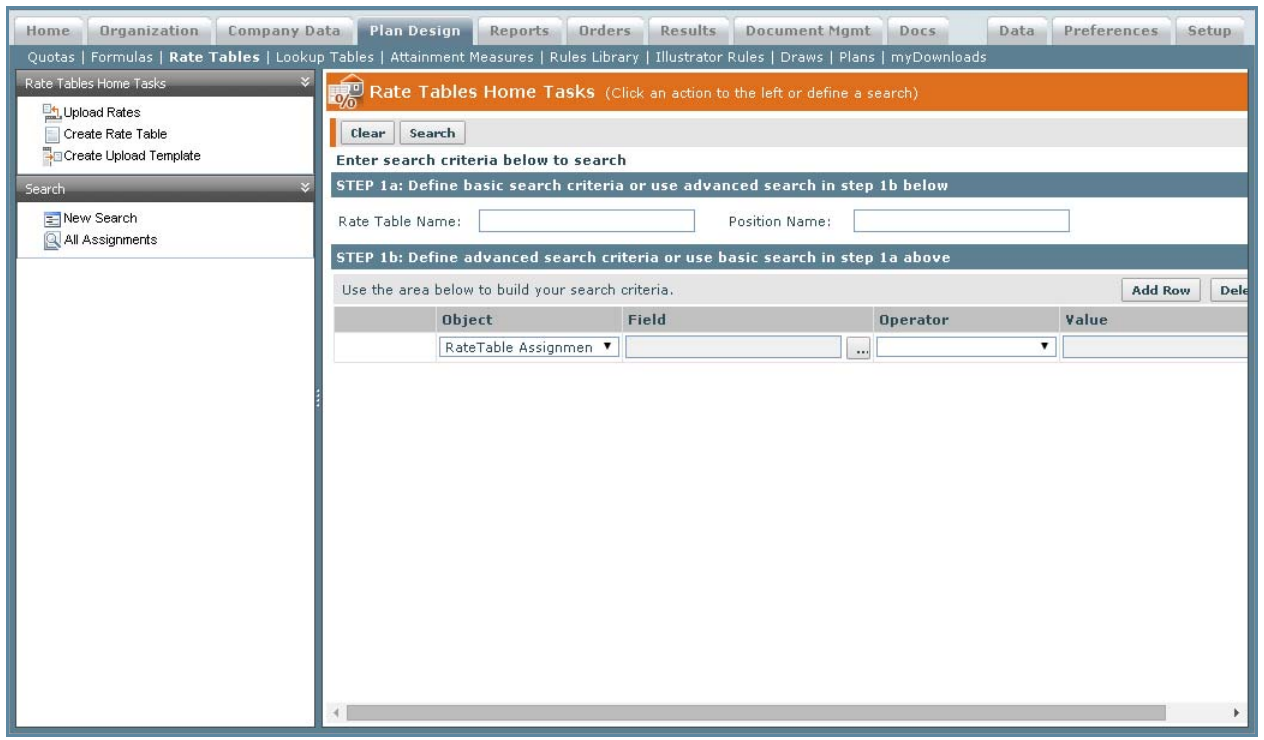
Search Rate Tables
1. Click the Plan Design tab, then click Rate Tables in the secondary menu. The Rate
Tables Home screen appears.
Rate Tables Home Screen
From the Rate Tables Search Results or Rate Tables Create & Edit screens, you can
start a new search by clicking the New Search button.
Step 1a: Define basic search criteria
2. Type the value in the Rate Table Name or Position Name fields.
Step 2b: (Optional) Define advanced search criteria
3. Click the ![]() button next to the Field text box, select a field for the search criteria,
button next to the Field text box, select a field for the search criteria,
and click OK.
4. Choose an Operator from the drop-down list.
5. Type or choose a value in the Value field.
6. Click Add Row to add to the search criteria; click Delete Row to remove the last
row in the search criteria list.
7. Click Search. Alternatively, click Clear to clear the search form.
note: The search matches substrings and is not case sensitive. This means that
searching for “ar” using the Rate Table Name field matches Hardware Rate Table
2009 and Software Rate Table 2009, for example.
8. (Optional) Click the All Assignments button. All rate table assignments appear in
the Rate Tables Search Results area.
note: Refer to the Xactly Concepts Guide for examples of how to perform
advanced searches.
Create a Rate Table
1. Click the Create Rate Table button. The Rate Tables Create & Edit screen appears.
2. Enter a name for the Rate Table you are creating in the Name* field.
3. Enter the Attainment UnitType*. This is the UnitType in which the low and high
attainment is measured. The list is defined in Setup > Type Codes > Unit Type.
4. (Optional) Enter a description in the Description field. This is the description of the
rate table being created.
5. (Optional) In the Tags field, add or remove the tags associated with the rate table.
Do the following:
• To add or remove tags, click the Select button. The Select General Tags dialog
appears.
Select the tags you want to associate with the rate table and click the Apply
Selected Tags to Rate Table button. You can also find specific tags (using the
Find Tags search box), or create and upload new tags, as required.
note: You can associate up to 50 tags with a rate table.
For more information about managing tags, see “Tags” on page 101.
• To remove all tags associated with the rate table, click the Remove All button.
Exercise caution when removing all associated tags because this action does
not ask for confirmation.
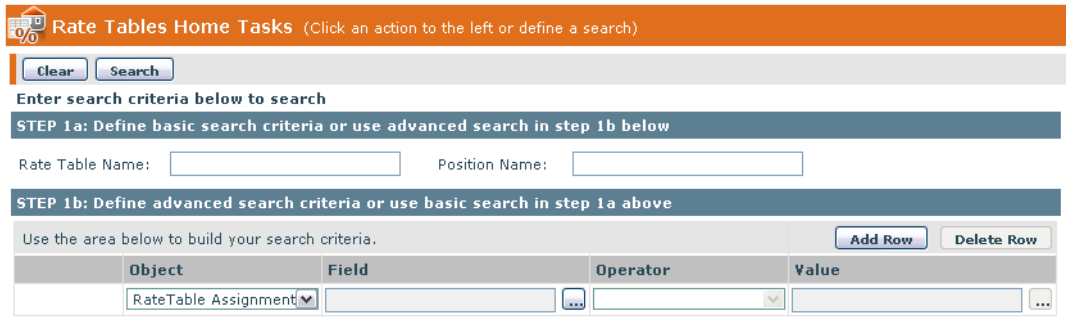
6. (Optional) Click the Add Rate Tier button. The following fields appear.

Add Rate Tier Fields
7. (Optional) Enter a Low tier amount. This is the lowest value for the tier and is calculated
using the Attainment UnitType.
8. (Optional) Enter a High tier amount. This is the highest value for the tier and is calculated
using the Attainment UnitType.
• If the Attainment UnitType is percent (%), the quota attainment will be calculated
in percent when the commission rule is calculated for the order placed.
The formula would be orderamount/quota for defined period * 100.
The rate will then be selected, based on which tier row the quota attainment
fell in.
• If the Attainment UnitType is Currency, the attainment measure value will be
used to evaluate the rate table instead of percent of Quota.
note: If the High tier is left empty, the system will interpret it as greater than the
Low tier value.
9. (Optional) Enter a Default rate by doing one of the following:
a. Enter a numeric value.
OR
b. Click the ![]() button next to the Default field. The Select a Formula screen
button next to the Default field. The Select a Formula screen
appears. The formula expressions that are listed here are numeric type.
c. Select a numeric formula.
d. Click the OK button.
10. (Optional) Continue adding tiers and values as needed.
New Added Rate Tier
note: If an additional tier is added to the rate table the value from the previous
tier’s High field is autopopulated into the Low field of the newly added tier and is
not editable.
11. Click the Save > Save button to save the new Rate Table, or click the Save > Save
and create rate table button to save the rate table and display the form to add a
new rate table.
Alternatively, you can save the Rate Table and add a Title, Position, or version.
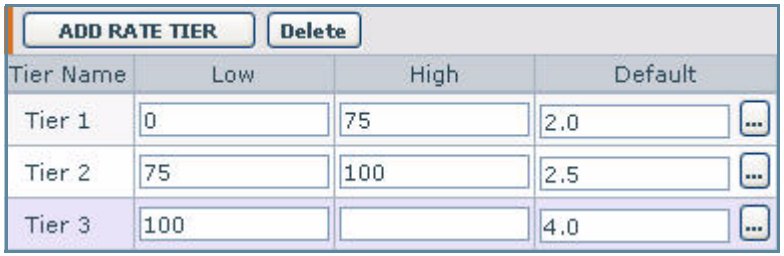
To save the Rate Table and add a Title:
a. (Optional) Click the Save > Save and add title button to save the Rate Table
and select a Title.
The Select a Title screen appears. The screen contains a list of Titles that were
created in Organization >Titles.
Select a Title Screen
b. Select a Title and click the OK button.
This assigns a single Rate Table amount to all people with a particular title.
Note that the Type field of Rate Table changes to Title and the Name field
assumes the name of the Title.
c. Click the Save > Save button to save the title assignment.
d. (Optional) Click All Assignments to display the list of Rate Table assignments,
including the newly-created Rate Table.
To save the Rate Table and add a Position:
a. (Optional) Click the Save > Save and add position button to save the Rate
Table and select a Position.
The Select a Position screen appears. The screen contains a list of Positions that
were created in Organization > Hierarchy.

Select a Position Screen
b. Select a position and click the OK button.
This assigns a specific Rate Table amount to an individual associated with a
specific position. Note that the Type field of Rate Table changes to Position
and the Name, Person Name, and Unit Type fields assume the corresponding
values of the Position.
c. Click the Save > Save button to save the position assignment.
d. (Optional) Click All Assignments to display the list of Rate Table assignments,
including the newly-created Rate Table.
To save the Rate Table and add a version:
a. (Optional) Click the Save > Save and add version button to save the Rate
Table and select a Position.
The Select an effective start period for the new version screen appears.
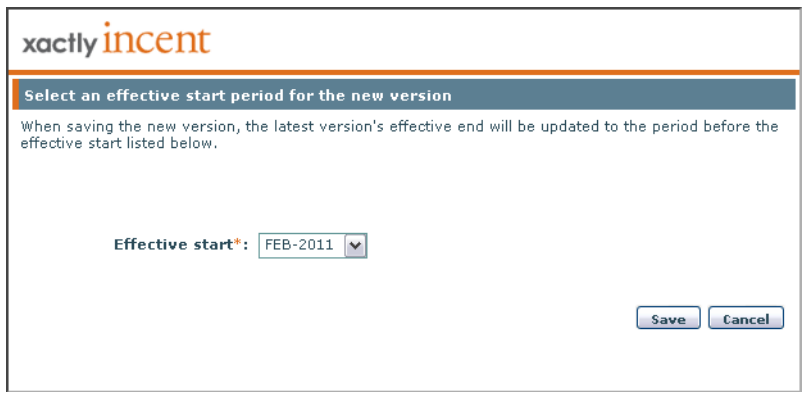
Select an Effective Start Period for the New Version Screen
b. Choose an effective start period from the drop-down list and click the Save
button.
c. Click the Save > Save button to save the new version.
d. (Optional) Click All Assignments to display the list of Rate Table assignments,
including the newly-created Rate Table.
Manage Rate Tables
You can edit Rate Tables, add or delete Titles and Positions, determine where a Rate
Table is being used, display the audit trail for a Rate Table, and delete Rate Tables
and assignments.
Edit an Assignment
note: After saving, you cannot change the Name or Attainment UnitType.
1. Select a Rate Table from the list in the Rate Tables Search Results area.
2. Click the Edit Assignment button.
Alternatively, you can double-click a Rate Table in the Rate Tables Search
Results area.
3. Edit the fields that require changes.
note: You can add additional Titles and Positions.
4. Click the Save > Save button. Click All Assignments to display the list of Rate
Tables, including the edited Rate Table.
Add a Title
1. Double-click a Rate Table in the Rate Tables Search Results area.
2. Click the Add Title button.
The Select a Title screen appears. The screen contains a list of Titles that were
created in Organization > Titles.

Select a Title Screen
3. Select a title and click the OK button.
This assigns a single Rate Table amount to all people with a particular title.
Note that the Type field of Rate Table changes to Title and the Name field
assumes the name of the title.
4. Click the Save > Save button to save the title assignment.
Add a Position
1. Double-click a Rate Table from the list in the Rate Tables Search Results area.
2. Click the Add Position button.
The Select a Position screen appears. The screen contains a list of Positions that
were created in Organization > Hierarchy.
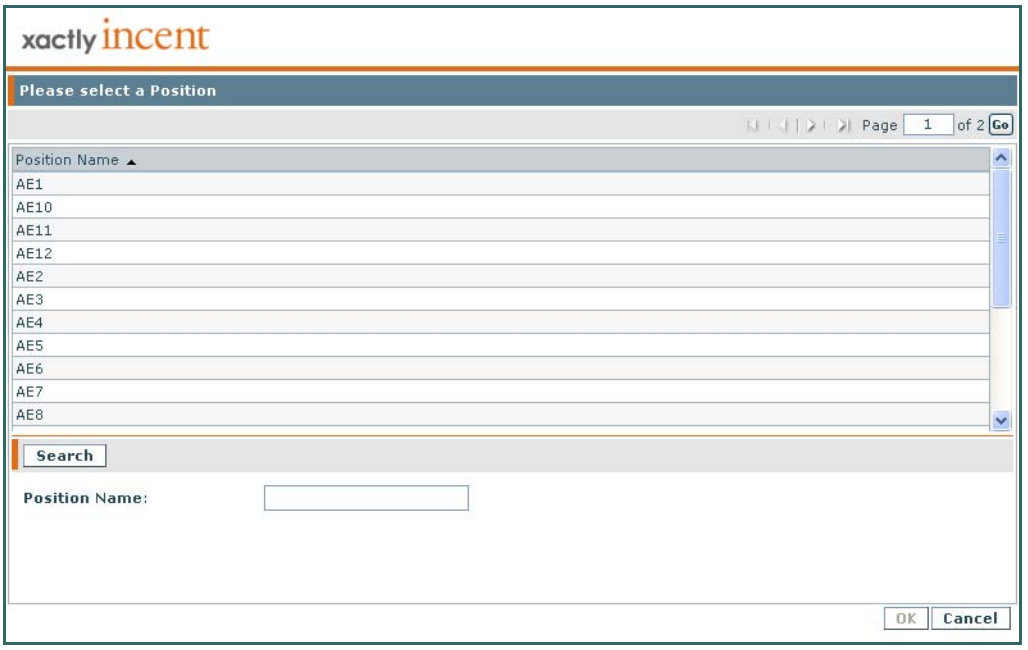
Select a Position Screen
3. Select a position and click the OK button.
This assigns a specific Rate Table amount to an individual associated with a
specific position. Note that the Type field of Rate Table changes to Position
and the Name, Person Name, and Unit Type fields assume the corresponding
values of the position.
4. Click the Save > Save button to save the position assignment.
Delete a Rate Table
You can delete an entire Rate Table (Type: Plan). Note that when you delete a
Rate Table, all associated assignments are also deleted.
1. Select a Rate Table (Type: Plan) from the list in the Rate Tables Search Results
area.
2. Click the Delete Rate Table button.
The following alert appears: “Warning: Rate Table ‘Rate TableName’ and all
associated assignments will be deleted.”
3. Click the OK button to confirm the deletion, or click the Cancel button to cancel
the action.
A dialog appears enabling you to add a comment describing the reason.
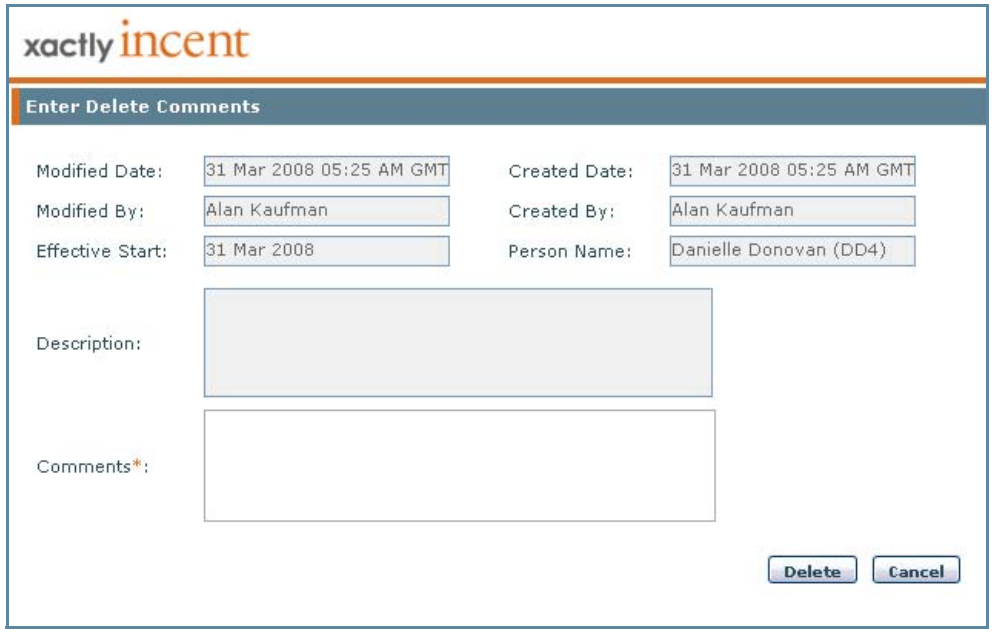
Enter Delete Comments Dialog
4. Enter a comment and click the Delete button.
note: Rate Tables assigned to Rules or Formulas cannot be deleted until the assignment
is removed.
Delete a Rate Tier
1. Select a Rate Table from the list in the Rate Tables Search Results area.
2. Click the Edit Assignment button.
Alternatively, you can double-click a Rate Table in the Rate Tables Search
Results area.
3. Click a rate tier.
4. Click the Delete button, located to the right of the Add Rate Tier button. The
rate tier is deleted.
Delete an Assignment
You can delete a Rate Table assignment (Type: Position or Title).
1. Select a Rate Table (Type: Title or Position) from the list in the Rate Tables
Search Results area.
2. Click the Delete Assignment button.
A dialog appears enabling you to add a comment describing the reason.
3. Enter a comment and click the Delete button.
Determine Where a Rate Table is Used
You can show information about where the Rate Table is used in formulas and rule
results.
1. Select a Rate Table from the list in the Rate Tables Search Results area.
2. Click the Where Used button. A pop-up window appears that shows the
related objects to which the Rate Table belongs.
3. Click Download to save the information to a text file. A dialog appears
enabling you to save the file to disk. Click OK, choose a location, and click
Save. The information is downloaded to the selected file.
4. Click the Close button.
Audit a Rate Table
Two types of audits are available: a Plan assignment audit (similar to the current
Rate Table audit) and a Position/Title assignment audit. Note that the old and new
rate by tier is tracked by Plan, Position, and Title assignment.
1. Select a Rate Table from the list in the Rate Tables Search Results area.
2. Click the Audit button. A dialog appears displaying the audit trail for the Rate
Table.
3. Click Download to save the audit to a text file. A dialog appears enabling you
to save the file to disk. Click OK, choose a location, and click Save. The audit is
downloaded to the selected file.
4. Click the OK button to dismiss the audit dialog.
Manage Versions
You can add, modify, and delete versions, as well as display the audit trail for versions.
Add a Version
1. Select an assignment from the list in the Rate Tables Search Results area.
2. Click the Edit Assignment button.
3. Click the Add Version button.
A dialog appears enabling you to select the effective start date. Note that the
effective start must be after the effective start date of the latest existing version
of the rate table.
4. Choose the effective start date and click Save. Incent copies the information
from the latest version and saves it using the new effective start.
Modify a Version
1. Select an assignment from the list in the Rate Tables Search Results area.
2. Click the Edit Assignment button.
3. Select a version in the list.
4. In STEP 1: Effective dates for this version, choose a new Effective Start* date
using the drop-down list.
The new period must be after the effective start period of the version before it.
5. Click Save > Save to modify the version information for the assignment.
Delete a Version
1. Select an assignment from the list in the Rate Tables Search Results area.
2. Click the Edit Assignment button.
3. Select a version in the list.
4. Click the Delete Version button. A dialog appears enabling you to add a comment
describing the reason. Note that you cannot delete the first (master) version
unless the Rate Table is deleted. Deleting a version updates the effective
end date of the version preceding it.
5. Enter a comment and click Delete.
Audit a Version
1. Select an assignment from the list in the Rate Tables Search Results area.
2. Click the Edit Assignment button.
3. Select a version in the list.
4. Click the Audit Version button. A dialog appears displaying the audit trail for
the version.
5. Click Download to save the audit to a text file. A dialog appears enabling you
to save the file to disk. Click OK, choose a location, and click Save. The audit is
downloaded to the selected file.
6. Click the OK button to dismiss the audit dialog.
Upload and Download Rate Tables
This section describes how to upload and download rate tables.
Upload Rate Tables
You can upload Rate Tables based on assignments. This means that you can
update Rate Table assignments across multiple Rate Tables using a single upload.
note: Uploads cannot contain single-quotes, double-quotes, or semicolons, as the
symbols will cause an error in the uploading of the file.
1. Click the Upload Rates button. The Upload Rates dialog appears.
2. In the File field, click the Browse (or equivalent) button, and select the appropriate
file.
3. Select the update option, from among the following:
• Allow creation of new versions
• Allow updates to existing versions
• Allow updates and new creation
Select the checkbox to allow mid-period dates and align to the period start
date, as appropriate. This allows the effective start date in the upload template
to be any date in the period with Incent determining the correct period
when saving the record.
4. Click the Upload button to upload the rate table file. A confirmation message
appears.
5. Click the OK button.
Important Points for Uploading Rate Tables
• You cannot create Rate Tables using the Rate Table Upload template. You
must first create Rate Tables using the Create & Edit page before uploading
Rate Table assignments using the Rate Table Upload template.
• Formula expressions are not supported in cells.
• To cancel the upload operation, click the Cancel button.
Upload Unsuccessful Message
If the upload is unsuccessful, an error message will appear. The following is one
error message that may appear:
• Rate Table (Rate Table name) already exists. Select the update flag if the existing
Rate Table needs to be updated.
note: If an error message appears, correct the error and upload the file again.
Download Assignments to a Text File
You can download assignments for a selected Rate Table as either a Comma
Separated Values (CSV) or text (.TXT) file.
note: The Rate Tables text file has all the text running together, as one row of text.
For this reason, the file needs to be opened in Excel as a Delimited, Semicolon file.
By opening the file as Delimited, Semicolon, the text will be imported into separate
rows and columns in Excel.
1. Click the Download Assignments button. The Select versions to download dialog
appears.
2. Select to download either the latest versions or all versions.
3. Choose the Download Format*, either Comma Separated Values (CSV) or
Text, and click Download. A dialog appears enabling you to save the file to
disk.
4. Click OK, choose a location, and click Save. The versions are downloaded to
the selected file.
5. Use Excel to open the saved Rate Tables file. The file now appears in Excel.
Create an Upload Template
You can create an upload template based on Rate Table assignments. The generated
template includes all combinations of Rate Tables and assignments, sorted
by Rate Table name.
To create an upload template:
1. Click the Create Upload Template button.
Step 1 of 3: Define Rate Table Name
2. Select a Rate Table from the Available Rate Tables area.
3. Click the Single Left Arrow to move the Rate Table from the Available Rate
Tables area to the Selected Rate Tables area.
Alternatively, double-click a Rate Table to move it from one list to the other.
Step 2 of 3: Define Rate Table Position Assignments
Rate Table Position Assignments is a list of Positions that were created in the Organization
> Hierarchy area.
4. Select a Position from the Available Positions area.
When selecting Rate Table assignments (Positions and Titles), the following
actions are available:
Table 1: Rate Table Assignment Actions
| The Double Left Arrow lets you move all positions or titles from the Available Positions or Available Titles section. You do not need to select a position or title in order to move them. |
|
| The Single Left Arrow lets you move individual positions or titles from the Available Positions or Available Titles section. You must click an item to move it. |
|
| The Single Right Arrow lets you move individual positions or titles from the Assigned Positions or Assigned Titles section. You must click an item to move it. |
|
| The Double Right Arrow lets you move all positions or titles from the Assigned Positions or Assigned Titles section. You do not need to select a position or title in order to move them. |
5. Click the Single Left Arrow (or Double Left Arrow) to move the Position(s) from
the Available Positions area to the Selected Positions area.
Alternatively, double-click a Position to move it from one list to the other.
Step 3 of 3: Define Rate Table Title Assignments
Rate Table Title Assignments is a list of Titles that were created in the Organization >
Titles.
6. Select a Title from the Available Titles area.
7. Click the Single Left Arrow (or Double Left Arrow) to move the Title(s) from the
Available Titles area to the Selected Titles area.
Alternatively, double-click a Title to move it from one list to the other.
8. Click the Generate button.
note: After the Generate button is clicked, only the Rate Table Description field
can be edited.
9. Click the OK button. The File Download screen appears.
10. Click the Save button to save the template file. The Save As screen appears.
11. Enter the name of the Rate Table template in the Filename field.
12. Click the Save button.