Reports > Customize > Incentive Statement Templates
You can use the Incentive Statement Templates area to customize the information displayed in each section of the Incentive Statement report, as well as define which sections can be viewed by all users.
note: Xactly offers a default customization template that applies to all plans that are not currently assigned to a specific template. You can edit or copy this template, but you cannot delete it.
Also, customizations you make in the Reports > Customize > Report Columns area are reflected in the drill-down reports within the Full Reports segment of the Incentive Statement.
Finally, Incent does not display quarterly or yearly aggregate values for percentages.
Customizable Sections
The following table describes the sections that you can customize when managing Incentive Statement templates:
| Segment | Section | Customizable |
|---|---|---|
| Summary | Incentive Summary | Yes |
| Payments | Yes | |
| Quota Attainment | No. The gauges are derived from the Quotas section in the Full Report segment |
|
| Year-to-Date-Summary | No | |
| Previous Year Held Incentives | No | |
| Full Report | Payments | No |
| Quotas | Yes | |
| Credits | Yes | |
| Commissions | Yes | |
| Orders | Yes | |
| Bonuses | Yes | |
| Draws | No |
Screen
 Incentive Statement Templates Screen
All Fields
The following table describes the information available when managing incentive statement templates:
| Field | Description |
|---|---|
| Template Name | The name of the Incentive Statement template. |
| Last Modified | The date and time when the template was last modified. |
How to…
This section describes how to manage Incentive Statement templates.
Display All Incentive Statement Templates
Click the Reports tab, then click Customize > Incentive Statement in the secondary menu. The Incentive Statement Templates screen appears.
- To find specific templates, type part of the name in the Find Templates text box, and click the
 button. The search results appear.
Click the button to clear the Find Templates text box and reset the search
results. - To display the plan assignments for a template, click the name of the template.
The information appears in the Plan Assignments tab. - Use the page navigation buttons to navigate between the pages of Incentive Statement template results.
Create a Template
1. Click the Reports tab, then click Customize > Incentive Statement in the secondary menu. The Incentive Statement Templates screen appears.
2. Click the ![]() button. The Incentive Statement Customization screen appears.
button. The Incentive Statement Customization screen appears.
 Incentive Statement Customization Screen
Click the << Back to Template Library link to return to the main screen without saving the new template.
3. In the Name field, type a name for the template.
4. (Optional) In the Description field, type a description of the template.
5. In the Plan Assignments field, select the plans to associate with the template.
To associate all plans for a year with the new template, click the Select all plans radio button, and choose the plan year using the drop-down list.
To associate specific plans with the new template, do the following:
a. Click the Select individual plans radio button and click the See all Plans link. The Select Plans dialog appears.
b. Select the appropriate plans.
Plans already associated with another template are automatically disabled (with the corresponding template displayed in the Template column).
c. Click the ![]() button. The selected plans are associated with the template.
button. The selected plans are associated with the template.
To remove a plan from the template, click the x button for the corresponding plan.
6. To display a preview of the template, as a particular participant would see it, click the ![]() button.
button.
Do the following:
a. In the Preview plan for field, click the Select Participant link. The Select Participant dialog appears.
b. Select a participant in the list, and click the ![]() button. The Incentive Statement appears, as the selected participant would see it.
button. The Incentive Statement appears, as the selected participant would see it.
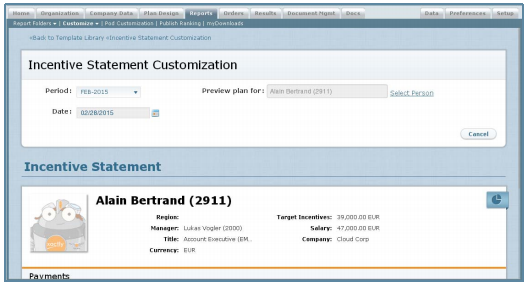 Incentive Statement Customization Preview
c. Review the statement.
d. Click the ![]() button to return to the Incentive Statement Customization screen.
button to return to the Incentive Statement Customization screen.
7. To edit the layout of the template, click the![]() button. The Edit Layout dialog appears.
button. The Edit Layout dialog appears.
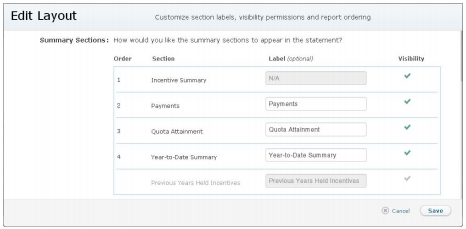 Edit Layout Dialog
Do the following:
a. In the Summary Sections area, click the ![]() button to toggle the visibility of the corresponding summary section in the statement.
button to toggle the visibility of the corresponding summary section in the statement.
A green check mark indicates that the section is visible in the statement; a gray check mark hides the section. Optionally, you can also change the labels of visible sections, as required.
The following sections are visible by default:
• Incentive Summary
• Payments
• Quota Attainment
• Year-to-Date Summary
The Previous Years Held Incentives section is hidden by default.
b. In the Full Report Sections area, click the ![]() button to toggle the visibility of the corresponding report section in the statement.
button to toggle the visibility of the corresponding report section in the statement.
A green check mark indicates that the section is visible in the statement; a gray check mark hides the section. Optionally, you can also change the labels of visible sections, as required.
To change the order in which the report sections appear, drag and drop a section to the new position. Alternatively, you can use the arrow buttons to move report sections up and down accordingly.
The following sections are visible by default:
• Payments
• Quotas
• Credits
• Commissions
• Orders
• Bonuses
The Draws and Objectives sections are hidden by default.
note: The Objectives option is available to businesses using Xactly Objectives.
c. In the Column Visibility field, select whether the year and quarter columns are to appear in the statement.
d. In the Show YTD Credit field, select whether the credits should be added cumulatively.
This setting affects how credits are displayed in the Orders and Credits pod on the sales dashboards.
e. In the Year Column Alignment field, select whether the year column should appear left or right aligned in the full report.
f. Click the ![]() button to save the layout. Alternatively, click the
button to save the layout. Alternatively, click the ![]() button to dismiss the dialog without saving your changes.
button to dismiss the dialog without saving your changes.
8. To change the title of the statement, hover over the title and click the Edit button that appears.
Type the new title of the statement in the text box that appears.
9. To customize the summary section of the statement, hover over the section and click the Edit button that appears. The Edit Summary Section pane appears.
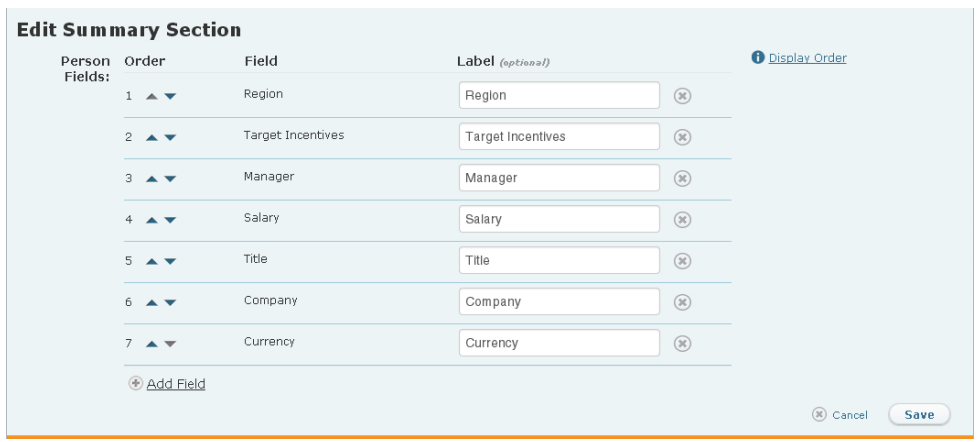 Edit Summary Section
a. To add a field to the summary section, click the ![]() button. The Select Fields dialog appears.
button. The Select Fields dialog appears.
Select the appropriate fields and click the ![]() button.
button.
b. To remove a field from the summary section, click the ![]() button for the corresponding field.
button for the corresponding field.
c. To change the order in which the fields appear, drag and drop a field to the new position. Alternatively, you can use the arrow buttons to move fields up and down accordingly.
To display the order in which the fields appear in the summary section, click the Display Order button.
d. (Optional) To change the label of a field, type the new label in the corresponding text box.
e. Click the![]() button to save your customizations. Alternatively, click
button to save your customizations. Alternatively, click ![]() the button to dismiss the dialog without saving your changes.
the button to dismiss the dialog without saving your changes.
10. To customize the Payments section of the statement, hover over the section and click the Edit button that appears. The Edit Payments Section pane appears.
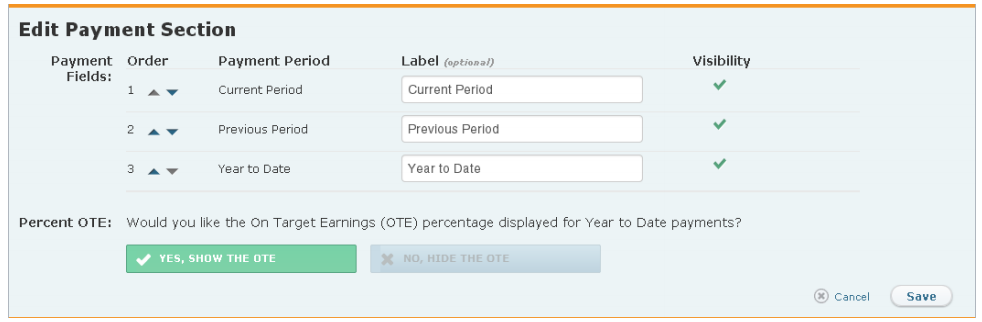 Edit Payment Section
a. To toggle the visibility of a payment field, click the![]() button for the corresponding field. A green check mark indicates that the field is visible in the statement; a gray check mark hides the field.
button for the corresponding field. A green check mark indicates that the field is visible in the statement; a gray check mark hides the field.
b. To change the order in which the fields appear, drag and drop a field to the new position. Alternatively, you can use the arrow buttons to move fields up and down accordingly.
c. (Optional) To change the label of a field, type the new label in the corresponding text box.
d. In the Percent OTE field, select whether you want the On Target Earnings (OTE) percentage displayed for Year to Date payments.
e. Click the![]() button to save your customizations. Alternatively, click
button to save your customizations. Alternatively, click ![]() the button to dismiss the dialog without saving your changes.
the button to dismiss the dialog without saving your changes.
11. To customize the Quotas section in the Full Report segment of the statement, hover over the section and click the Edit button that appears. The Edit Quotas Section pane appears.
 Edit Quotas Section
To include all quotas in the statement, select the Include All radio button.
To select specific quotas, choose the Select Specific Quotas radio button. The list of quotas appear.
a. To add a quota to the statement, click the ![]() button. The Select Quotas dialog appears.
button. The Select Quotas dialog appears.
Select the appropriate quotas and click the![]() button.
button.
b. To remove a quota, click the![]() button for the corresponding quota.
button for the corresponding quota.
c. To change the order in which the quotas appear, drag and drop a quota to the new position. Alternatively, you can use the arrow buttons to move quotas up and down accordingly.
d. (Optional) To change the label of a quota, type the new label in the corresponding text box.
e. To specify the quota attainment types and credit types to include for a quota, click the Edit button for the corresponding quota. The Edit Types dialog appears.
In the Quota Attainment field:
• To include an attainment type for the quota, select the corresponding check box.
• To change the order in which the attainment types appear, drag and drop an entry to the new position. Alternatively, you can use the arrow buttons to move attainment types up and down accordingly.
• (Optional) To change the label of an attainment type, type the new label in the corresponding text box.
• To display a gauge for the attainment type, select the corresponding check box.
In the Quota Credit field:
• To add a credit type for the quota, click the ![]() button.
button.
The Select Credit Types dialog appears. Select the appropriate credit types and click the ![]() button.
button.
• To remove a credit type, click the![]() button for the corresponding credit type.
button for the corresponding credit type.
Click the![]() button to save the quota attainment types and credit types you selected.
button to save the quota attainment types and credit types you selected.
f. Click the![]() button to save your customizations to the Quotas section.
button to save your customizations to the Quotas section.
Alternatively, click the ![]() button to dismiss the dialog without saving your changes.
button to dismiss the dialog without saving your changes.
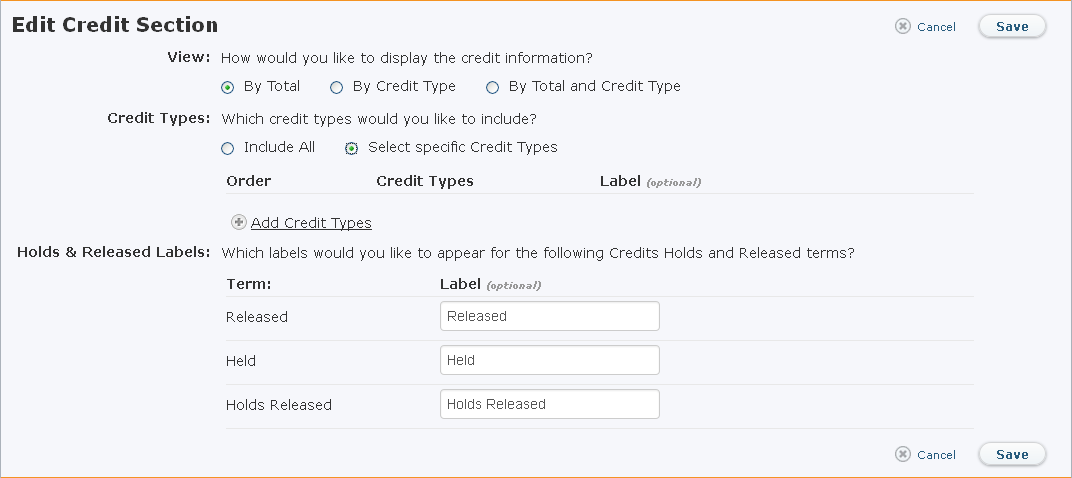
12. To customize the Credits section in the Full Report segment of the statement, hover over the section and click the Edit button that appears. The Edit Credit Section pane appears.
 Edit Credit Section
a. In the View field, specify how to display the credit information by selecting the appropriate radio button.
You can choose to display the credit information by total or by credit type.
b. In the Credit Types field, specify the credit types to include.
To include all credit types in the statement, select the Include All radio button. To select specific credit types, choose the Select Specific Credit Types radio button. The list of credit types appear.
To add a credit type to the statement, click the ![]() button. The Select Credit Types dialog appears.
button. The Select Credit Types dialog appears.
Select the appropriate credit types and click the ![]() button.
button.
To remove a credit type, click the ![]() button for the corresponding credit type.
button for the corresponding credit type.
To change the order in which the credit types appear, drag and drop a credit type to the new position. Alternatively, you can use the arrow buttons to move credit types up and down accordingly.
(Optional) To change the label of a credit type, type the new label in the corresponding text box. If you use the same label for multiple credit types, the credit types with the same label are aggregated and displayed as a single value. Note however that Incent does not aggregate percentage values since, in many cases, these totals do not make sense (such as a quarterly total of monthly percentages).
Note: The credit types you include here appear in the Current Year Credits by Period and Orders and Credits pods, and affect the values in the Team Overview pod in the Home > myHome area. Similarly, the labels you specify here appear in the Current Year Credits by Type pod and in the Orders and Credits drill-down report in the Home > myHome area.
c. In the Holds & Released Labels field, specify the labels for the credit holds and released terms.
d. Click the ![]() button to save your customizations to the Credits section. Alternatively, click the
button to save your customizations to the Credits section. Alternatively, click the ![]() button to dismiss the dialog without saving your changes.
button to dismiss the dialog without saving your changes.
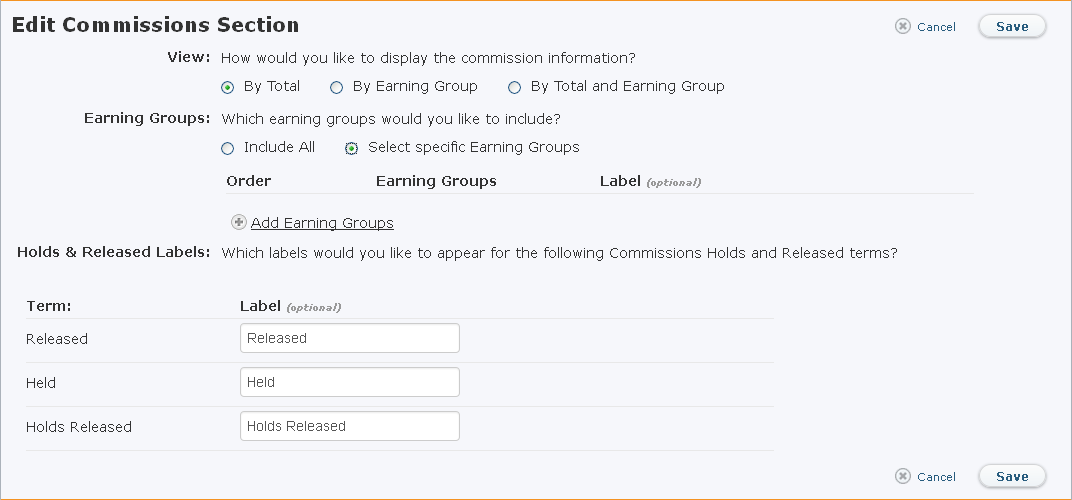
13. To customize the Commissions section in the Full Report segment of the statement, hover over the section and click the Edit button that appears. The Edit Commissions Section pane appears.
 Edit Commissions Section
a. In the View field, specify how to display the commission information by selecting the appropriate radio button.
You can choose to display the commission information by total or by earning group.
b. In the Earning Groups field, specify the earning groups to include.
To include all earning groups in the statement, select the Include All radio button. To select specific earning groups, choose the Select Specific Earning Groups radio button. The list of earning groups appear.
To add an earning group to the statement, click the ![]() button. The Select Earning Groups dialog appears.
button. The Select Earning Groups dialog appears.
Select the appropriate earning groups and click the ![]() button.
button.
To remove an earning group, click the ![]() button for the corresponding earning group.
button for the corresponding earning group.
To change the order in which the earning groups appear, drag and drop an earning group to the new position. Alternatively, you can use the arrow buttons to move earning groups up and down accordingly.
(Optional) To change the label of an earning group, type the new label in the corresponding text box. If you use the same label for multiple earning groups, the earning groups with the same label are aggregated and displayed as a single value. Note however that Incent does not aggregate percentage values since, in many cases, these totals do not make sense (such as a quarterly total of monthly percentages).
Note: The earning groups you include here appear in the Current Year Commissions by Period pod in the Home > myHome area.
c. In the Holds & Released Labels field, specify the labels for the commission holds and released terms.
d. Click the ![]() button to save your customizations to the Commissions section. Alternatively, click the
button to save your customizations to the Commissions section. Alternatively, click the ![]() button to dismiss the dialog without saving your changes.
button to dismiss the dialog without saving your changes.
14. To customize the Orders section in the Full Report segment of the statement, hover over the section and click the Edit button that appears. The Edit Orders Section pane appears.
 Edit Orders Section
a. In the View field, specify how to display the order information by selecting the appropriate radio button.
You can choose to display the order information by total or by order type.
b. In the Order Types field, specify the order types to include.
To include all order types in the statement, select the Include All radio button. To select specific order types, choose the Select Specific Order Types radio button. The list of order types appear.
To add an order type to the statement, click the ![]() button. The Select Order Types dialog appears.
button. The Select Order Types dialog appears.
Select the appropriate order types and click the ![]() button.
button.
To remove an order type, click the ![]() button for the corresponding order type.
button for the corresponding order type.
To change the order in which the order types appear, drag and drop an order type to the new position. Alternatively, you can use the arrow buttons to move order types up and down accordingly.
(Optional) To change the label of an order type, type the new label in the corresponding text box. If you use the same label for multiple order types, the order types with the same label are aggregated and displayed as a single value. Note however that Incent does not aggregate percentage values since, in many cases, these totals do not make sense (such as a quarterly total of monthly percentages).
The order types you include here appear in the Orders and Credits pod and the associated drill-down report in the Home > myHome area.
c. Click the ![]() button to save your customizations to the Orders section. Alternatively, click the
button to save your customizations to the Orders section. Alternatively, click the ![]() button to dismiss the dialog without saving your changes.
button to dismiss the dialog without saving your changes.
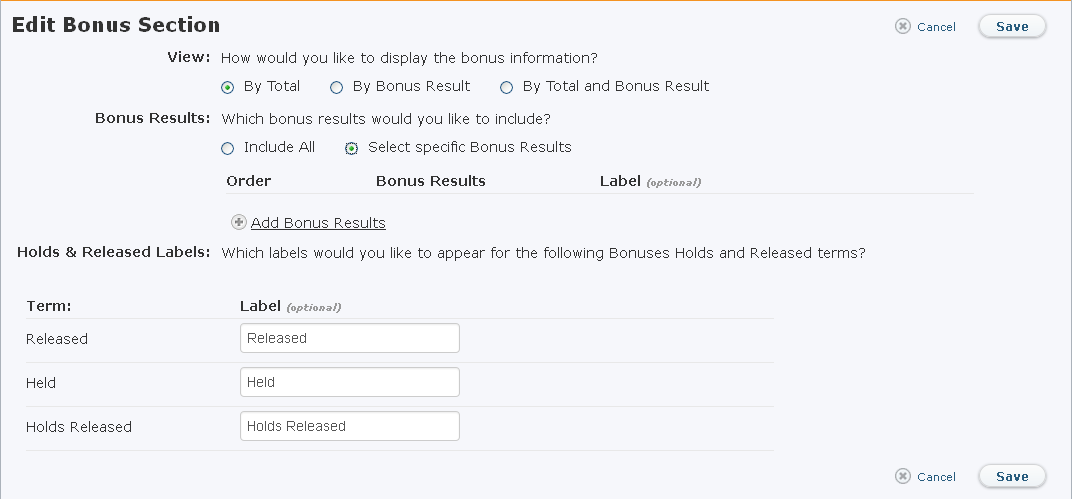
15. To customize the Bonuses section in the Full Report segment of the statement, hover over the section and click the Edit button that appears. The Edit Bonus Section pane appears.
 Edit Bonus Section
a. In the View field, specify how to display the bonus information by selecting the appropriate radio button.
You can choose to display the bonus information by total or by bonus result.
b. In the Bonus Results field, specify the bonus results to include.
To include all bonus results in the statement, select the Include All radio button. To select specific bonus results, choose the Select Specific Bonus Results radio button. The list of bonus results appear.
To add a bonus result to the statement, click the ![]() button. The Select Bonus Results dialog appears.
button. The Select Bonus Results dialog appears.
Select the appropriate bonus results and click the ![]() button.
button.
To remove a bonus result, click the ![]() button for the corresponding bonus result.
button for the corresponding bonus result.
To change the order in which the bonus results appear, drag and drop a bonus result to the new position. Alternatively, you can use the arrow buttons to move bonus results up and down accordingly.
(Optional) To change the label of a bonus result, type the new label in the corresponding text box. If you use the same label for multiple bonus results, the bonus results with the same label are aggregated and displayed as a single value. Note however that Incent does not aggregate percentage values since, in many cases, these totals do not make sense (such as a quarterly total of monthly percentages).
Note: The bonus results you include here appear in the Current Year Bonuses by Period pod in the Home > myHome area.
c. In the Holds & Released Labels field, specify the labels for the bonus holds and released terms.
d. Click the ![]() button to save all your customizations to the template.
button to save all your customizations to the template.
Edit a Template
- Click the Reports tab, then click Customize > Incentive Statement in the secondary menu. The Incentive Statement Templates screen appears.
- Hover over a template in the list, and click the Edit button that appears. The Incentive Statement Customization screen appears.
- Modify the fields, as required.
- Click the
 button to save all your customizations to the template. Alternatively, click the << Back to Template Library link to return to the main screen without saving your changes.
Copy a Template
- Click the Reports tab, then click Customize > Incentive Statement in the secondary menu. The Incentive Statement Templates screen appears.
- Hover over a template in the list, and click the Copy button that appears. The Incentive Statement Customization screen appears.
- In the Name field, type a new name for the template.
- Modify any other fields, as required.
- Click the button to save all your customizations to the template. Alternatively, click the << Back to Template Library link to return to the main screen without saving your changes.
Delete a Template
- Click the Reports tab, then click Customize > Incentive Statement in the secondary menu. The Incentive Statement Templates screen appears.
- Hover over a template in the list, and click the Delete button that appears. A confirmation dialog appears.
- Click the
 button to delete the template.
Alternatively, click the button to dismiss the dialog without deleting the template.