Reports > Customize > Plan Summary
The Plan Summary area allows administrators to define which sections of the standard Plan Summary report can be viewed by all users. You can make hidden any sections that you don’t want users to see.
You can perform the following tasks on the Plan Summary page:
- Edit Report—Select the report sections that users can view
- Plan Summary—Adjust how employee information is displayed
- Plan Quotas—Change the section label
- Commission Rates—Change the section label, and adjust how commission rates
are displayed. - Draw—Change the section label
- Bonuses—Change the section label
note: Rate tables and quotas appear on reports only if they are directly assigned to a person’s position, or if they are associated with the result of a commission rule on a person’s plan. Rate tables and quotas associated with a person through others means, such as formulas, do not appear on standard Incent reports.
Screen
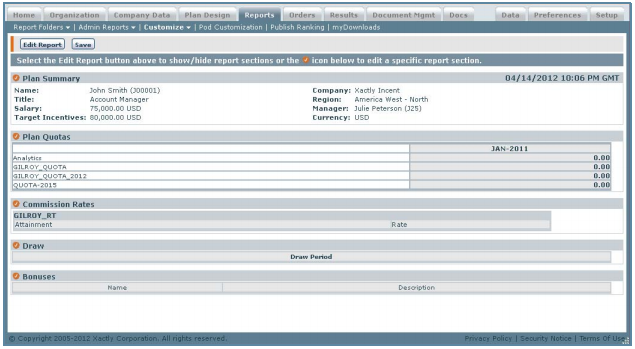 Plan Summary Screen
All Fields
The following table describes the information you can specify when customizing the plan summary:
| Section | Column | Description |
|---|---|---|
| Plan Summary | Name | The name of the person. |
| Title | The title of the person. | |
| Salary | The salary of the person. | |
| Target Incentives | The target incentives of the person. | |
| Company | The company name for the person. | |
| Region | The region | |
| Manager | The person's manager. | |
| Currency | The compensation currency. | |
| Plan | Quota XXXX | Each QTR-X-XXXX column displays a plan quota value for the particular quarter. |
| Commission Rates | Attainment | The percentage ranges for attainment goals. |
| Rate | The commission rate to be paid upon meeting the associated attainment goal. |
|
| Draw | Draw Period | The period of the draw. |
| Bonuses | Name | The name of the bonus. |
| Description | A description of the bonus. |
How to…
Edit the Reports Section
1. Click the Reports tab, then click Customize > Plan Summary in the secondary menu. The Plan Overview screen appears.
2. Click the Edit Report button, and the following screen appears:
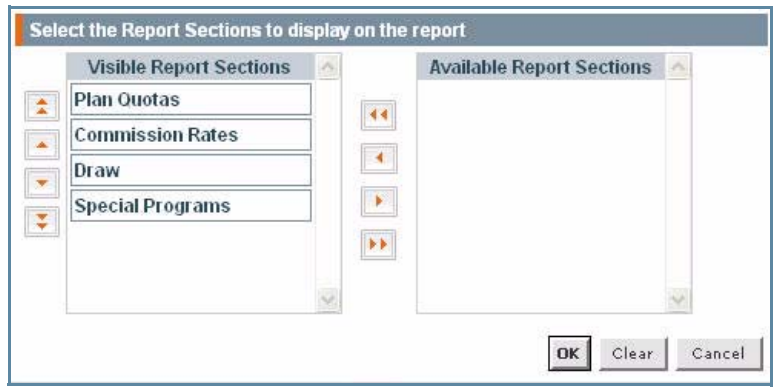 Plan Summary Edit Report Screen
3. Drag and drop any reports sections that you do not want to be visible to the Available Report Sections area.
4. Use the Up and Down Arrows to re-order the report sections in the Visible Report Sections column.
5. Click OK.
6. Click the Save button on the Plan Summary screen to save your changes.
Change the Plan Summary
For this section, you can change how information is displayed about an employee, including a name, title, salary, incentives, company, manager, and currency.
note: By default, the content appearing in a plan summary is identical to the information in a plan document. If you customize a plan summary, you need complete similar customizations to the plan document template to have both continue to display the same information.
1. Click the ![]() icon in front of Plan Summary. The following screen appears:
icon in front of Plan Summary. The following screen appears:
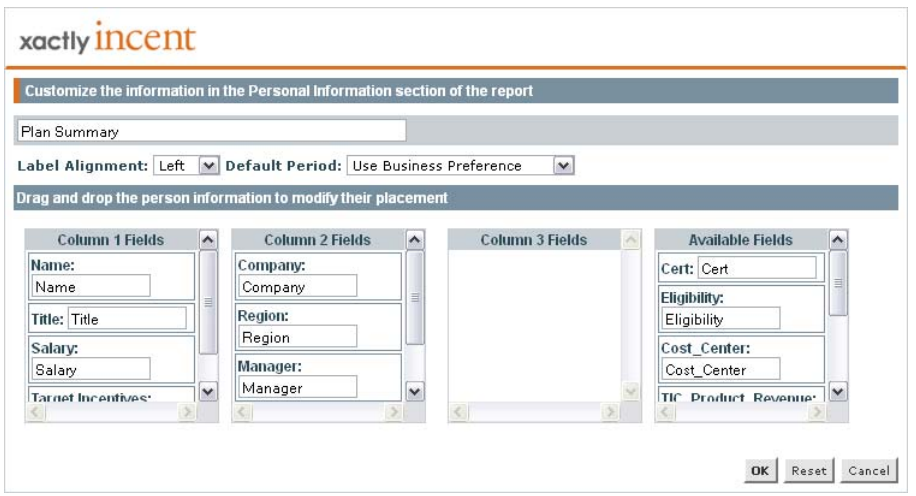 Customize Plan Summary Screen
2. Modify the report section label, as required. By default, the label is set to Plan Summary.
3. In the Label Alignment field, choose either Left or Right using the drop-down list.
4. In the Default Period field, choose the default period for the report.
You can choose from among the following options:
• Use Business Preference (default). This is the value in the REPORT_DEFAULT_PERIOD setting.
• First Open Period
• Last Closed Period
• Period Prior to Current Date (for example, if today’s date is Feb 15, 2017 and, assuming the default calendar, the period would default to Jan-2017)
• Current Calendar Period (for example, if today’s date is Feb 15, 2017 and, assuming the default calendar, the period would default to Feb-2017)
5. Select the standard and custom person fields to display, arrange the information across three columns, hide any fields you do not want to display, and change the field labels.
• To move any of the fields drag and drop them to another column.
• To hide any of the fields so they do not display on the report, drag and drop them to the Available Fields column.
• To change any of the field labels, double-click on the field and change the field label name.
6. Click OK.
7. Click the Save button on the Plan Summary screen to save your changes.
Change the Plan Quotas
You can change the Plan Quotas section label name by doing the following:
- Click the
 icon in front of Plan Quotas.
 - Enter the new name on the screen that appears.
- Click OK.
- Click the Save button on the Plan Summary screen to save your changes.
Change the Commission Rates
You can change the Commission Rates section label name, select the number of columns in which to display rate tables, and select rate tables that you want to be hidden in all reports.
To modify the Commission Rates area, complete these steps:
1. Click the icon in front of Commission Rates. The following screen appears:
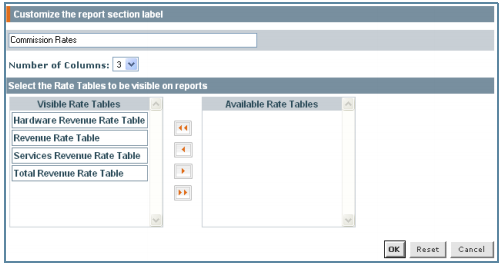 Commission Rates Screen
2. You can change the Commission Rates name to another name.
3. You can select 1, 2, or 3 columns in which to display the rate tables.
4. Scroll down to view the entire list of Visible Rate Tables, if necessary. (The rate tables are always displayed in alphanumeric order.)
5. Drag and drop any rate tables that you do not want to appear in the report to the Available Rate Tables area.
6. Use the Up and Down Arrows to re-order the report sections in the visible Report Sections column.
7. Click OK.
8. Click the Save button on the Plan Summary screen to save your changes.
Change the Draw
You can change the Draw section label name by doing the following:
- Click the icon in front of Draw.
- Enter the new name on the screen that appears.
- Click OK.
- Click the Save button on the Plan Summary screen to save your changes.
Change the Bonuses
You can change the Bonuses section label name by doing the following:
- Click the icon in front of Bonuses.
- Enter the new name on the screen that appears.
- Click OK.
- Click the Save button on the Plan Summary screen to save your changes.