Results > Bonuses
You can use the Bonuses area to view calculated bonuses in a period. A bonus may be calculated based on an order item. Bonuses are not dependent on a credit being created.
note: Business group administrators can only search, view, and download bonus results that are associated with business groups to which the administrators themselves are assigned. Similarly, business group administrators can only search, view, create, release, and download held bonuses that are associated with business groups to which the administrators themselves are assigned.
Customizing Searches
The Released and Held pages offer you the ability to customize your standard searches. By configuring and saving the search fields and columns, you can tailor the search experience to your needs and save time finding precisely the information you need. Customized searches are defined by the following information:
• Search fields—The specific data fields used in the search. The search fields you specify appear in the Filters pane of the sidebar after running a search, allowing you to fine-tune your search in an iterative fashion.
• Columns—The columns of data that appear as part of the search results. Specifying the columns and their order allows you to prioritize important information on the search results page.
You can also create saved searches that define specific search fields and search criteria. You can then access not only your previously-saved searches, but also searches saved by other administrators. You can further mark certain saved searches as favorites for quick and easy access.
For more information, see “Customizing and Saving Searches”.
Screen
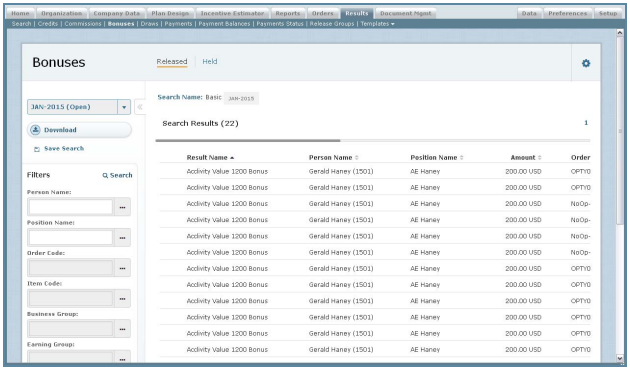 Bonuses Screen
Released Bonuses
The following table describes the information displayed when searching bonuses on the Released page:
| Field | Description |
|---|---|
| Actual Release Date | The date the bonus was released. |
| Amount | The amount of the bonus for the position or person. |
| Business Group | The business group associated with the bonus. |
| Created Date | The date and time on which the bonus was created. |
| Customer Name | A descriptive name for the customer. |
| Earning Group | The earning group associated with the bonus. |
| Est. Release Date | The estimated release date of a processed bonus. |
| Geography Name | A descriptive name for the geography. |
| Held? | Indicates whether the bonus is held. |
| Incentive Date | The date that a calculated incentive is given to a salesperson for an order item. |
| Input Type | The input type specifying how a rule is triggered. Bonuses can be triggered by either an order or a credit. |
| Item Code | The order item code associated with the bonus. |
| Order Code | The order code associated with the bonus. |
| Period | The period for which bonuses are displayed. |
| Person Name | The name of the person associated with the bonus. |
| Position Name | The name of the position associated with the bonus. |
| Product Name | A descriptive name for the product. |
| Reason Code | The reason code, as defined in the Setup > Configure > Reason Code area. |
| Result Name | The name of the bonus. |
| Rule Name | The name of the rule used to calculate the bonus. |
Held Bonuses
The following table describes the information displayed when searching bonuses on the Held page:
| Field | Description |
|---|---|
| Actual Release Date | The date the bonus was released. |
| Amount | The amount of the bonus for the position or person. |
| Business Group | The business group associated with the bonus. |
| Created Date | The date and time on which the bonus was created. |
| Customer Name | A descriptive name for the customer. |
| Earning Group | The earning group associated with the bonus. |
| Est. Release Date | The estimated release date of a processed bonus. |
| Geography Name | A descriptive name for the geography. |
| Held? | Indicates whether the bonus is held. |
| Incentive Date | The date that a calculated incentive is given to a salesperson for an order item. |
| Input Type | The input type. |
| Item Code | The order item code associated with the bonus. |
| Order Code | The order code associated with the bonus. |
| Period | The period for which bonuses are displayed. |
| Person Name | The name of the person associated with the bonus. |
| Position Name | The name of the position associated with the bonus. |
| Product Name | A descriptive name for the product. |
| Reason Code | Used to audit the reason why a bonus was put on hold. |
| Result Name | The name of the bonus. |
| Rule Name | The name of the rule used to calculate the bonus. |
note: You can configure the search fields that appear in the Filters pane of the sidebar when defining the search settings.
How to …
This section describes how to manage bonus results.
Manage Bonuses
Click the Results tab, then click Bonuses in the secondary menu. The Bonuses screen appears.
• To manage released bonuses, click the Released button. The Released Bonuses screen appears allowing you to search and download released bonuses.
For more information about managing released bonuses, see “Manage Released Bonuses”.
• To manage held bonuses, click the Held button. The Held Bonuses screen appears allowing you to view, release, and download held bonuses.
For more information about managing held bonuses, see “Manage Held Bonuses”.
Manage Released Bonuses
You can use the Released page to manage released bonuses. Using the Released page, you can complete the following tasks:
• Search released bonuses (both basic and more complex searches)
• Customize your search filters and results
• Download released bonuses
Search Released Bonuses
1. Click the Results tab, then click Bonuses in the secondary menu. The Bonuses > Released screen appears allowing you to specify the search criteria.
2. In the Period field (on the left), choose a period using the drop-down list.
3. Specify the basic search criteria.
Do the following:
• In text fields, type an appropriate value in the field.
• In drop-down list fields, choose the appropriate value.
• In fields that allow you to search for a value, click the ![]() button and select the appropriate value using the dialog that appears.
button and select the appropriate value using the dialog that appears.
• In date fields, click the ![]() button and select the appropriate date using the dialog that appears.
button and select the appropriate date using the dialog that appears.
• To clear a field, click the ![]() button for the corresponding field.
button for the corresponding field.
4. Define a search using more fields, if required.
Do the following:
a. Click the More Search Options button (near the bottom).
b. In the Basic Search section, modify the basic search criteria.
c. In the General Result Information, Order Information, and Bonus Information sections, specify or modify the additional search criteria.
5. Click the ![]() button. The search results appear.
button. The search results appear.
The search criteria appear above the results, as shown below:
![]() Search Criteria
Search Criteria
To remove a field from the search criteria, click the ![]() button for the corresponding field.
button for the corresponding field.
6. Refine the search results, as required.
Do the following:
• In the Period field (on the left), choose a period using the drop-down list. The results update immediately.
• In the Filters pane (on the left), specify additional search criteria to further filter the search results and click the ![]() button. The updated results appear.
button. The updated results appear.
• Click the ![]() button to save the current search. The Create Saved Search dialog appears. Type a name for the search and click the
button to save the current search. The Create Saved Search dialog appears. Type a name for the search and click the![]() button.
button.
7. To display bonus details, click a bonus. A Details pane appears displaying general result, person, order, and bonus information.
Download Released Bonuses
You can download released bonuses to either a Comma Separated Values (CSV) or text (.TXT) file.
1. Click the Results tab, then click Bonuses in the secondary menu. The Bonuses > Released screen appears allowing you to specify the search criteria.
2. Select the appropriate period.
3. To download all bonuses for the selected period, click the ![]() button. The Download dialog appears.
button. The Download dialog appears.
a. In the Download Name field, type the name of the download.
b. In the Download Format field, select the download format (either CSV or TXT).
4. To download specific bonuses, search for the appropriate bonuses. The search results appear.
a. Click the![]() button. The Download dialog appears.
button. The Download dialog appears.
b. In the Download Name field, type the name of the download.
c. In the Download Format field, select the download format (either CSV or TXT).
5. Click the![]() button.
button.
The download starts processing. You can check the status by clicking the![]() button in the main menu (top right of the screen). Click OK again.
button in the main menu (top right of the screen). Click OK again.
Manage Held Bonuses
You can use the Held page to manage held credits. Using the Held page, you can complete the following tasks:
• Search held bonuses (both basic and more complex searches)
• Customize your search filters and results
• Release held bonuses
• Add and view comments
• Download held bonuses
note: Access to the Held page is set in the Setup > Roles area (by setting the Holds privilege to Read-Write).
Search Held Bonuses
1. Click the Results tab, then click Bonuses in the secondary menu. The Bonuses > Released screen appears. Click the Held button.
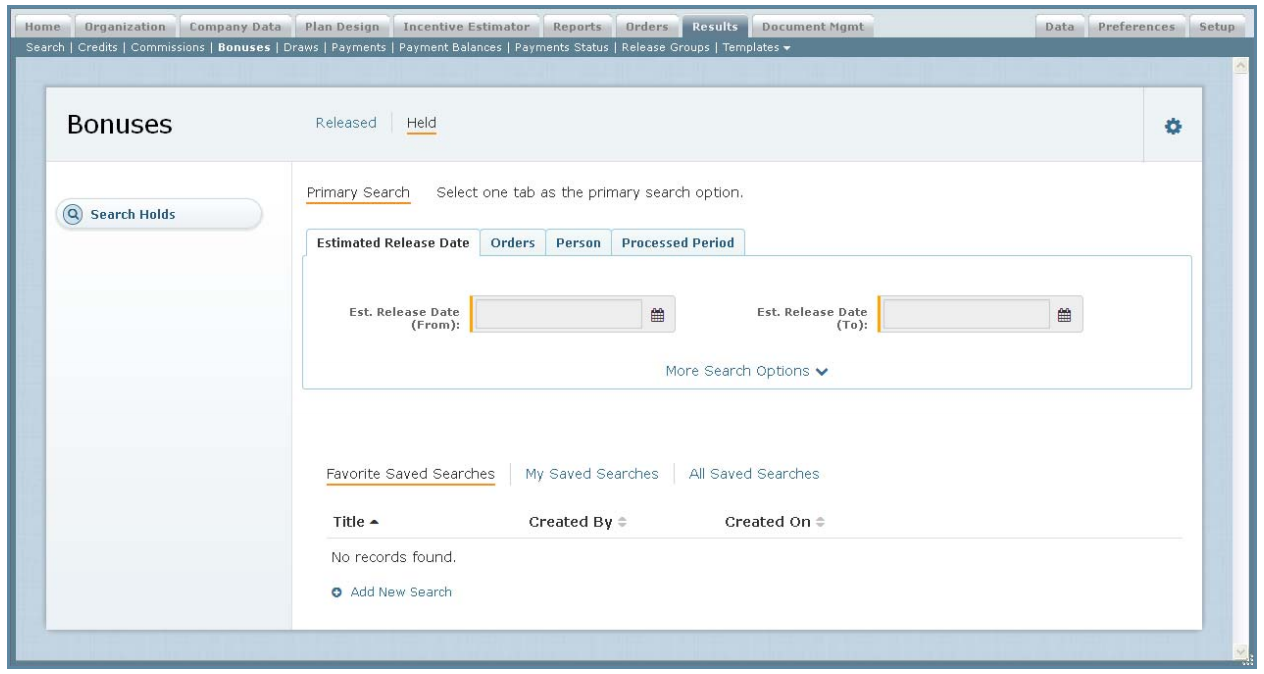 Basic Search Screen
2. Select a tab to specify the primary search criteria.
You need to choose from among the following:
• Estimated Release Date—Use to search by a range of estimated release dates
• Orders—Use to search by order and item codes
• Person—Use to search by person
• Processed Period—Use to search by processed period
3. Specify the basic search criteria.
Do the following:
• In text fields, type an appropriate value in the field.
• In drop-down list fields, choose the appropriate value.
• In fields that allow you to search for a value, click the ![]() button and select the appropriate value using the dialog that appears.
button and select the appropriate value using the dialog that appears.
• In date fields, click the ![]() button and select the appropriate date using the dialog that appears.
button and select the appropriate date using the dialog that appears.
• To clear a field, click the![]() button for the corresponding field.
button for the corresponding field.
4. Define a search using more fields, if required.
Do the following:
a. Click the More Search Options button (near the bottom).
b. In the Basic Search section, modify the basic search criteria.
c. In the General Result Information, Person Information, Order Information, and Bonus Information sections, specify or modify the additional search criteria.
5. Click the ![]() button. The search results appear.
button. The search results appear.
The search criteria appear above the results, as shown below:
![]() Search Criteria
Search Criteria
To remove a field from the search criteria, click the button for the corresponding field.
6. Refine the search results, as required.
Do the following:
• In the Filters pane (on the left), specify additional search criteria to further filter the search results and click the![]() button. The updated results appear.
button. The updated results appear.
• Click the ![]() button to save the current search. The Create Saved Search dialog appears. Type a name for the search and click the button.
button to save the current search. The Create Saved Search dialog appears. Type a name for the search and click the button.
7. To display bonus details, click a bonus. A Details pane appears.
Release Held Bonuses
1. Click the Results tab, then click Bonuses in the secondary menu. The Bonuses > Released screen appears. Click the Held button.
2. Search for the appropriate held bonuses.
3. To release specific held bonuses, select the corresponding check boxes, hover over the ![]() button, and choose Selected Holds. The Release Selected dialog appears.
button, and choose Selected Holds. The Release Selected dialog appears.
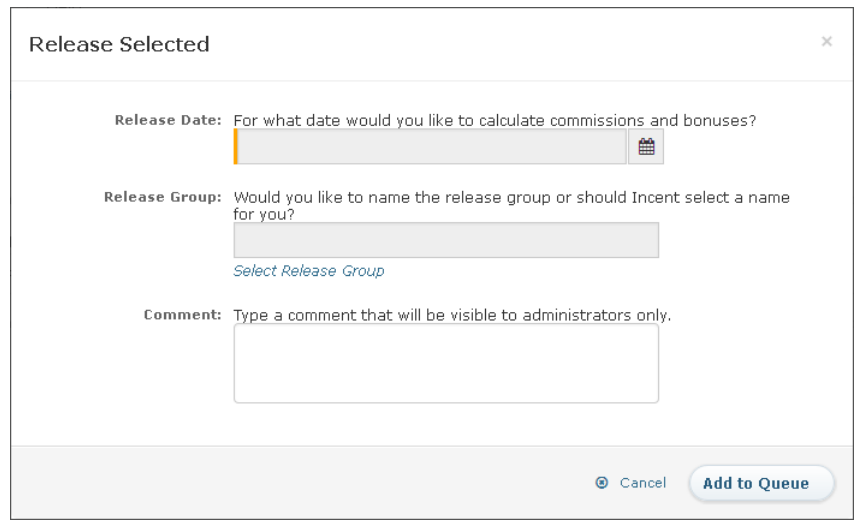 Release Selected Dialog
Alternatively, to release all held bonuses in the current search, hover over the ![]() button, and choose Holds in Primary Search.
button, and choose Holds in Primary Search.
Do the following:
a. In the Release Date field, select the date for which the payment applies.
b. (Optional) In the Release Group field, select the corresponding release group.
If you leave this field blank, the release group is generated automatically during processing.
c. (Optional) In the Comment field, type a comment (that will be visible to administrators only).
d. Click the ![]() button. The release action is added to the process queue.
button. The release action is added to the process queue.
Display and Add Comments
You can add comments to held bonuses, and display existing comments, as appropriate.
1. Click the Results tab, then click Bonuses in the secondary menu. The Bonuses > Released screen appears. Click the Held button.
2. To display existing comments, click the ![]() button that appears to the left of held bonuses (in the results list). The Comments dialog appears showing the current comments.
button that appears to the left of held bonuses (in the results list). The Comments dialog appears showing the current comments.
3. To add a comment, do any of the following:
• Click the![]() button to the left of a held bonuses and type the comment in the text box.
button to the left of a held bonuses and type the comment in the text box.
• Select one or more check boxes next to held bonuses, click the ![]() button, and type the comment in the text box.
button, and type the comment in the text box.
• When viewing existing comments, type the comment in the text box.
Click the ![]() button.
button.
Download Held Bonuses
You can download held bonuses to either a Comma Separated Values (CSV) or text (.TXT) file.
1. Click the Results tab, then click Bonuses in the secondary menu. The Bonuses > Released screen appears. Click the Held button.
2. Search for the appropriate held bonuses.
3. Click the ![]() button. The Download dialog appears.
button. The Download dialog appears.
4. In the Download Name field, type the name of the download.
5. In the Download Format field, select the download format (either CSV or TXT), and click Download.
The download starts processing. You can check the status by clicking the ![]() button in the main menu (top right of the screen). Click OK again.
button in the main menu (top right of the screen). Click OK again.