Introduction to Results
The Results area is used by administrators to display and manage credits, commissions, bonuses, draws and payments that have been calculated or created. Manual adjustments such as credits and bonuses can also be created using this area. In addition, payments can be reviewed, finalized, and released to payroll.
note: The period you select in the Orders and Results areas remains in effect in these areas (during your current session) until you select another period.
What You Can Do
You can complete the following tasks in the Results area:
• Search, display, and download released credits, commissions, and bonuses
• Search, display, release, download, and add comments to held credits, commissions, and bonuses
• Search, display, and download draws
• Search, display, calculate balances, finalize, release, and download payments
• Search, display, add, upload, download, delete, and add comments to manual payments
• Search, display, and download payment balances
• Search, display, and create a PDF listing prior period results
• Search and display the payment status
• Search, display, and create release groups
• Create a payment download template
Related Articles
• Search
• Credits
• Commissions
• Bonuses
• Draws
• Payments
• Payment Balances
• Payment Status
• Release Groups
• Templates (Incent only)
Access Control
The Results privilege with its underlying pages is needed for access to the Results area.
Relationship to Other Areas
The following figure shows how the tasks you perform in the Results area fit in the Xactly Incent and Modeling workflow.
 Typical Implementation Process Flow
Rounding within Calculations
Calculations are rounded to the 5th decimal place at the end of the calculation process. For example, if an exchange rate is entered to the 18th decimal place, the calculation uses the 18th decimal place and then rounds the result to the 5th decimal place.
note: When presenting numeric values with long decimal precision, Incent and Modeling may round the value for (user interface) display purposes only. The actual value remains unchanged in the database for calculation purposes.
note: For more information about attainment calculations, see the Xactly Incent Concepts Guide.
Customizing and Saving Searches
Several pages in the Results area offer you the ability to customize your standard searches. By configuring and saving the search fields and columns, you can tailor the search experience to your needs and save time finding precisely the information you need. Customized searches are defined by the following information:
• Search fields—The specific data fields used in the search. The search fields you specify appear in the Filters pane of the sidebar after running a search, allowing you to fine-tune your search in an iterative fashion.
• Columns—The columns of data that appear as part of the search results.
Specifying the columns and their order allows you to prioritize important information on the search results page.
You can also create saved searches that define specific search fields and search criteria. You can then access not only your previously-saved searches, but also searches saved by other administrators. You can further mark certain saved searches as favorites for quick and easy access.
This section describes how to customize searches, and create and manage saved searches in the Results area.
Customize Searches
1. Click the Results tab, then navigate to the appropriate page (such as Bonuses, for example).
2. Click the ![]() button. The Settings screen appears.
button. The Settings screen appears.
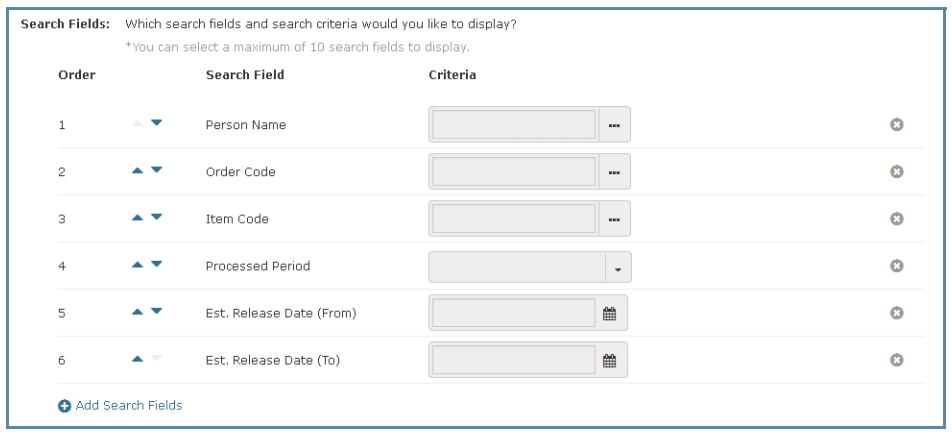
3. In the Search Fields section, specify the search fields and respective search criteria.
The search fields you specify appear in the Filters pane of the sidebar after running a search.
note: You can select a maximum of 10 search fields to display.
Do the following:
a. To add a search field, click the ![]() button. The Select Search Fields dialog appears.
button. The Select Search Fields dialog appears.
Select the appropriate search fields and click the ![]() button.
button.
b. To remove a search field, click the![]() button for the corresponding field.
button for the corresponding field.
c. To change the order in which the search fields appear, drag and drop a field to the new position. Alternatively, you can use the arrow buttons to move fields up and down accordingly.
4. In the Columns section, specify the columns to display on the Basic Search page.
Do the following:
a. To add a column, click the ![]() button. The Select Columns dialog appears.
button. The Select Columns dialog appears.
Select the appropriate columns and click the![]() button.
button.
b. To remove a column, click the![]() button for the corresponding column.
button for the corresponding column.
c. To change the order in which the columns appear, drag and drop a column to the new position. Alternatively, you can use the arrow buttons to move columns up and down accordingly.
5. Click the ![]() button to save the search settings.
button to save the search settings.
Alternatively, click the ![]() button to dismiss the screen without saving the search settings.
button to dismiss the screen without saving the search settings.
Create a Saved Search
1. Click the Results tab, then navigate to the appropriate page (such as Bonuses, for example).
2. Click the![]() button. The Create Saved Search screen appears.
button. The Create Saved Search screen appears.
3. In the Name field, type a name for the saved search.
4. In the Favorite List field, specify whether you would you like to include the saved search in your Favorite Saved Searches list.
This lets you quickly access your most frequently used searches.
5. In the Search Fields section, specify the search fields and respective search criteria.
The search fields you specify appear in the Filters pane of the sidebar after running a search.
note: You can select a maximum of 10 search fields to display.
 Saved Search Fields
a. To add a search field, click the ![]() button. The Select Search Fields dialog appears.
button. The Select Search Fields dialog appears.
Select the appropriate search fields and click the![]() button.
button.
b. To remove a search field, click the![]() button for the corresponding field.
button for the corresponding field.
c. To change the order in which the search fields appear, drag and drop a field to the new position. Alternatively, you can use the arrow buttons to move fields up and down accordingly.
d. Specify default values for the search fields, as appropriate.
6. Click the ![]() button to create the saved search.
button to create the saved search.
Run a Saved Search
1. Click the Results tab, then navigate to the appropriate page.
2. Display the available saved searches.
You can click any of the following buttons:
• Favorite Saved Searches—Saved searches that you have marked as favorites
• My Saved Searches—Saved searches that you have created
• All Saved Searches—Saved searches created by all administrators in your organization
3. Click the saved search you want to run. The search results appear on the page.
Edit a Saved Search
note: You can only edit saved searches that you have created. You cannot edit saved searches created by other administrators in your organization.
1. Click the Results tab, then navigate to the appropriate page.
2. Display the available saved searches.
Click the appropriate button to display your favorite saved searches, all your saved searches, or all saved searches (including those created by others administrators in your organization).
3. Hover over a saved search and click the Edit button that appears. The Edit Saved Search screen appears.
4. Modify the saved search, as required.
5. Click the button to save your changes to the saved search.
Alternatively, click the![]() button to dismiss the screen without saving your changes to the saved search.
button to dismiss the screen without saving your changes to the saved search.
Copy a Saved Search
You can copy a saved search, including one created by another administrator in your organization, to use as the basis of a new saved search.
1. Click the Results tab, then navigate to the appropriate page.
2. Display the available saved searches.
Click the appropriate button to display your favorite saved searches, all your saved searches, or all saved searches (including those created by others administrators in your organization).
3. Hover over a saved search and click the Copy button that appears. The Copy Saved Search screen appears.
4. In the Name field, type a new name for the saved search.
5. Modify the saved search, as required.
6. Click the ![]() button to save the new saved search.
button to save the new saved search.
Alternatively, click the ![]() button to dismiss the screen without saving the new saved search.
button to dismiss the screen without saving the new saved search.
Delete a Saved Search
1. Click the Results tab, then navigate to the appropriate page.
2. Display the available saved searches.
Click the appropriate button to display your favorite saved searches, all your saved searches, or all saved searches (including those created by others administrators in your organization).
3. Hover over a saved search and click the Delete button that appears. The Confirm Delete dialog appears.
Click the ![]() button to confirm the operation. Alternatively, click the
button to confirm the operation. Alternatively, click the![]() button to dismiss the dialog without deleting the saved search.
button to dismiss the dialog without deleting the saved search.
Manage Prior Period Processing Results
Prior period processing is the means by which Incent allows you to reprocess prior periods to generate retroactive adjustments to results, known as prior period adjustments (PPA). When PPP is run, all changes are applied to a new version of the results, which are rolled forward to the current period.
This maintains the integrity of your original results—which were used to pay your team—and allows you to show a comparison between the original and later calculations, as these calculations might affect incentives.
note: Prior period processing is disabled by default. Contact Xactly Support to have PPP enabled for your organization. For more information about managing prior period processing within Incent, see “Manage Prior Period Processing.” For background and details about PPP, see the Xactly Incent Concepts Guide.
PPP can store up to 12 versions of any period. This means that you can reprocess the prior 11 periods to adjust for changes. For example, if the current period is June, you could reprocess results starting with the prior July.
After processing is complete, you can show how the July data was calculated in August, September, and so on, using the As of Period drop-down list on several pages in the Results area of Incent, displaying each of those versions of July data and what changed over time.
For example, you could use the As of Period field (on the left) to choose the period for which you would like to see credits, commissions, bonuses, draws, payments, and payment balances “as of” the selected period.
note: This field only appears when you have Prior Period Processing (PPP) enabled for your business.
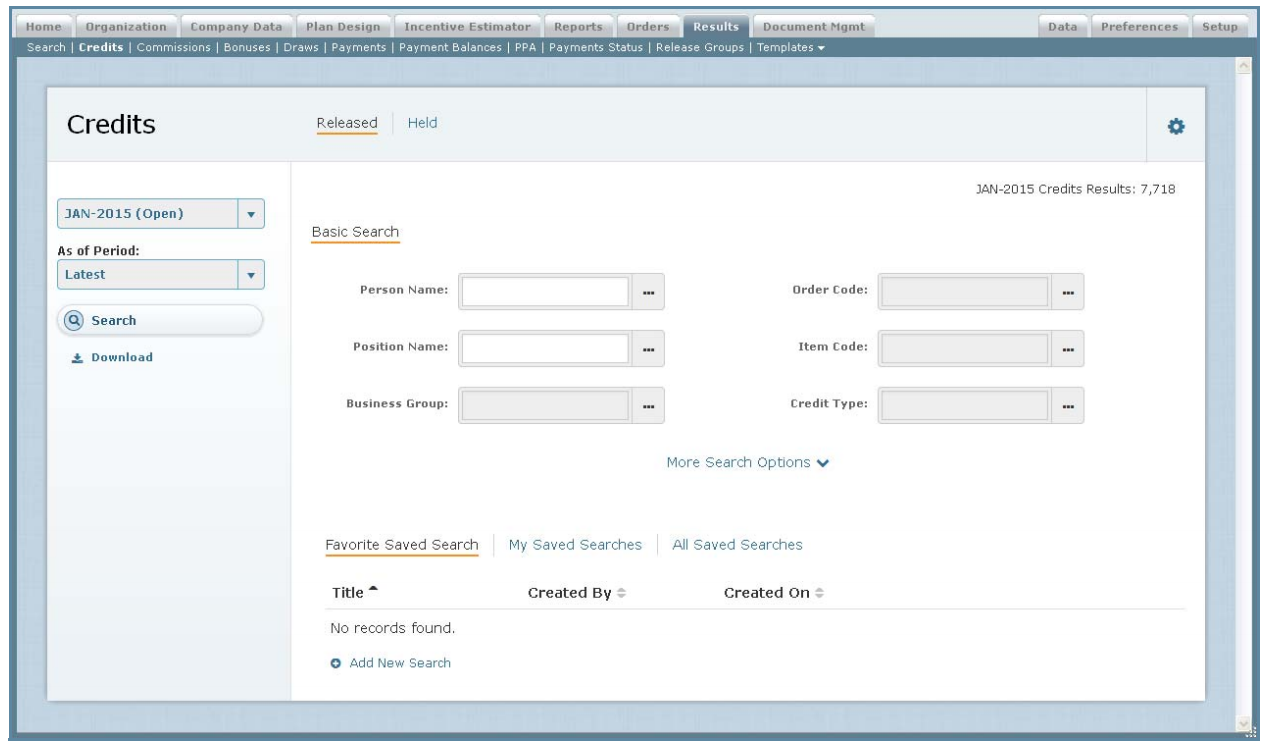 Credit Results Search with “As of Period” Option
When prior period processing is enabled, you also gain access to two additional ways to search and display results:
• Perform advanced searches
• Display prior period results
Perform Advanced Searches
When PPP is enabled for your organization, a new page, Advanced Search, appears in the Results > Search area. Using the Advanced Search page, you can complete the following tasks:
• Quickly search processed orders, split orders, credits, commissions, bonuses, draws, and payments
• Customize your search filters and results, and search custom fields
• Download results
To perform advanced searches:
1. Click the Results tab, then click the Advanced Search button. The Advanced Search screen appears.
2. Click the type of results that you need to search. Choose from among the following: Processed Orders, Split Orders, Credits, Commissions, Bonuses, Draws, or Payments. The corresponding search results appear.
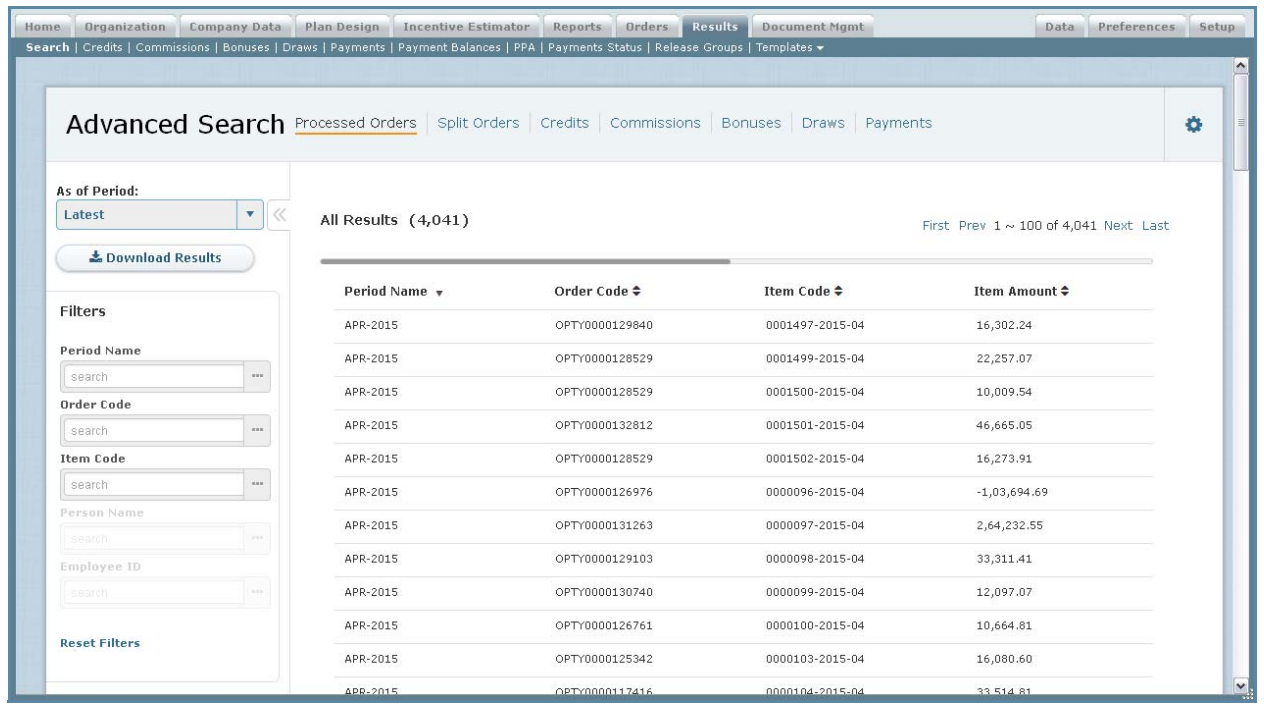 Advanced Search Screen
3. In the As of Period field (on the left), choose a period using the drop-down list.
4. (Optional) Using the Filters pane (on the left), filter the search results, as
required. The search criteria appear above the results, as shown below:
![]() Search Criteria
Search Criteria
To remove a field from the search criteria, click the button for the corresponding field.
5. Refine the search results, as required.
Do the following:
• In the As of Period field, choose a period using the drop-down list. The results update immediately.
• In the Filters pane, specify additional search criteria to further filter the search results. The updated results appear.
6. To customize the search, click the ![]() button. The Settings screen appears.
button. The Settings screen appears.
Configure the search, as appropriate. See “Customize Searches” for more information.
To download search results:
1. Click the Results tab, then click the Advanced Search button. The Advanced Search screen appears.
2. Click the type of results that you need to search. Choose from among the following: Processed Orders, Split Orders, Credits, Commissions, Bonuses, Draws, or Payments. The corresponding search results appear.
3. Search for the appropriate results.
4. Click the ![]() button. The Download dialog appears.
button. The Download dialog appears.
5. In the Download Name field, type the name of the download.
6. Click Download Search Results.
The download starts processing. You can check the status by clicking the button in the main menu (top right of the screen). Click OK again.
Display Prior Period Results
You can use the PPA area to view prior period results for a range of result types including balances, bonuses, commissions, credits, payments without balances, payments with balances, and processed orders.
note: The PPA area is only available when Prior Period Processing (PPP) is enabled for your business.
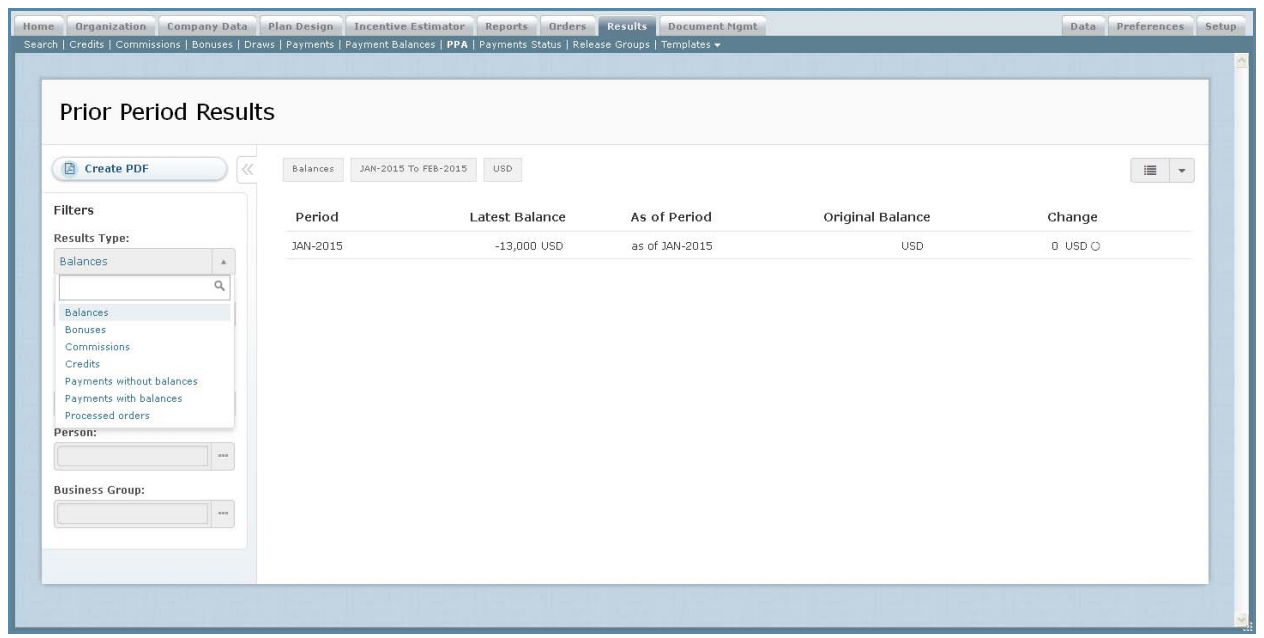 Prior Period Results Screen
The following table describes the information displayed when searching prior period results:
| Field | Description |
|---|---|
| Period | The period for the prior period adjustment. |
| Latest Balance | The latest balance associated with the result. |
| As of Period | The “as of” period selected for the results. |
| Original Balance | The original balance before the adjustment. |
| Change | The prior period adjustment amount. |
To search prior period results:
1. Click the Results tab, then click PPA in the secondary menu. The Prior Period Results screen appears allowing you to specify the search criteria.
2. In the Results Type field, choose the results to display using the drop-down list.
3. In the Period (To) field, choose the period representing the end of the date range using the drop-down list.
4. In the Period (From) field, choose the period representing the start of the date range using the drop-down list.
5. In the Unit Type field, choose the unit type using the drop-down list.
6. Using the remaining fields, filter the prior period results, as appropriate. The search results update automatically.
7. (Optional) Click the ![]() button and choose the display style for the results.
button and choose the display style for the results.
You can choose from the following display styles:
• Summary View—Displays a concise summary of the prior period results
• List View—Displays the more familiar tabular view
To create a PDF of the prior period results:
1. Click the Results tab, then click PPA in the secondary menu. The Prior Period Results screen appears allowing you to specify the search criteria.
2. Search for the appropriate prior period results.
3. Click the ![]() button. Download the generated PDF file to your local machine using the dialog that appears.
button. Download the generated PDF file to your local machine using the dialog that appears.