Plan Design > Objectives
You can use the Objectives area to create and manage company, individual, and discretionary objectives (which can then be added to plans). A company objective is very similar to an individual objective except that it is only scored once (by the administrator), and the scoring applies to all employees who have the objective on their plan.
A discretionary objective, in contrast, offers a way to distribute a discretionary bonus from a bonus pool within your organization.
You can also use the Objectives area to create and manage categories, which allow you to categorize objectives on a plan. Categories can also serve as a tool to align objectives and report on productivity across key focus areas.
Screen
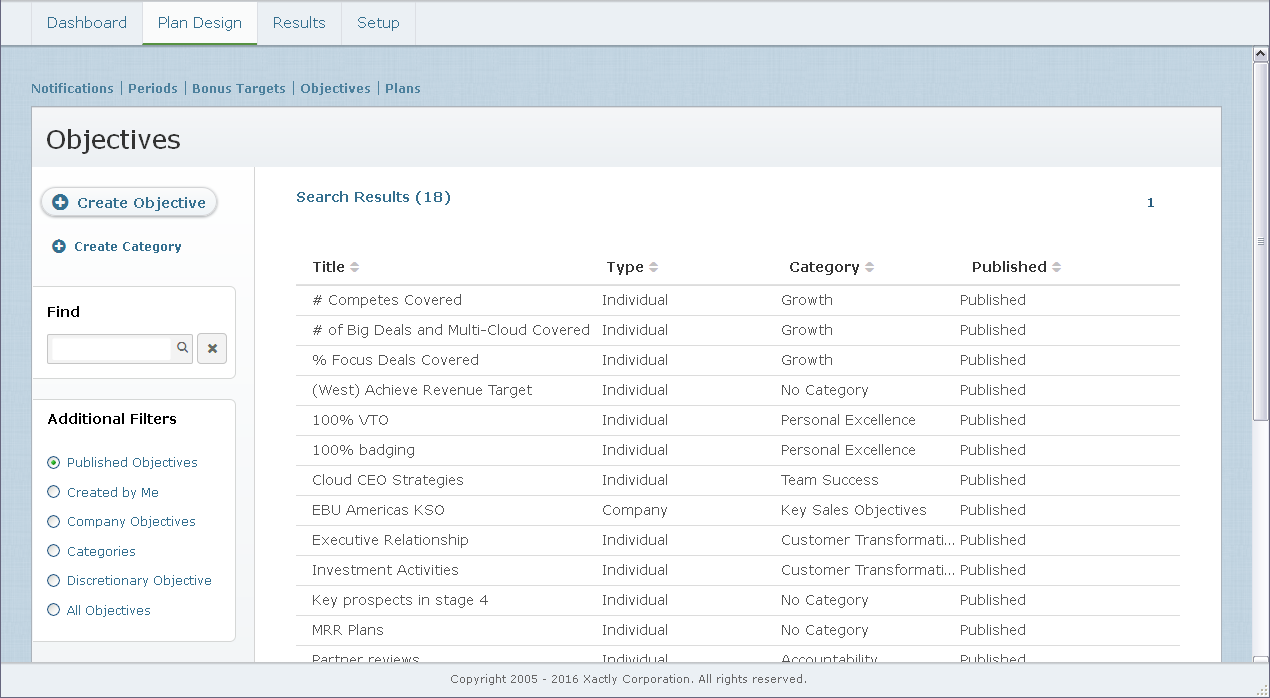 Objectives Screen
Displayed Fields
The following table describes the information displayed when managing objectives:
| Column | Description |
|---|---|
| Title | The title of the objective. |
| Type | The type of objective, either Company or Individual. |
| Category | The category (high-level organizational goal) with which the objective aligns. |
| Published | Indicates whether the objective is published or not. |
How to…
This section describes how to manage objectives.
Display All Objectives or Categories
Click the Plan Design tab, then click Objectives in the secondary menu. The Objectives screen appears displaying the objectives for the organization.
• To find specific objectives, type part of the title or description in the Find text box, and click the ![]() button. The search results appear.
button. The search results appear.
Click the ![]() button to clear the Find text box and reset the search results.
button to clear the Find text box and reset the search results.
• To find specific categories, select Categories in the Additional Filters section, type part of the name in the Find text box, and click the ![]() button. The search results appear.
button. The search results appear.
• To filter objectives, choose an option in the Additional Filters section:
• Published Objectives
• Created by Me
• Company Objectives
• Categories
• Discretionary Objectives
• All Objectives
• Use the page navigation buttons to navigate between the pages of objectives.
Create an Objective
1. Click the Plan Design tab, then click Objectives in the secondary menu. The Objectives screen appears displaying the objectives for the organization.
2. Click the ![]() button. The Create Objective screen
button. The Create Objective screen
appears.
3. In the Type field, choose the objective type using the drop-down list.
You can choose from among the following options:
• Company
• Individual
• Discretionary
4. (Company and Individual Objectives) In the Title field, type a title for the objective.
5. In the Description field, type a detailed description of the objective.
Although the Description field is optional, the description is very important to convey the definition of the objective to employees.
6. In the Icon field, select the icon to use with the objective.
The icon is a visual identifier and appears with the objective on the plan.
7. (Company and Individual Objectives) In the Aligns With Category field, choose the high-level organizational goal to which the new objective contributes.
When a plan contains categories other than “No Category,” objectives are grouped by category and each category has its own weighting bar.
8. (Company and Individual Objectives) In the Self Evaluation field, select whether to allow employees to view and enter their own evaluation of this objective.
When disabled, an employee no longer sees the option to enter an evaluation for the objective.
9. (Individual Objectives) In the Employee’s Contribution field, optionally specify the employee’s individual contribution or responsibility if the new individual objective is a group goal.
10. (Company and Individual Objectives) In the Target field, select either the ![]() or
or ![]() button to indicated whether the objective has a quantitative target.
button to indicated whether the objective has a quantitative target.
If you selected the Yes button, complete the following steps:
a. In the Units field, specify the units for the quantitative target.
Select one of the following:
• Money—Select the unit type using the drop-down list
• Percentage—Specifies a percentage value
• Other—Select another option using the drop-down list (the options are defined as Unit Types in Xactly Incent)
b. In the Target Number field, type the numeric value associated with the unit you selected in the previous step.
c. Select whether Higher numbers are better or Higher numbers are worse using the corresponding radio button.
11. (Company and Individual Objectives) In the Measurement field, select how the objective is to be measured at the end of the quarter.
Select one of the following:
• Yes/No
• Percent
• Rating Scale
If you select Rating Scale, you can customize the rating scale by adding or deleting
values, as appropriate.
note: You can add up to 30 rows when defining a rating scale.
12. (Company and Individual Objectives) In the Publish field, specify whether to publish the objective (using the drop-down list).
Choosing Published allows all users to view the objective. Choosing Not Published, in contrast, ensures that only you can view the objective and add it to plans. By default, individual objectives are set to Not Published.
note: Administrators need to publish an objective to allow managers to see the objective and add it to plans.
13. Click the ![]() button to save the new objective. Alternatively, click the
button to save the new objective. Alternatively, click the ![]() button to dismiss the screen without creating the objective.
button to dismiss the screen without creating the objective.
Edit an Objective
1. Click the Plan Design tab, then click Objectives in the secondary menu. The Objectives screen appears displaying the company objectives for the organization.
2. Hover over the objective, and click the Edit button that appears. The Edit Objective screen appears.
note: After an objective has been added to a plan, only the Publish field can be modified.
3. Modify the fields, as required.
4. Click the![]() button. Alternatively, click the
button. Alternatively, click the ![]() button to dismiss the screen without saving your changes.
button to dismiss the screen without saving your changes.
Copy an Objective
1. Click the Plan Design tab, then click Objectives in the secondary menu. The Objectives screen appears displaying the objectives for the organization.
2. Hover over the objective, and click the Copy button that appears as a pop-up.
The Create Objective screen appears with the fields already populated using values from the objective you are copying.
3. In the Title field, type a new title for the objective.
4. Modify any other fields, as required.
5. Click the ![]() button to save the new objective. Alternatively, click the
button to save the new objective. Alternatively, click the ![]() button to dismiss the screen without creating the objective.
button to dismiss the screen without creating the objective.
Delete an Objective
1. Click the Plan Design tab, then click Objectives in the secondary menu. The Objectives screen appears displaying the objectives for the organization.
2. Hover over the objective, and click the Delete button that appears as a pop-up. A confirmation dialog appears.
3. Click the ![]() button to delete the objective. Alternatively, click the
button to delete the objective. Alternatively, click the ![]() button to dismiss the dialog without deleting the objective.
button to dismiss the dialog without deleting the objective.
Create a Category
1. Click the Plan Design tab, then click Objectives in the secondary menu. The Objectives screen appears displaying the objectives for the organization.
2. Click the ![]() button. The Create Category screen appears.
button. The Create Category screen appears.
3. In the Title field, type a title for the category.
4. (Optional) In the Description field, type a description for the category.
5. In the Icon field, select the icon to use with the category.
6. Click the ![]() button to save the new category. Alternatively, click the
button to save the new category. Alternatively, click the ![]() button to dismiss the screen without creating the category.
button to dismiss the screen without creating the category.
Edit a Category
1. Click the Plan Design tab, then click Objectives in the secondary menu.
2. Hover over the category, and click the Edit button that appears. The Edit Category screen appears.
3. Modify the fields, as required.
4. Click the button. Alternatively, click the button to dismiss the screen without saving your changes.
Copy a Category
1. Click the Plan Design tab, then click Objectives in the secondary menu.
2. Hover over the category, and click the Copy button that appears as a pop-up.
The Create Category screen appears with the fields already populated using values from the category you are copying.
3. In the Title field, type a new title for the category.
4. Modify any other fields, as required.
5. Click the ![]() button to save the new category. Alternatively, click the
button to save the new category. Alternatively, click the ![]() button to dismiss the screen without creating the category.
button to dismiss the screen without creating the category.
Delete a Category
1. Click the Plan Design tab, then click Objectives in the secondary menu.
2. Hover over the category, and click the Delete button that appears as a pop-up. A confirmation dialog appears.
3. Click the ![]() button to delete the category.
button to delete the category.
Alternatively, click the ![]() button to dismiss the dialog without deleting the category.
button to dismiss the dialog without deleting the category.