Quota Plans
You can use the Plans area to define and manage quota plans for your organization.
Using this area, you can do the following:
• Display the quota plans defined for a period
• Display plan summaries
• Create a new quota plan
• Create an effective-dated quota plan version
For each plan, you can do the following:
• Display plan details
• Submit a plan to a manager
• Recall a plan, as appropriate
• Publish a plan
• Delete a plan, if needed
• Download quota plans for use with Xactly Incent
note: Only administrators can create and publish quota plans using Xactly Quota.
Users assigned the Executive role, in contrast, can only view plans directly assigned to
the executive user.
Screen
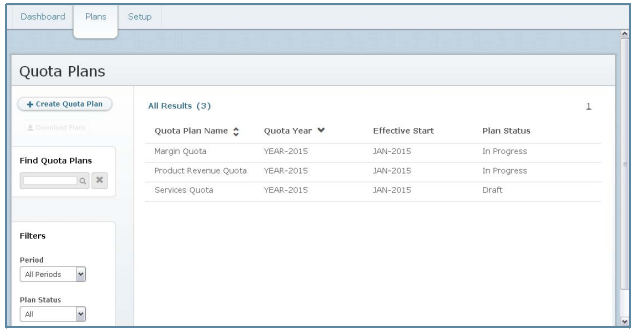
Plans Screen
Displayed Fields
The following table describes the information displayed when managing quota plans:
| Field | Description |
|---|---|
| Quota Plan Name | The name of the quota plan. |
| Quota Year | The year for which the quota applies. |
| Effective Start | The effective state date of the quota plan version. |
| Plan Status | The status of the quota plan, from among the following: • Draft—The plan has been created but not submitted • In Progress—The plan has been submitted but not fully approved • Completed—All allocations have been completed • Published—The plan has been published • Recalled—The plan has been recalled • Error—An error exists with the plan. |
How to …
This section describes how to manage quota plans.
Display All Quota Plans
Click the Plans tab. The Quota Plans screen appears displaying all quota plans.
• To find specific plans, type part of the name in the Find Quota Plans text box, and
click the ![]() button. The search results appear.
button. The search results appear.
Click the ![]() button to clear the Find Quota Plans text box and reset the search results.
button to clear the Find Quota Plans text box and reset the search results.
• To filter plans by period, choose the appropriate period using the Period dropdown list.
• To filter plans by status, choose the appropriate option using the Plan Status dropdown list.
• Click an entry to reveal a summary of the plan.
The Summary tab displays the following information:
• Assignee
• Amount
• Description
• Due date
• Uplift
• Unit Type
• Uplift range
• Acceptance interval
• Uplift default
• Organization hierarchy date
• Use the page navigation buttons to navigate between pages of quota plan
results.
Create a Quota Plan
1. Click the Plans tab. The Quota Plans screen appears displaying all quota plans.
2. Click the ![]() button. The Create Quota Plan screen appears.
button. The Create Quota Plan screen appears.
3. In the Quota Plan Name field, type the name of the plan.
4. (Optional) In the Description field, type a description of the quota plan.
5. In the Quota Period field, choose the period for the quota plan using the dropdown list.
6. In the Unit Type field, choose the appropriate unit type for the quota plan using the drop-down list.
The drop-down list includes all unit types defined in Xactly Incent.
7. In the Quota Amount field, assign values for the relevant periods.
Do the following:
a. Click the ![]() button to specify the values as amounts. Alternatively,
button to specify the values as amounts. Alternatively,
click the ![]() button to specify the values as percentages.
button to specify the values as percentages.
b. In the Year field, type the appropriate value. Optionally, click the ![]() button
button
to distribute the value you typed evenly across the quarters and months.
note: You need to specify an amount in the Year field independent of whether
you chose to enter amounts or percentages (in the previous step). In cases
when you choose to enter percentages, you can then specify all remaining
values for quarters and months as percentages.
c. In the Quarterly fields, adjust the values as required.
Optionally, click the ![]() button to distribute the value you typed for a quarter evenly across the corresponding months.
button to distribute the value you typed for a quarter evenly across the corresponding months.
Verify that the Quarterly Total displays an ![]() icon, which indicates that the sum of the quarters matches the sum for the year. Alternatively, an
icon, which indicates that the sum of the quarters matches the sum for the year. Alternatively, an ![]() icon indicates that the values do not match.
icon indicates that the values do not match.
Click the ![]() button next to a Quarterly Total to recalculate the corresponding
button next to a Quarterly Total to recalculate the corresponding
yearly value.
d. In the Monthly fields, adjust the values as required.
Verify that the Monthly Total displays an ![]() icon, which indicates that the sum of the months matches the sum of the quarters. Alternatively, an
icon, which indicates that the sum of the months matches the sum of the quarters. Alternatively, an ![]() icon indicates that the values do not match.
icon indicates that the values do not match.
Optionally, click the![]() button next to a monthly value to recalculate the corresponding quarterly value.
button next to a monthly value to recalculate the corresponding quarterly value.
e. Specify whether to allow managers to allocate quotas for specific periods.
Click the ![]() switch to toggle the corresponding month or quarter on or off.
switch to toggle the corresponding month or quarter on or off.
Switching a period off prevents managers from allocating quotas for that
period.
For example, if you want to allow managers to allocate quotas only for
December, toggle every period off except for the month of December.
Similarly, you can click the corresponding ![]() switch to toggle allocation on or
switch to toggle allocation on or
off for all quarters or months.
8. In the Uplift Default field, specify the default value for the uplift to be used at each level.
The uplift value is the amount each manager can over-assign allocations to cover the team quota. Select the checkbox to allow users to override the default value, and specify the appropriate limits in the corresponding fields.
9. In the Due Date field, specify the date by which the quota should be approved by all levels. Click the![]() button and select a date using the calendar pop-up that appears.
button and select a date using the calendar pop-up that appears.
10. In the Acceptance Interval field, specify the number of days an assignee will have to view and approve their quota number after they receive a notification.
11. In the Assignment section, specify the organization hierarchy date and assignee for the quota plan.
Do the following:
a. In the Org Hierarchy Date field, specify the date to use for viewing the sales hierarchy. Click the ![]() button and select a date using the calendar pop-up that appears.
button and select a date using the calendar pop-up that appears.
The workflow is based on the specified hierarchy. This means that if you are allocating for an upcoming period, use a future-dated hierarchy version, if available, to associate the workflow with the appropriate management structure.
b. In the Assignee field, specify to whom the quota is to be assigned and sent for review. Click the ![]() button and choose the assignee using the dialog box that appears.
button and choose the assignee using the dialog box that appears.
Click the![]() button to change the assignee, if required.
button to change the assignee, if required.
12. Click the ![]() button. The quota plan is saved.
button. The quota plan is saved.
Alternatively, click the ![]() button to submit the plan to the selected
button to submit the plan to the selected
assignee. Quota sends an email notification to the assignee and the administrator.
Upload Allocations and Analysis Data
You can optionally upload the key data points to support allocation decisions and
upload initial allocation values for users.
1. Click the Plans tab. The Quota Plans screen appears displaying all quota plans.
2. Click an entry to reveal a summary of the plan, and then click the Upload tab.
3. In the Allocation Analysis area, upload the key data points to support allocation decisions.
Do the following:
a. Click the![]() button. The Upload Allocation Analysis Data dialog appears.
button. The Upload Allocation Analysis Data dialog appears.
b. Click the Click here link to download the allocation hierarchy.
c. Edit the file to include the allocation analysis data and save the file.
d. Click the ![]() button in the dialog, and select the file you saved.
button in the dialog, and select the file you saved.
e. Click the![]() button.
button.
4. In the Allocations area, upload initial allocation values for users.
Do the following:
a. Click the![]() button. The Upload Allocation Data dialog appears.
button. The Upload Allocation Data dialog appears.
b. Click the Click here link to download the allocation hierarchy.
c. Edit the file to include the allocation data and save the file.
d. Click the![]() button in the dialog, and select the file you saved.
button in the dialog, and select the file you saved.
e. Click the![]() button.
button.
note: Uploading allocations overwrites any previously-uploaded values for the
plan. For example, if an upload assigns a position a value of 1000 and a subsequent upload has a value of 2000 for the position, the allocation for the position is 2000. You can keep existing values unchanged by leaving the value blank for the corresponding positions.
Also, you cannot upload and modify allocations that have been submitted.
View a Quota Plan
You can view quota plans that have been submitted (not in Draft status).
1. Click the Plans tab. The Quota Plans screen appears displaying all quota plans.
2. Hover over a quota plan in the list, and click the View button that appears. The View Quota Plan screen appears.
note: You cannot change any of the settings.
3. Click the button to return to the Quota Plans screen.
Edit a Quota Plan
You can edit quota plans that are in the Draft status.
1. Click the Plans tab. The Quota Plans screen appears displaying all quota plans.
2. Hover over a quota plan in the list, and click the Edit button that appears. The Edit Quota Plan screen appears.
3. Modify the fields, as required.
note: When editing a quota plan version, you cannot change the quota plan name or quota period. Also, you cannot change the effective start date if the plan version has been submitted.
4. Click the![]() button. The quota plan is saved.
button. The quota plan is saved.
Alternatively, click the![]() button to submit the plan to the selected
button to submit the plan to the selected
assignee.
note: Saving the plan does not make the plan visible to managers. You must assign and submit the plan to have the assignee receive an email notification and be able to allocate the plan.
Add a Quota Plan Version
You can add effectively-dated versions of existing quota plans (by default, quota
plans in Quota always start on the first day of the first month of a fiscal year). This
allows you to revise quota plans throughout the year, as needed.
For example, you might need to revise a plan for the following reasons (among others):
• To change one or more values in an existing quota plan
• To update values to reflect changes to the team
• To reflect business changes that require new quota values to be assigned.
Quota plan versions behave identically to quota plans, with distinct values and its own workflow. This means that quota plan versions can be published or recalled independently from each other, for example.
note: Unlike Incent, Xactly Quota does not require you to create versions in order (by date). This means that you can create a December version before creating a February version of a quota plan.
To add a quota plan version:
1. Click the Plans tab. The Quota Plans screen appears displaying all quota plans.
2. Hover over the quota plan for which you want to create a new version, and click
the Add Version button that appears. The Add Quota Plan Version screen
appears.
note: You can only create effectively-dated versions of quota plans. You cannot
create a version of another quota plan version.
3. In the Effective Start field, choose the period that is to serve as the effective start
date for the quota plan version using the drop-down list.
4. Modify the remaining fields, as required.
note: You cannot change the quota plan name or quota period when adding a new version. You can, however, specify different assignees across a quota plan and its associated versions. For example, an original quota plan might be assigned to the vice president, while a quota plan version could be assigned to a director.
5. Click the button. The quota plan version is saved.
Alternatively, click the button to submit the plan version to the
selected assignee.
note: Saving the plan version does not make the plan visible to managers. You must assign and submit the plan version to have the assignee receive an email notification and be able to allocate the plan.
Recall a Plan
1. Click the Plans tab. The Quota Plans screen appears displaying all quota plans.
2. Hover over a quota plan in the list, and click the Recall button that appears. A confirmation dialog appears.
When you recall a plan from an assignee, all allocations are removed and the
plan is returned to its original state. At this point, you will need to resubmit the plan (after appropriate modifications) and all allocations will need to be redone.
3. Click the ![]() button to recall the plan. Alternatively, click the
button to recall the plan. Alternatively, click the ![]()
button to dismiss the dialog without recalling the plan.
Publish a Plan
1. Click the Plans tab. The Quota Plans screen appears displaying all quota plans.
2. Hover over a quota plan in the list, and click the Publish button that appears. The plan is published and the status updates accordingly.
Delete a Plan
note: You cannot delete plans that have been published.
1. Click the Plans tab. The Quota Plans screen appears displaying all quota plans.
2. Hover over a quota plan in the list, and click the Delete button that appears. A confirmation dialog appears.
3. Click the ![]() button to delete the quota plan.
button to delete the quota plan.
Alternatively, click the ![]() button to dismiss the dialog without deleting the quota plan.
button to dismiss the dialog without deleting the quota plan.
Download Quota Plans
You can download the plans you defined in Xactly Quota to use with Xactly Incent.
note: When downloading quota plans, all versions of a quota plan are included for the specified year.
1. Click the Plans tab. The Quota Plans screen appears displaying all quota plans.
2. In the Period field, choose a period using the drop-down list.
3. Click the ![]() button. Depending on your browser, a dialog might
button. Depending on your browser, a dialog might
appear allowing you to specify where to save the file.
4. Save the quota plans file to your local machine.
The downloaded file includes all defined versions of quota plan for the selected period.
note: Xactly Quota downloads the data as a Microsoft Excel (XLSX) format file
(using the Incent Quota import template). You can then import this file directly into Incent.