Setting Up Quota
You can use the Setup area to manage roles and user access in the Quota application.
All users defined in Incent automatically appear on the User Access page of the
Setup area.
note: Roles defined in Xactly Incent do not apply to the Quota application. You
need to define roles for the Quota application using this area. Assigning a role in
Quota automatically gives the user access to the Quota application in the Xactly menu.
Screen

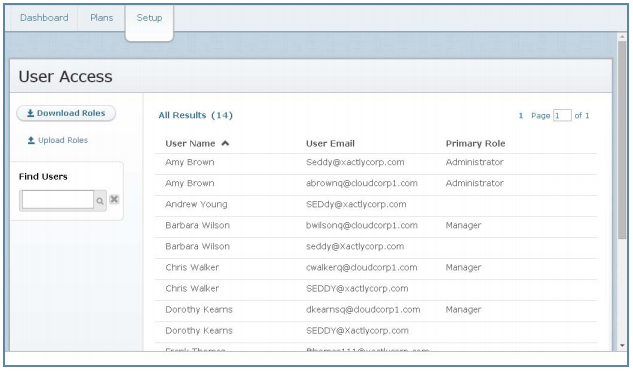
User Access Screen
Displayed Fields
The following table describes the information displayed when managing roles and
user access:
| Field | Description |
|---|---|
| User Name | The name of the user. |
| User Email | The email address of the user. |
| Primary Role | The primary role of the user in the Xactly Quota. |
How to…
This section describes how to set up Xactly Quota and manage user access.
Display All Users
Click the Setup tab. The User Access screen appears displaying all users, user email
addresses, and corresponding roles in the results area.
• To find specific users, type part of the user name or user email in the Find Users text
box, and click the button. The search results appear.
Click the button to clear the Find Users text box and reset the search results.
note: The Xactly Support users are provided for your convenience. By default, they
have no role assigned and hence no access to your data. However, when working
with Xactly Support, you might want to provide access to your data to help
troubleshoot or solve an issue. You can ignore these users unless directed to use
them by Xactly Support.
• Use the page navigation buttons to navigate between the pages of user results.
Edit a User Role
1. Click the Setup tab. The User Access screen appears.
2. Select the user in the list. A panel appears allowing you to select the user role
within the Quota application.
3. Select the appropriate user roles.
Setting a role enables the corresponding user to access Xactly Quota. The roles
assigned to a user also determines the areas (application tabs) the user can see
after launching Quota.
You can choose from among the following options:
• Administrator—Provides access to all administrative functions and all user information
in the application.
• Executive—Provides access to see all quota plans being allocated by any user
in their hierarchy on the Dashboard and to perform allocations on any of these
plans.
• Manager—Provides access to the Plans tab, where managers can see the
plans submitted to them.
note: You can assign more than one role to each user. For example, the Sales
Operations administrator might also be a manager.
Assigning a Quota role requires a license. You cannot assign roles to additional
users when the Remaining Licenses count reaches 0 (zero). Deselecting all roles for
a user and saving allows you to reclaim a license.
4. Click the ![]() button. The user role is saved and the Remaining Licenses
button. The user role is saved and the Remaining Licenses
count is updated accordingly.
note: Note that Xactly Quota does not send an email notification when you
remove all roles from a user. Also, removing all roles from a user does not modify or
remove their corresponding password. If you add a role again later, the user
retains the same password.
Download User Roles
1. Click the Setup tab. The User Access screen appears.
2. Click the ![]() button. Depending on your browser, a dialog
button. Depending on your browser, a dialog
might appear allowing you to specify where to save the file.
3. Save the roles file to your local machine.
note: Xactly Quota downloads the data as a Comma Separated Values (CSV) format
file.
Upload User Roles
1. Click the Setup tab. The User Access screen appears.
2. Click the![]() button. Depending on your browser, a dialog
button. Depending on your browser, a dialog
might appear allowing you to specify where to save the file.
3. Save the roles file to your local machine.
note: Xactly Quota downloads the data as a Comma Separated Values (CSV) format
file.
4. Modify the user, email, and roles data in the downloaded file, and save the file as
a CSV-format file.
You can specify multiple roles in a single row, separated by a comma, such as
Administrator,Executive, for instance.
5. Click the ![]() button. The Upload Roles dialog appears.
button. The Upload Roles dialog appears.
6. Click the![]() button. A dialog appears allowing you to locate the
button. A dialog appears allowing you to locate the
upload file. Select the appropriate file.
7. Click the![]() button. The roles are uploaded to Xactly Quota.
button. The roles are uploaded to Xactly Quota.
Alternatively, click the![]() button to dismiss the dialog without uploading
button to dismiss the dialog without uploading
the roles.
When uploading roles, assigning or removing roles can modify the license count. If
an upload requires more licenses than are available, Quota displays an error.
note: When uploading roles, Xactly Quota processes rows in order and continues
until the end of the file. This means that rows which only modify existing user roles
continue to be processed, even in cases when the license count is exceeded.
