Salesforce CRM
Xactly Incent for AppExchange integrates the Incent rules-based architecture with
Salesforce CRM allowing sales representatives to access Xactly Incent reports and
dashboards through a Saleforce tab.
Sales representatives can also access the Xactly Commissions Mash-Up with Salesforce
and Incentive Estimator™ to quickly estimate potential incentives based on
opportunities, during and after a sale.
note: Password and session timeout policies set within Xactly Incent do not apply
when accessing the application within Salesforce CRM. In this case, application
access and session timeouts are controlled by Salesforce CRM.
Screen
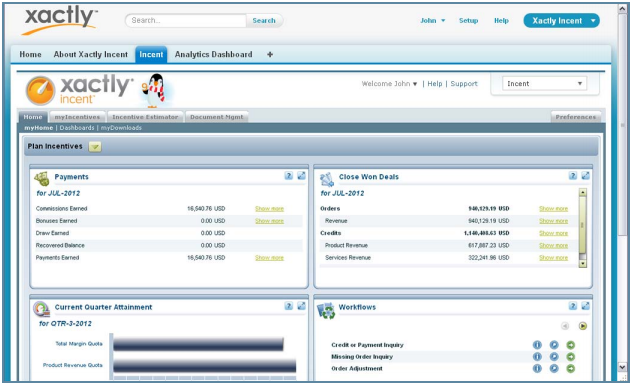
Xactly Incent for AppExchange Home Screen
How to…
This section describes how to integrate Incent with Salesforce CRM.
Install Xactly Incent (Managed Package)
This section describes the tasks you need to perform to install Xactly Incent for AppExchange
using a managed package.
Before You Install
Before you install Xactly Incent for AppExchange, you must uninstall any existing
Xactly Incent AppExchange applications.
1. Log in to Salesforce.
2. In the user menu (at the top right of the screen), choose the Setup option. The
Setup screen appears.
3. In the App Setup pane (on the left), click the Installed Packages link. The
Installed Packages screen appears.
4. In the Installed Packages section, click the Uninstall link for the Xactly Incent
package. The Uninstalling a Package screen appears.

Installed Packaged Screen
5. At the bottom of the screen, select the checkbox to confirm that you want to
uninstall the package, and click the Uninstall button. The system uninstalls the
package and displays the Installed Packages screen.
In the Build menu (on the left), click the Installed Packages link to refresh the
page, if necessary.
6. In the Uninstalled Packages section, click the Del link for the Xactly Incent
package. A confirmation dialog appears.
7. Click OK to delete the package.
8. Log out of Salesforce.
note: If the uninstall is unsuccessful, one reason might be because of unresolved
dependencies such as an Estimate Incentives button added to the Opportunity
Layout. If this is the case, navigate to the Opportunity Layout, select the opportunity,
drag and drop the Estimate Incentives button from the Opportunity Layout,
and save the layout.
Install Incent for AppExchange
1. Contact Xactly Technical Support to confirm that your Xactly Incent environment
has been configured for Salesforce integration and Connect access.
Xactly Technical Support will supply you with a URL to use to initiate the managed
package installation.
2. Navigate to the URL supplied by Xactly Technical Support.
3. Log in to the system using your Salesforce credentials. After you are logged in,
the Package Installation Details screen appears.
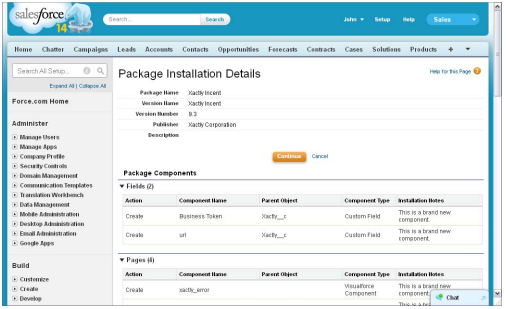
Package Installation Details Screen
4. Click the Continue button. The Package Installer wizard launches (Step 1.
Approve Package API Access).
5. Click the Next button. The Package Installer wizard continues (Step 2. Choose
security level).
6. Click the Next button. The Package Installer wizard continues (Step 3. Install
Package).
7. Click the Install button. The system installs the package and the Install Complete
screen appears.
8. Click the Force.com App Menu button (in the top-right corner) and choose
Xactly Incent using the drop-down menu. The Xactly Incent environment
appears.
You can optionally externalize the URL for Xactly Incent.
After You Install
After installation, you can optionally externalize the URL for the package, or add
the Incent tabs to your default display.
note: When using Microsoft Internet Explorer 9 or 10 or Mozilla Firefox, users need to
add *.xactlycorp.com and *.salesforce.com as trusted sites or as add-on exceptions
(for IE and Firefox respectively) and allow cookies for these sites.
Externalize the URL
You can optionally externalize the URL for the package.
1. Log in to Salesforce.
2. In the user menu (at the top right of the screen), choose the Setup option. The
Setup screen appears.
3. In the App Setup pane (on the left), click the Develop > Custom Settings link.
The Custom Settings screen appears.
4. Click the Manage link for the Xactly Incent package. The Xactly screen
appears.
5. Click the New button. The Xactly Exit screen appears.
6. In the Name field, type XactlyIncent.
Type the text exactly as it appears (without a space).
7. In the URL field, type the URL that you want to externalize.
For example, type www.xactlycorp.com (for the production environment) or
sandbox.xactlycorp.com (for the Xactly Sandbox).
8. Click the Save button.
Add the Business Token
You can add the Xactly business token to Salesforce.com.
1. Log in to Salesforce.
2. In the user menu (at the top right of the screen), choose the Setup option. The
Setup screen appears.
3. In the App Setup pane (on the left), click the Develop > Custom Settings link.
The Custom Settings screen appears.
4. Click the Manage link for the Xactly Incent package. The Xactly screen
appears.
5. Click the New button. The Xactly Exit screen appears.
6. In the Name field, type XactlyIncent.
Type the text exactly as it appears (without a space).
7. In the Business Token field, type the business token value.
Contact Xactly Technical Support to obtain the business token for your organization.
8. Do not change the URL field.
9. Click the Save button.
Add the Xactly Tabs
Next, you can optionally add the Xactly tabs (About Xactly Incent and Incent) to
your default display.
1. Click ![]() (All Tabs) at the top of the page. The All Tabs screen appears.
(All Tabs) at the top of the page. The All Tabs screen appears.
2. Click the Customize My Tabs button.
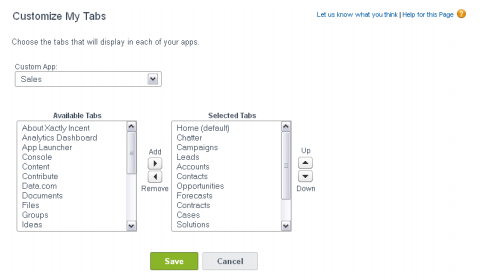
Customize My Tabs Screen
3. Move the tabs you want to add from the Available Tabs list to the Selected
Tabs list, using the Right Arrow key under Add.
After you have moved the tabs over, you can use the Up and Down keys to
place them in the order in which you want them to appear across the top of
the AppExchange application.
4. Click the Save button.
Make the Xactly App Accessible Through a Subtab
Salesforce enables you to customize the subtabs that appear on various pages in
the application (such as the Profile and Chatter pages, for example), as seen by
you and as seen by others.
This procedure describes how to add a subtab for the Xactly app to these pages.
1. Log in to Salesforce.
2. In the user menu (at the top right of the screen), choose the Setup option. The
Setup screen appears.
3. In the App Setup pane, click the Create > Apps link. The Apps screen appears.
4. In the Subtab Apps pane, click the Edit link next to the Profile (Others) label.
The ProfilePlatformOthers screen appears.
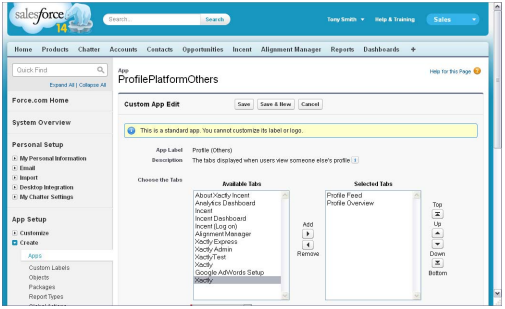
ProfilePlatformOthers Screen
5. In the Available Tabs list, select the Xactly item and click the ![]() button (Add)
button (Add)
to move the tab to the Selected Tabs list.
6. (Optional) Move the Xactly tab up or down, as required, using the up and
down arrows respectively.
7. Click the ![]() button.
button.
8. In the Subtab Apps pane, click the Edit link next to the Profile (Self) label. The
ProfilePlatformOthers screen appears.
9. In the Available Tabs list, select the Xactly item and click the![]() button (Add)
button (Add)
to move the tab to the Selected Tabs list.
10. (Optional) Move the Xactly tab up or down, as required, using the up and
down arrows respectively.
11. Click the![]() button.
button.
Install Xactly Incent (Unmanaged Package)
This section describes the tasks you need to perform to install Xactly Incent for AppExchange
using an unmanaged package.
Before You Install
Before you install Xactly Incent for AppExchange, you must uninstall any existing
Xactly Incent AppExchange applications.
1. Contact Xactly Technical Support to get the information you need to log in.
2. Log in to Salesforce.
3. In the user menu (at the top right of the screen), choose the Setup option. The
Setup screen appears.
4. In the App Setup pane, click the Installed Packages link.
5. In the Installed Packages section, click the Uninstall button next to any Xactly
installed packages listed. The Uninstalling a Package screen appears.

UnInstalling a Package Screen
6. Scroll to the bottom of the page, and click the check box next to the statement
“Yes, I want to uninstall this package and permanently delete all associated
components.”
7. Click the Uninstall button. The Packages Installed from AppExchange page
reappears.
The Uninstall Status column is set to “In Progress” until the Uninstall process completes.
8. If the status doesn’t change for awhile, click the browser refresh button to
refresh your screen, and the status will update.
After the uninstall is complete, you will receive an email from Salesforce stating
that ‘Your request to uninstall package “Xactly Incent” was successful.’
9. When the Uninstall process completes, click Del to delete the data from the
uninstalled package. The system asks for confirmation.
10. Click OK.
11. Click Logout.
Install Incent for AppExchange
1. Contact Xactly Technical Support to confirm that your Xactly Incent environment
has been configured for Salesforce integration and Connect access.
2. Navigate to the following URL:
https://login.salesforce.com/?startURL=%2Fpackaging%2
FinstallPackage.apexp%3Fp0%3D04t60000000EMhe
3. Log in to the system using your Salesforce credentials. After you are logged in,
the Package Installation Details screen appears.
4. Click Continue. The Handle Component Name Conflict screen appears.
5. Select the “Automatically attempt to rename conflicting components in
installing package” radio button, and click Next. The Approve Package API
Access screen appears.
6. On the Approve Package API Access screen, click Next. The Choose Security
Level screen appears.
7. Click Select security settings. The screen expands to display the Customize
Security information.
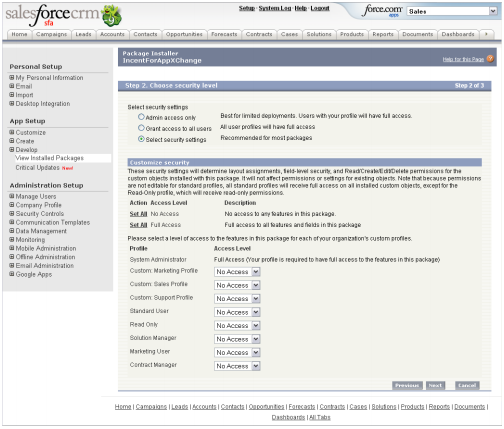
Customize Security
The settings you choose on this page determine the security levels for custom
objects installed with this package. These settings do not affect permissions for
existing objects. Note that all standard profiles receive full access on all
installed custom objects, except for anything set to Read-Only permissions.
You can set each profile individually to either No Access or Full Access.
You can also set all of the Profiles to No Access or Full Access by clicking the
appropriate Set All button under Action Access Level.
8. Make your selections and click Next. The Install Package screen appears.
9. Click the Install button. The system installs the package and Install Complete
screen appears.
10. If you do not want to continue with the installation at this time, you can click
the Deploy Later button. Otherwise, click the Deploy Now button. The Deploy
Package screen appears.
11. Click the Deploy button. The Package Details for IncentForAppXChange
screen appears indicating that the package was successfully installed and
deployed.
note: Contact Xactly Support (support@xactlycorp.com) to request the IP configuration
information for AppExchange to allow network connectivity.
After You Install
After installation, you can optionally add the Incent tabs to your default display.
Add the Xactly Tabs
Next, you can optionally add the Xactly tabs (About Xactly Incent and Incent) to
your default display.
1. Click ![]() (All Tabs) at the top of the page. The All Tabs screen appears.
(All Tabs) at the top of the page. The All Tabs screen appears.
2. Click the Customize My Tabs button.

Customize My Tabs Screen
3. Move the tabs you want to add from the Available Tabs list to the Selected
Tabs list, using the Right Arrow key under Add.
After you have moved the tabs over, you can use the Up and Down keys to
place them in the order in which you want them to appear across the top of
the AppExchange application.
4. Click the Save button.
Estimate Incentives for an Opportunity
You can configure Salesforce CRM to allow users with access to Incent for AppExchange
to easily estimate incentives for an opportunity. To do so, you need to complete
the following administrative tasks:
• Set up the Opportunity page layouts
• Map Salesforce objects to Xactly objects
Set Up the Opportunity Page Layouts
You need to add the Estimate Incentives button to the Opportunity page layout.
1. In the user menu (at the top right of the screen), choose the Setup option. The
Setup screen appears.
2. In the App Setup pane (on the left), click the Customize > Opportunities >
Page Layouts link. The Opportunity Page Layout screen appears.
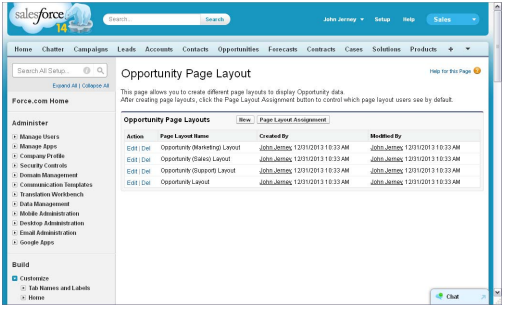
Opportunity Page Layout Screen
3. Click the Edit link next to the pages to which you want to add the Estimate
Incentives button. The corresponding page appears.

Edit Page Layout
4. Click the Buttons link (in the scrolling list).
5. Drag the Estimate Incentives button to the Custom Buttons area in the Opportunity
Detail section.
6. Click the Save button.
Map Salesforce Objects to Xactly Objects
Before you can estimate incentives for Salesforce opportunities, you need to map
Salesforce objects to the corresponding Xactly objects. For more information, see
Customize > Estimator Integration
Estimate Incentives in AppExchange
1. Click the Opportunities button. The Opportunities screen appears, allowing
you can select an opportunity.

Opportunities Home Screen
2. Using the View drop-down list, choose the opportunities to display.
3. From the opportunities displayed on the screen, select the opportunity you
want. The Opportunity Detail screen appears.
4. Click the Estimate Incentives button, and the Estimate Incentives window
appears.
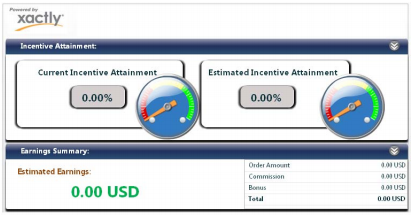
Estimate Incentives Window
The screen shows the incentive attainment, earnings summary, and the earnings
detail.
Resolve a “Current Session Has Expired” Alert
To resolve this issue using Internet Explorer, do the following:
1. Choose Tools > Internet Options from the main menu.
2. Click the Privacy tab.
3. Click Advanced.
4. Select the Override automatic cookie handling option, and click OK.
5. Click the Security tab, and click Trusted sites.
6. Click Sites and type the following in the Add this Web site to the zone text box:
https://www.xactlycorp.com/login.php
7. Click Add, and click OK.
8. Click OK.
Resolve a “Thank you for downloading” Message
If a user receives the following message, “Thank you for downloading Xactly Incent for
Appexchange,” verify the following:
• The Salesforce email address is the same as the Xactly Incent login
• The Lock sessions to the IP address from which they originated checkbox is not
selected on the Salesforce.com Administration Setup > Security Controls > Session
Settings page.
note: Login names are case sensitive and must aligned to allow access.
Configure Internet Explorer 9
When using Microsoft Internet Explorer 9, you need to first specify how cookies are
handled by your browser.
1. Using Internet Explorer, choose Tools > Internet Options from the main menu. The
Internet Options dialog appears.
2. Click the Privacy tab.
3. Click the Advanced button.
4. Select the Override automatic cookie handling checkbox.
5. Select the Accept checkbox for both First-party Cookies and Third-party Cookies.
6. Click the OK button to update your privacy settings, and click the OK button
again to dismiss the dialog.
Deploy the Xactly Incent App on Salesforce1
You can add the Xactly Incent app to the Salesforce1 navigation menu. This allows
sales representatives to access the Incentive Statement (quota attainment and summary
payment information) along with ranking information within the Salesforce1 app.
note: You need to configure and use the Ranking Pod within Incent to have ranking
information appear in the Salesforce1 app.
1. Log in to Salesforce.
2. In the user menu (at the top right of the screen), choose the Setup option. The
Setup screen appears.
3. In the Administration Setup pane, click the Mobile Administration > Mobile Navigation
link. The Mobile Navigation screen appears.

Mobile Navigation Screen
4. In the Available list, select the Xactly item and click the![]() button (Add) to move
button (Add) to move
the app to the Selected list.
5. (Optional) Move the Xactly app up or down, as required, using the up and down
arrows respectively.
6. Click the ![]() button.
button.